Ben's Miniature Gallery
This is a gallery of my painted miniatures. Feel free to email me with any comments or questions.
Categories:
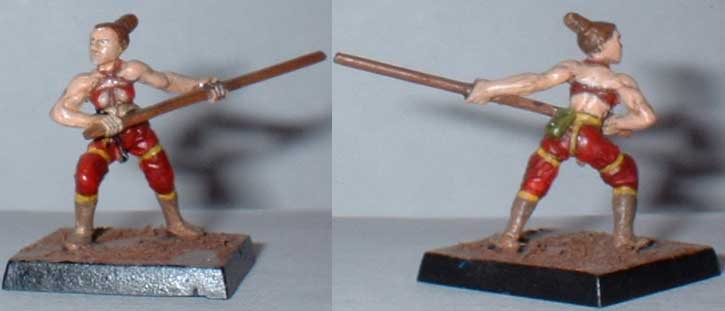
| Evil Woman With Skull Helmet added Sep 23, 2005 | |
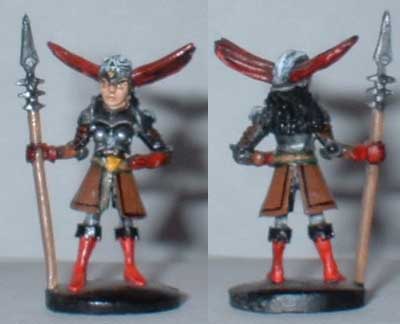 I searched long and hard for a mini to portray an insane cleric of mine. This Rafm mini fit the bill, except for the fact that it fell vistim to the old bikini = armor fallacy. I ended up building her a nice leather skirt out of paper stiffened with superglue. Her left hand was also holding the top of a shield, which I cut away. Then I cut out the inside of her elbowso I could reposition the hand on her hip. In the end I was very happy with the conversion, even though I think I only got to play the character twice. I searched long and hard for a mini to portray an insane cleric of mine. This Rafm mini fit the bill, except for the fact that it fell vistim to the old bikini = armor fallacy. I ended up building her a nice leather skirt out of paper stiffened with superglue. Her left hand was also holding the top of a shield, which I cut away. Then I cut out the inside of her elbowso I could reposition the hand on her hip. In the end I was very happy with the conversion, even though I think I only got to play the character twice.
|
|
| category: /other | permanent link | |
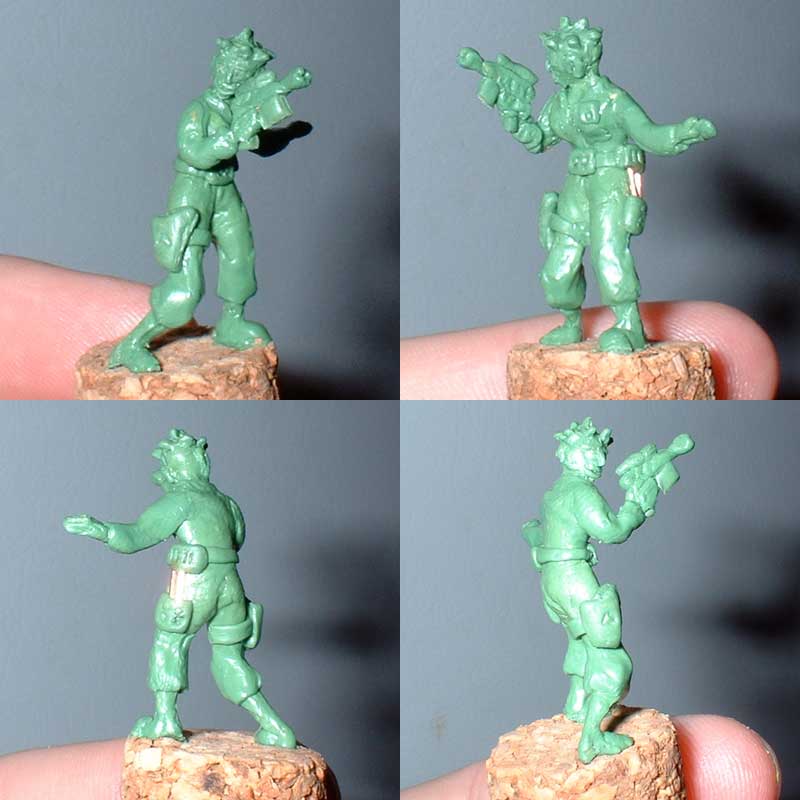
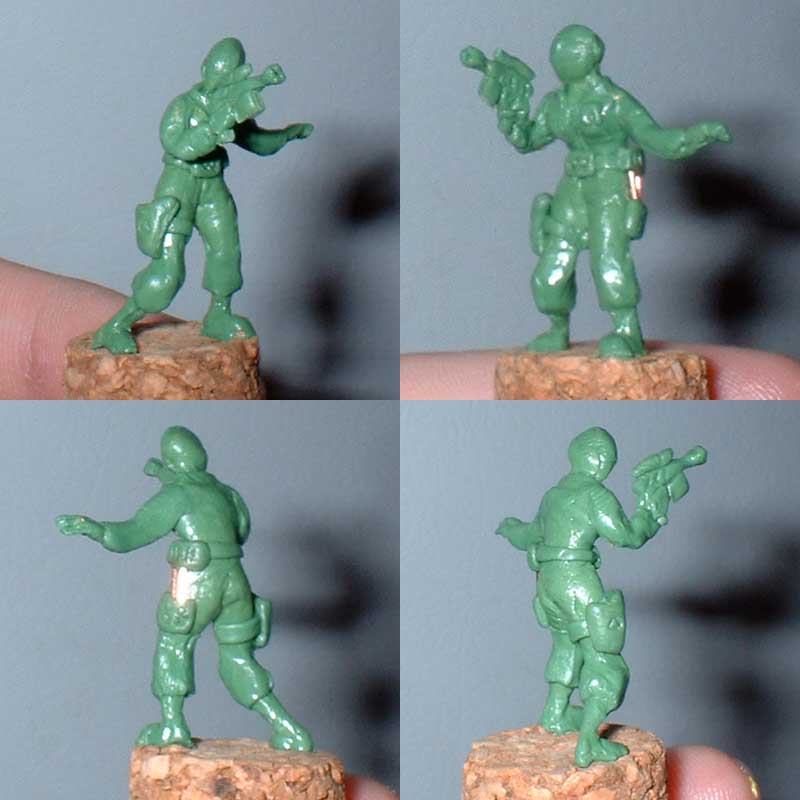
| Vargr Traveller (sculpt) added Sep 23, 2005 | |
 One of the players for the traveller gameis likely goingto be making a Vargr. rather than kill myself trying to find or convert an appropriate mini, I decided to break out the green stuff again. My previous sculpts ended up a little larger than I would have liked, so I made a conscious effort to keep this guy small. Vargr are supposed to be slightly smaller than humans, and this miniwinds up about half a head taller than the 25mm West end Star Wars minis, and about half a head shorter than the 28mm GW Cadians. I really prefer the 28mm scale for painting, so he hit just the right height. One of the players for the traveller gameis likely goingto be making a Vargr. rather than kill myself trying to find or convert an appropriate mini, I decided to break out the green stuff again. My previous sculpts ended up a little larger than I would have liked, so I made a conscious effort to keep this guy small. Vargr are supposed to be slightly smaller than humans, and this miniwinds up about half a head taller than the 25mm West end Star Wars minis, and about half a head shorter than the 28mm GW Cadians. I really prefer the 28mm scale for painting, so he hit just the right height.
There's still some roughness to my sculpts, but overall I think he turned out pretty nice. No fingerprints, fairly smooth on all the large surfaces. When I started putting on the clothes, I realized that the tail was emerging way too low. It was built on a wire that goes all the way through the torso and also forms the base of the head. I carefully snipped the tail off at the base, shaved of a little putty to give me a small piece of bare wire, and reinserted it at a better spot. I was worried that it would be weak, but it seems to have turned out sturdy enough. The character is probably going to be a merchant/diplomat type, so I only gave him a little pistol to defend himself with. I cut and shaved bits of plastic from a leftover sprue, and I think it helps to give some clean lines to balance out the organic look of all the putty. the epaulets and belt were thin shavings, while the pistol body is a solid chunk. There were a few more bits of putty added after the last picture in this series was taken, mostly finishing the boots and filling out the right leg. |
|
| category: /other | permanent link | |
| Twi'lek Slicer (part 3) added Sep 23, 2005 | |
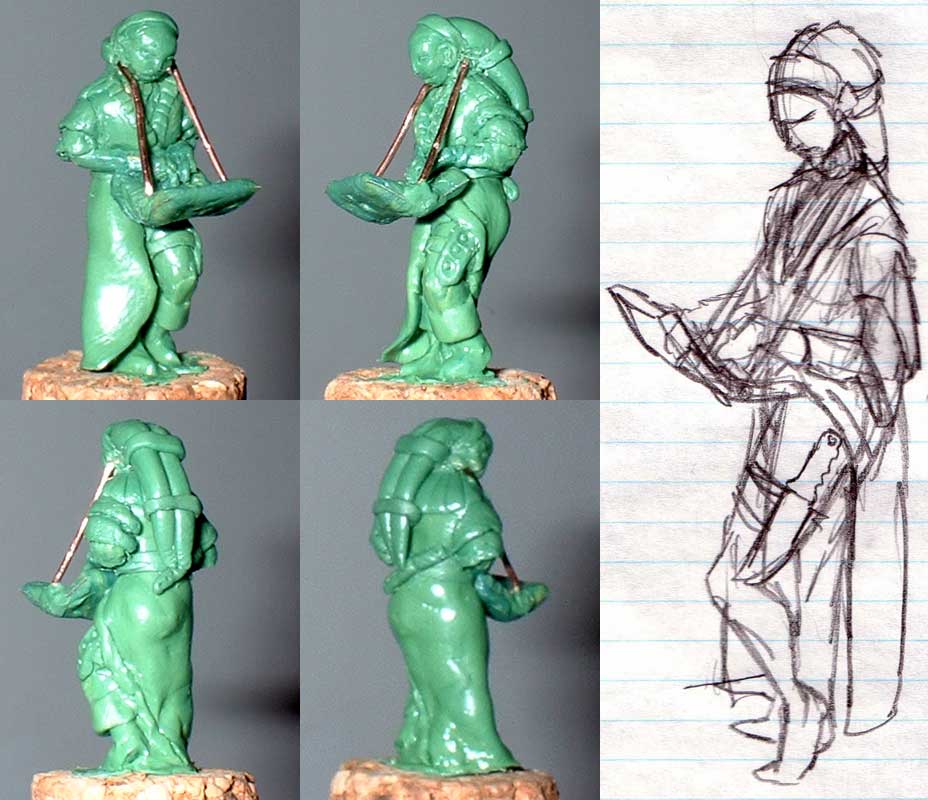 First, I put on a base layer of putty on the arms, and sculpted the hands. I was pretty happy with the way the hands turned out; I'll try to get a better picture of them once it's all painted. First, I put on a base layer of putty on the arms, and sculpted the hands. I was pretty happy with the way the hands turned out; I'll try to get a better picture of them once it's all painted.
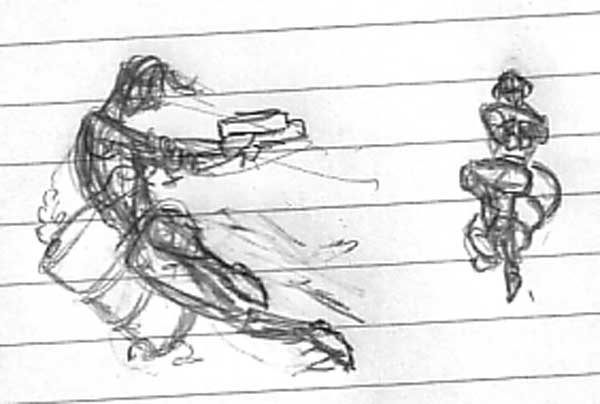
I also built the computer at this point. I wanted it to be sturdy and maintain its shape, so I cut a piece out of a soda can and bent it into the basic shape. I covered it with putty and engraved a screen and keyboard on it. There is also a certain fruit-shaped logo on the lid.I added the sleeves of the coat at this point, built up out of separate pieces layered on top of each other. I should have done these last, as they ended up getting smashed and rebuilt many times. The hardest part of this stage was getting the strap attached to the computer. I started with copper wire that I had flattened with a hammer, but it ended up being too inflexible. Also, a flat strap required more work to make it look natural. I scrapped that plan and used round wire instead. It's not perfect, but it gets the job done. I imagine it'll look better painted. The head areas was cured enough that I had to drill a hole for the strap. Once I got all the strap pieces in place, I added more putty to secure them in place and fill the holes that had been created. I've included the original design sketch. I think I ended up pretty close to my plan. |
|
| category: /other | permanent link | |
| Vargr Traveller (final) added Sep 23, 2005 | |
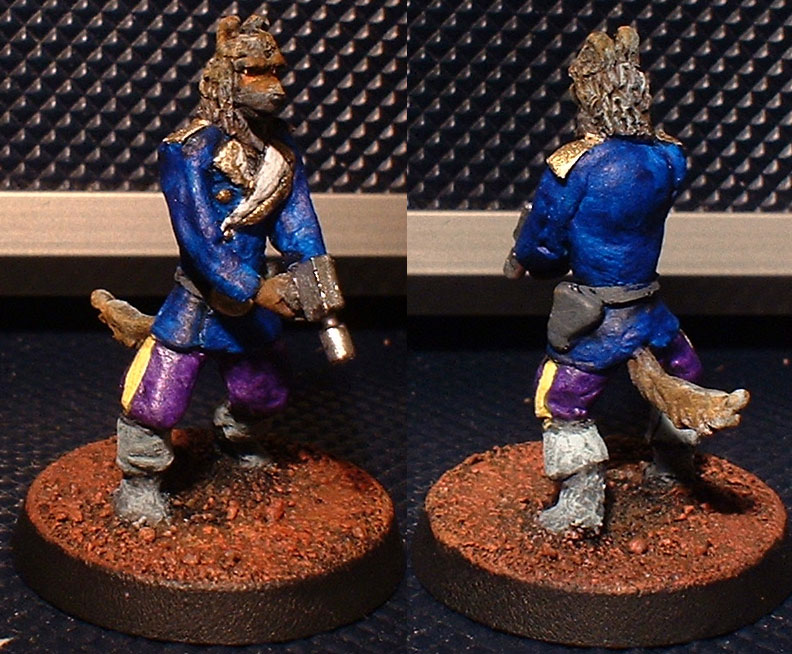 The outfit was somewhat inspired by the Vargr on the cover of the T20 book, so I kept fairly close to that color scheme. Vargr are generally flamboyant, so I felt pretty comfortable using some vibrant colors. I'm quite pleased with how the fur turned out. It's certainly easier to sculpt than smooth skin. The outfit was somewhat inspired by the Vargr on the cover of the T20 book, so I kept fairly close to that color scheme. Vargr are generally flamboyant, so I felt pretty comfortable using some vibrant colors. I'm quite pleased with how the fur turned out. It's certainly easier to sculpt than smooth skin.
|
|
| category: /other | permanent link | |
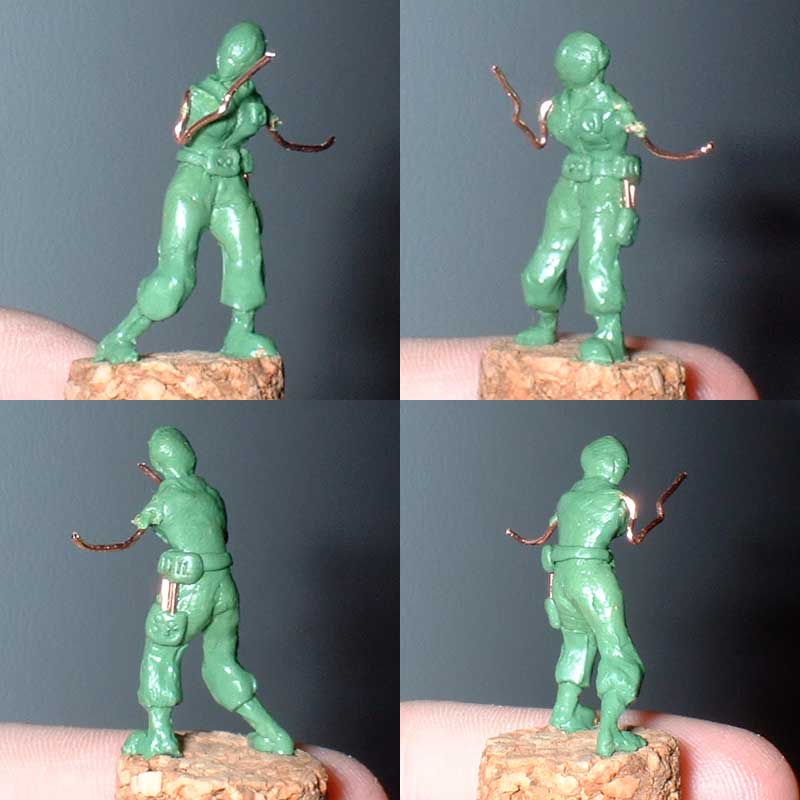
| Twi'lek Slicer (part 2) added Sep 23, 2005 | |
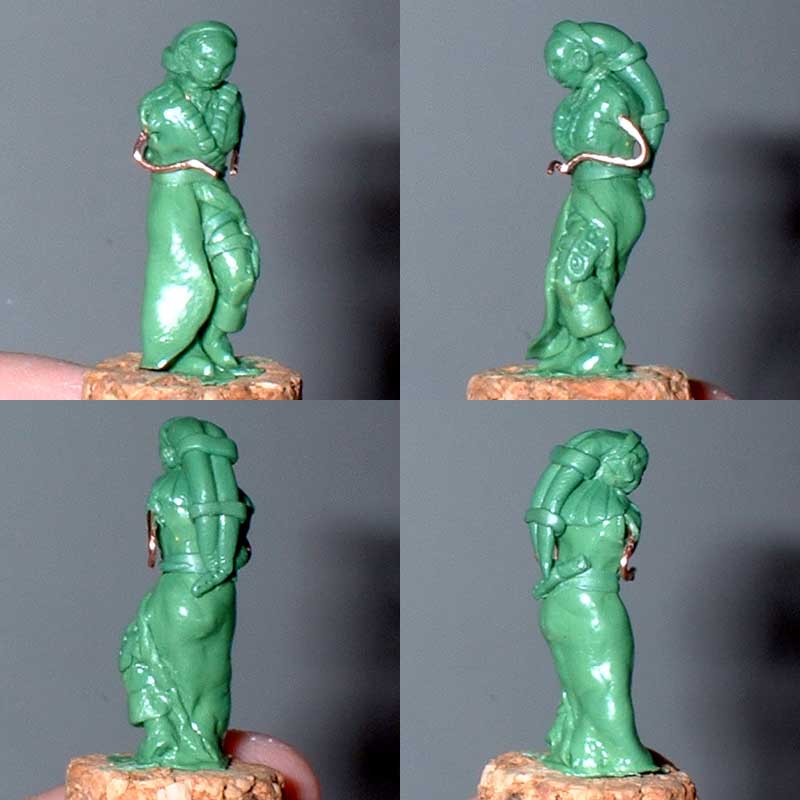 There were actually two stages completed before these pictures were taken. the first stage saw the addition of feet and some fleshing out of the legs. I also made the basic head shape, which I left flat on the back to receive the twi'lek head-tails later. There were actually two stages completed before these pictures were taken. the first stage saw the addition of feet and some fleshing out of the legs. I also made the basic head shape, which I left flat on the back to receive the twi'lek head-tails later.
Next, I made some flat sheets of putty and began applying them to form the trenchcoat. I didn't try to make exact shapes, since the putty is difficult to cut cleanly and tends to stretch out of shape easily anyway. I could have waited for the sheets to cure some, but instead I just worked with them in their initial soft form and let the coat grow organically. I started with a large triangular section that went down the back and around the straight right leg. It ended up with a curved hem, which I thought looked pretty neat. I trimmed the rest of the coat even with the ground. I added more small pieces, and ended up with the cross-over closure at the front more or less by accident. I turned back the collar there and added further pieces to conform to the style that had. I added a large collar at the back and the bottom portion that is falling back from her upraised leg. I wanted to have more leg exposed, but it just didn't happen that way. Finally, I used the edge of an x-acto knife to add the texture to the collar. This was the end of the first stage. After the head and coat had had time to cure, I went back and added the tops of the boots (I may have doone that just after adding the coat, I don't recall) I also added the knife sheath strapped to her leg. With the coat falling so low there, it's hard to figure out just what that is, so I added the belt with another knife at the small of her back. The character carries several knives, so it works. I put a fresh layer of putty on the face and worked it into the right shape. This face worked out much better than the last one. I'll probably try to add eyeballs in the empty sockets later, but I want to make sure the rest of the face is well cured before I start messing around with things like that. I added the head-tails and their bindings. Last, I shaped a couple of tiny blobs of putty into ears. The ruffly texture of the shirt wasn't really a design decision so much as an inability to get that area smooth after putting the coat on. There were some holes in the torso that needed to be filled, but I couldn't get the right tool in there without messing up the coat. In the end, I just rouched it up and called it fashion. Finally, I bent the arms into position. There is going to be a computer hanging from a strap around her neck, propped up on her raised leg. I had orginally intended for the strap to actually go around her neck, but now that I look at the pictures there are going to be some head-tails in the way. I feel confident that I'll be able to improvise a solution. |
|
| category: /other | permanent link | |
| Twi'lek Slicer (part 1) added Sep 23, 2005 | |
 I'm hooked on this whole sculpting thing. The last character for our Star Wars game has finally been created, and she's a twi'lek slicer (computer hacker). I know there are some twi'lek minis to be had out there, but I'm 1) impatient and 2) looking for excuses to sculpt more. This time I did a concept drawing first, which I'll probably scan at the end. There wasn't too much that changed between my first idea and what got drawn, but it was good to have a concrete image to work from. I'm hooked on this whole sculpting thing. The last character for our Star Wars game has finally been created, and she's a twi'lek slicer (computer hacker). I know there are some twi'lek minis to be had out there, but I'm 1) impatient and 2) looking for excuses to sculpt more. This time I did a concept drawing first, which I'll probably scan at the end. There wasn't too much that changed between my first idea and what got drawn, but it was good to have a concrete image to work from.
As I did before, I started with the torso and legs, aiming for a generally female shape. I decided to hold off on the head entirely this time, after seeing what the last head went through during later stages. There's really not a whole lot to say at this point. |
|
| category: /other | permanent link | |
| Twi'lek Slicer (part 0) added Sep 23, 2005 | |
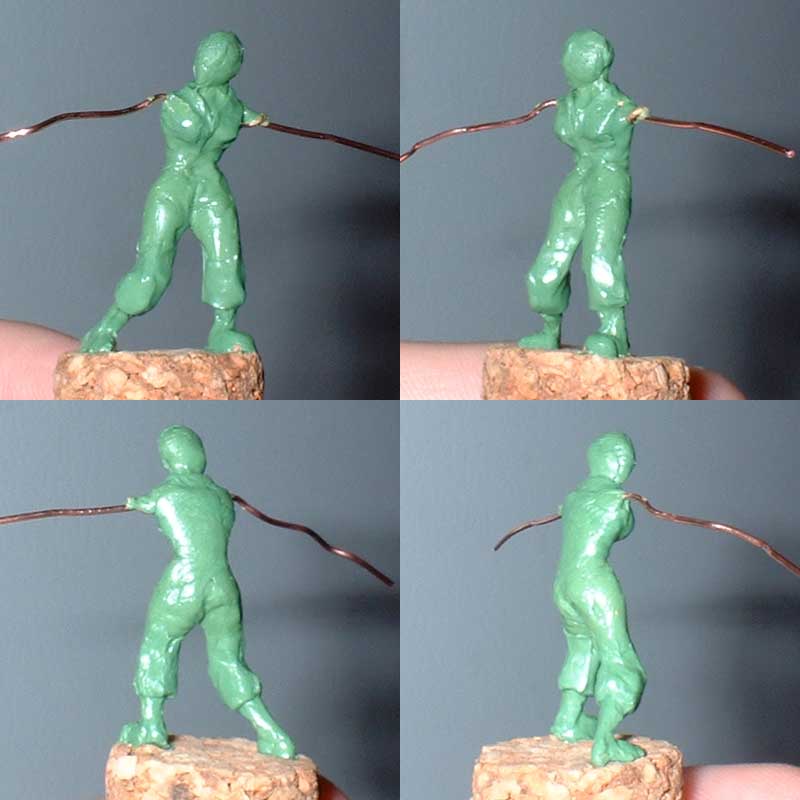
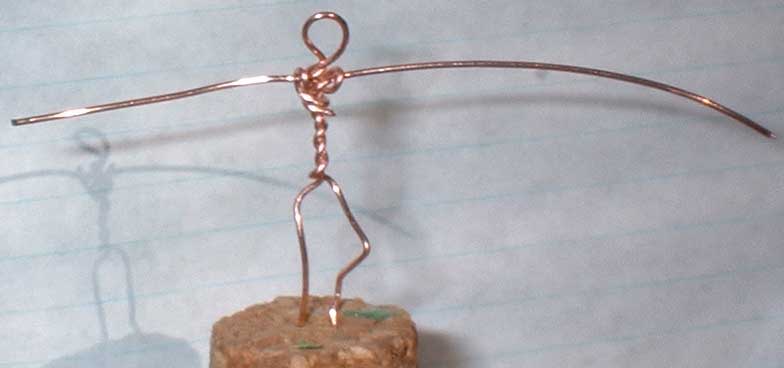 I decided to take a picture of the wire armature this time, just to show how I'm making it. This time the ends of the head loop are wrapped each once around the arm and once around the torso. It seems pretty sturdy. The arms are, of course, freakishly long. I decided to take a picture of the wire armature this time, just to show how I'm making it. This time the ends of the head loop are wrapped each once around the arm and once around the torso. It seems pretty sturdy. The arms are, of course, freakishly long.
The hardest part with this armature was getting it to be the right height. My first attempt looked pretty good until I compared it with the zabrak I'd sculpted earlier. The new armature was at least a head taller than the already-enormous zabrak, so I scrapped that one and started over. Even then I had to cut down the legs several times before I got the height right. |
|
| category: /other | permanent link | |
| Female Traveller (sculpt) added Sep 23, 2005 | |
 Not much more added, but I took some pics from other angles. This is pretty much the finished sculpt. I originally made a double-barrelled shotgun, but it was just too huge for her. Maybe it'll show up later on someone beefier. Not much more added, but I took some pics from other angles. This is pretty much the finished sculpt. I originally made a double-barrelled shotgun, but it was just too huge for her. Maybe it'll show up later on someone beefier.
|
|
| category: /other | permanent link | |
| Twi'lek Slicer (final) added Sep 23, 2005 | |
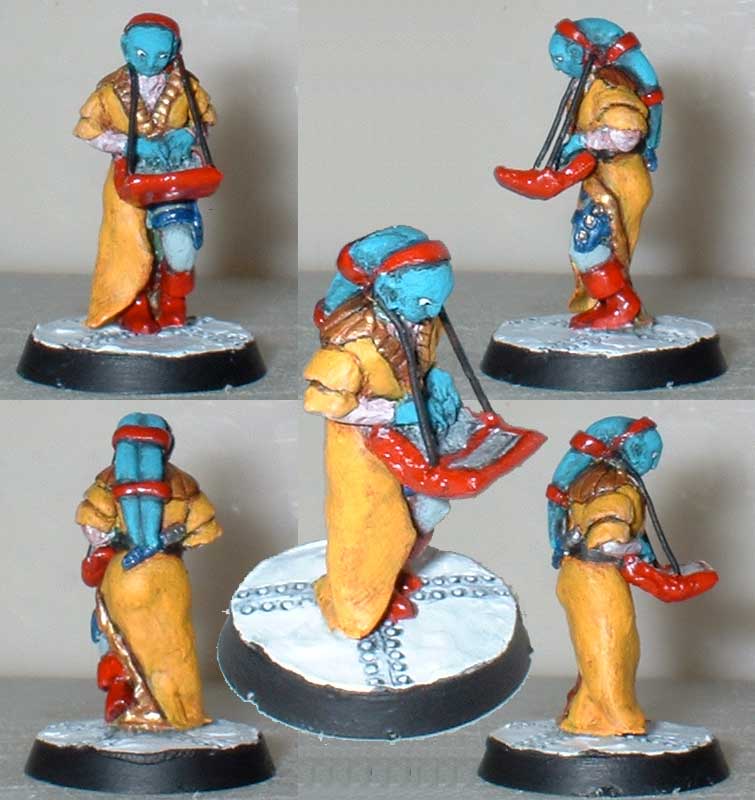 I'm quite happy with the way the paint job turned out. I tried to do some more graduated shading than I usually do, and I think it looks prety good. The base is the floor of some Imperial installation somewhere. I'm quite happy with the way the paint job turned out. I tried to do some more graduated shading than I usually do, and I think it looks prety good. The base is the floor of some Imperial installation somewhere.
|
|
| category: /other | permanent link | |
| Female Traveller (sculpt) added Sep 23, 2005 | |
 The last PC for the Traveller game. She's actually an Academic/Noble/Traveller, and the original concepts I had for the mini were much more in line with her previous careers. I much prefer this design. The rock is mostly composed of a ball of old cured green stuff with a hole drilled through it for the armature wire. The only thing I don't like about the pose is her left shin, which is too short. The last PC for the Traveller game. She's actually an Academic/Noble/Traveller, and the original concepts I had for the mini were much more in line with her previous careers. I much prefer this design. The rock is mostly composed of a ball of old cured green stuff with a hole drilled through it for the armature wire. The only thing I don't like about the pose is her left shin, which is too short.
I was running low on green stuff, so I went to the store to get some more. Much to my dismay, they didn't have any. just as I was about to leave, I noticed some Tamiya epoxy putties. The only things in English on the packages were "Quick Type" and "Smooth Surface". They both looked pretty fine-textured, so I went with the Quick Type putty and hoped for the best. The putty comes in two parts, white and beige, each a separate ribbon 1 1/8" wide and 4" long (25g total, according to the package). At $6, I think it's about the same as the GW blue/yellow package, which was what I had gotten before. Once mixed together, the Tamiya putty is much softer and stickier than green stuff, cures fairly quickly, and is less elastic. getting the first coat on is a little difficult, as it doesn't like to stick to metal much. Once it starts curing, it smooths very easily. Once fully cured, it is very hard, and carves and drills even better than Milliput, as it's not as crumbly. I've ordered more GS, but I'll defeinitely keep this stuff around. |
|
| category: /other | permanent link | |
| Sydite (sculpt) added Sep 23, 2005 | |
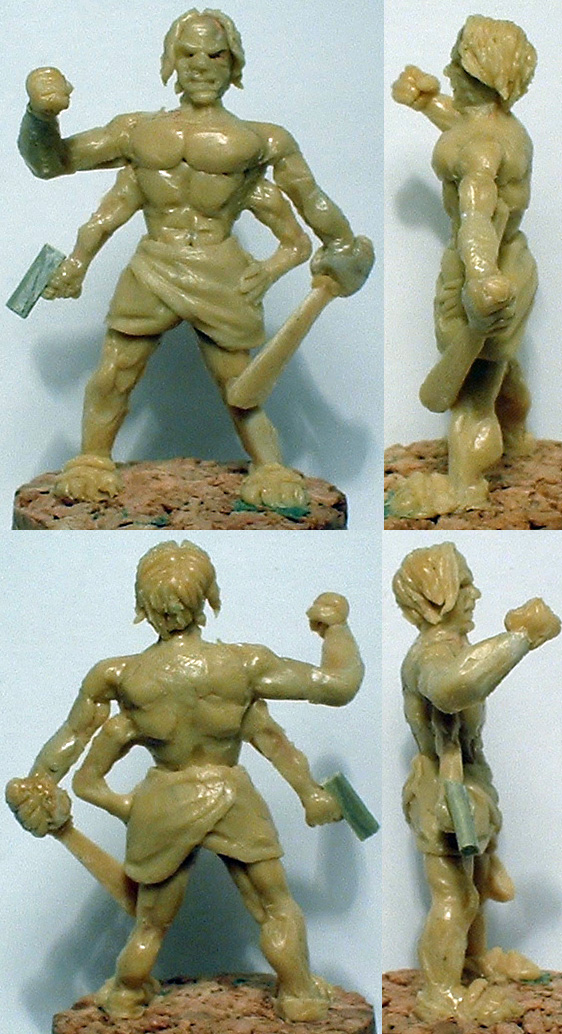 Put everything together, added enough clothing to be decent. I realized when I started taking pictures that I had forgotten his eyeballs; those will go in before painting. Put everything together, added enough clothing to be decent. I realized when I started taking pictures that I had forgotten his eyeballs; those will go in before painting.
|
|
| category: /other | permanent link | |
| Female Traveller (final) added Sep 23, 2005 | |
 This was my first experience with static grass. It didn't work quite like I was expecting it to, but it still provides a better effect than painting sand green. This was my first experience with static grass. It didn't work quite like I was expecting it to, but it still provides a better effect than painting sand green.
|
|
| category: /other | permanent link | |
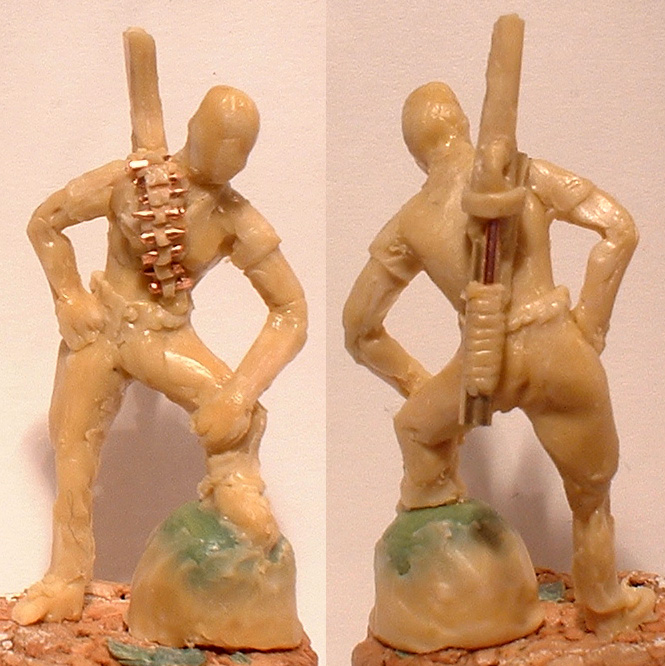
| Sydite (sculpt) added Sep 23, 2005 | |
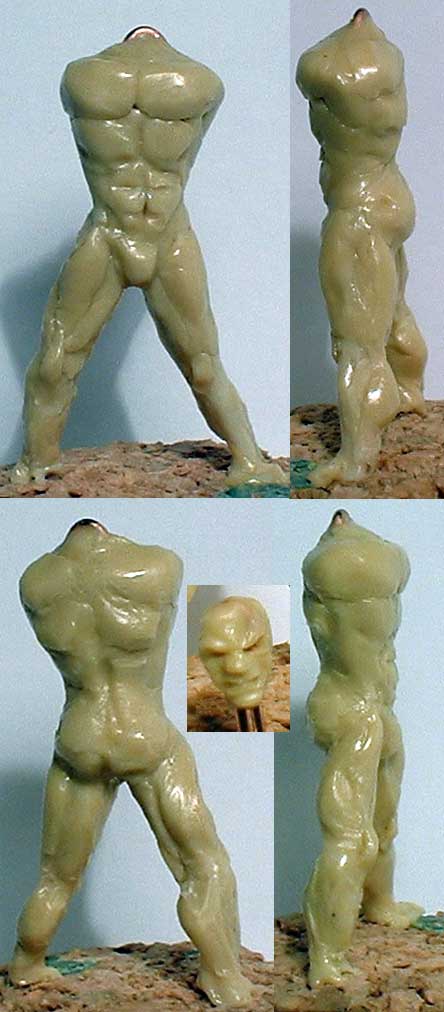 The purpose of this one is mostly to work on my anatomy. I finally got a face I felt happy with using the "slit and sausage" technique shown in Ramon Laan's tutorial. I needed a body to put it on, so I decided to make a nice burly Sydite so I could have an excuse for him to be nearly naked. I know that he's got two sets of pecs, but he'll need those for the four arms that will be going on in a later stage. The purpose of this one is mostly to work on my anatomy. I finally got a face I felt happy with using the "slit and sausage" technique shown in Ramon Laan's tutorial. I needed a body to put it on, so I decided to make a nice burly Sydite so I could have an excuse for him to be nearly naked. I know that he's got two sets of pecs, but he'll need those for the four arms that will be going on in a later stage.
|
|
| category: /other | permanent link | |
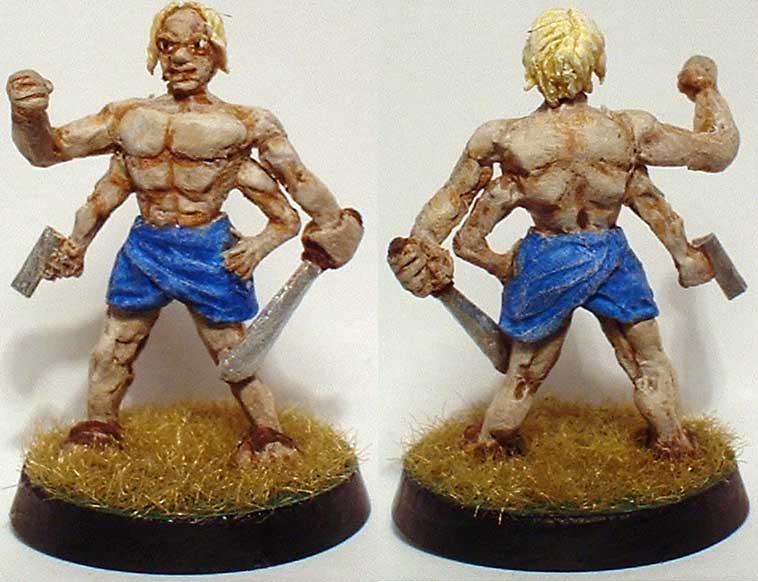
| Sydite (final) added Sep 23, 2005 | |
|
|
| category: /other | permanent link | |
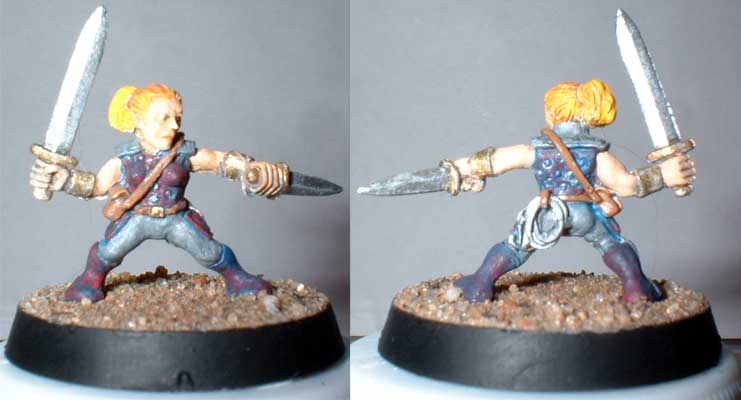
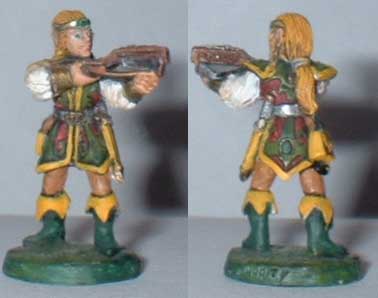
| Soveliss added Sep 23, 2005 | |
 The WotC iconic ranger, he was given to me as part of a set of "official" minis. Many of them are still unpainted, as I find them pretty silly design-wise. This guy was good enough to warrant a decent paint job, so I did him up in autumn colors. The base also includes some gravel terrain that I was pretty pleased with. For years I've been using the same bucket of sand as flocking. It was collected from the gutter in front of a house construction site and includes a lot of pretty fine sand as well as a variety of small gravel chunks. The WotC iconic ranger, he was given to me as part of a set of "official" minis. Many of them are still unpainted, as I find them pretty silly design-wise. This guy was good enough to warrant a decent paint job, so I did him up in autumn colors. The base also includes some gravel terrain that I was pretty pleased with. For years I've been using the same bucket of sand as flocking. It was collected from the gutter in front of a house construction site and includes a lot of pretty fine sand as well as a variety of small gravel chunks.
|
|
| category: /other | permanent link | |
| Samurai added Sep 23, 2005 | |
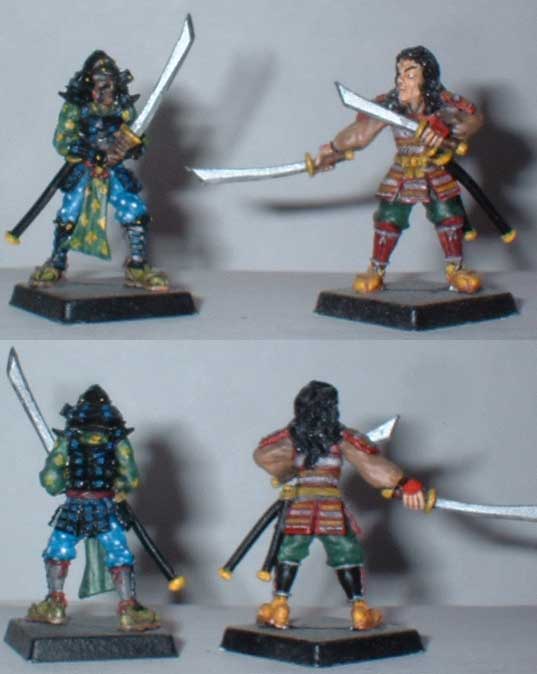 I don't remember exactly why I got these guys. They're from the Clan Wars line, as I recall. I don't remember exactly why I got these guys. They're from the Clan Wars line, as I recall.
|
|
| category: /other | permanent link | |
| Ships added Sep 23, 2005 | |
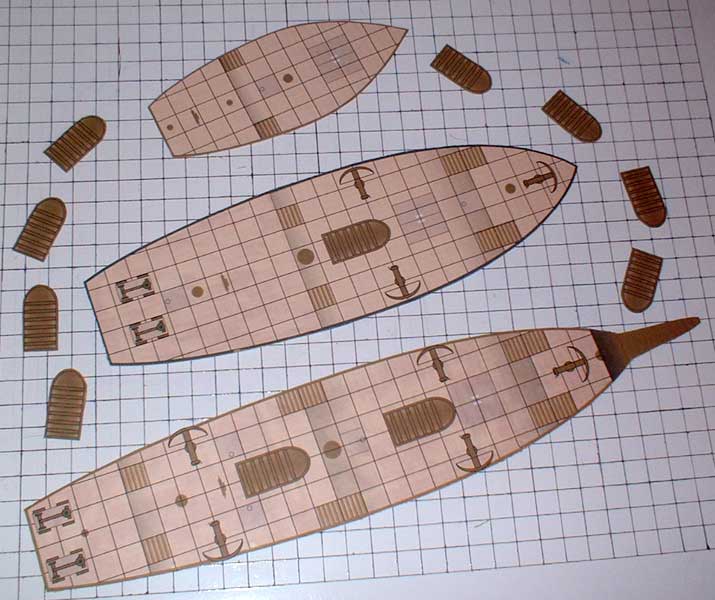 I finally got to the point where I needed to have some ships. I'd looked around the web for usable deck plans, but I just wasn't satisfied with anything I found. I found some good dimensions and drawings here. Based on those I created some ships in Illustrator. They may not be entirely accurate, but they should be good enough for gaming purposes. Anyone who wants to use and/or improve on them is welcome to. I printed them out and glued them to cardboard -- crude, but effective and cheap. Here are the files: I finally got to the point where I needed to have some ships. I'd looked around the web for usable deck plans, but I just wasn't satisfied with anything I found. I found some good dimensions and drawings here. Based on those I created some ships in Illustrator. They may not be entirely accurate, but they should be good enough for gaming purposes. Anyone who wants to use and/or improve on them is welcome to. I printed them out and glued them to cardboard -- crude, but effective and cheap. Here are the files:
|
|
| category: /other | permanent link | |
| Riktar Izen (sculpt) added Sep 23, 2005 | |
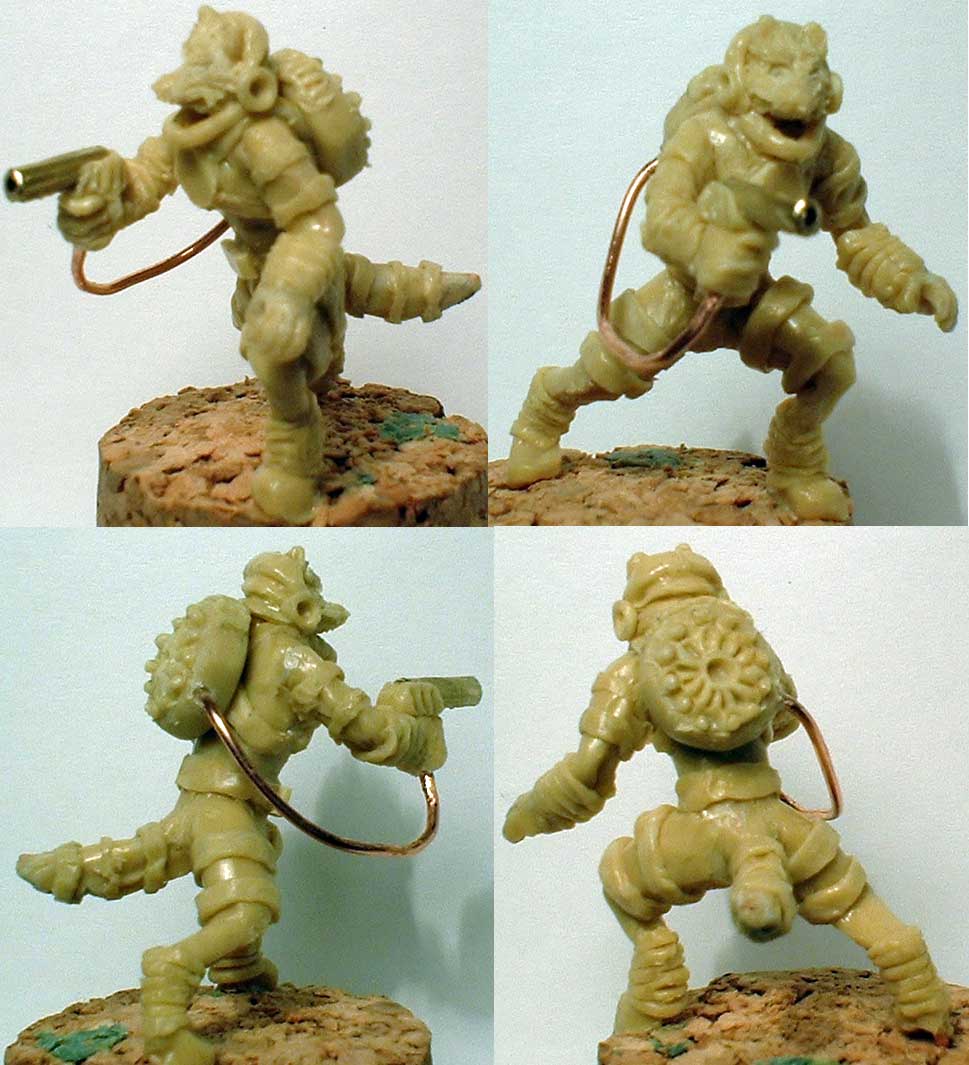 Finished adding all the bits and pieces, including the details on the laser pistol power pack. It's a little extreme for powering such a small laser, but it looks cool, and that's what's important. I had intended for this one to be practice for making smooth surfaces, but I ended up adding so many little bits and pieces that there are hardly any large smooth areas left. Ine of the problems with sculpting people in vac suits is that you can't see their faces with the helmet closed. I made this helmet fold back rahter than leaving it off altogether. The laser pistol looks kind of like a hair dryer, but I'm willing to live with that. Finished adding all the bits and pieces, including the details on the laser pistol power pack. It's a little extreme for powering such a small laser, but it looks cool, and that's what's important. I had intended for this one to be practice for making smooth surfaces, but I ended up adding so many little bits and pieces that there are hardly any large smooth areas left. Ine of the problems with sculpting people in vac suits is that you can't see their faces with the helmet closed. I made this helmet fold back rahter than leaving it off altogether. The laser pistol looks kind of like a hair dryer, but I'm willing to live with that.
|
|
| category: /other | permanent link | |
| Riktar Izen (sculpt) added Sep 23, 2005 | |
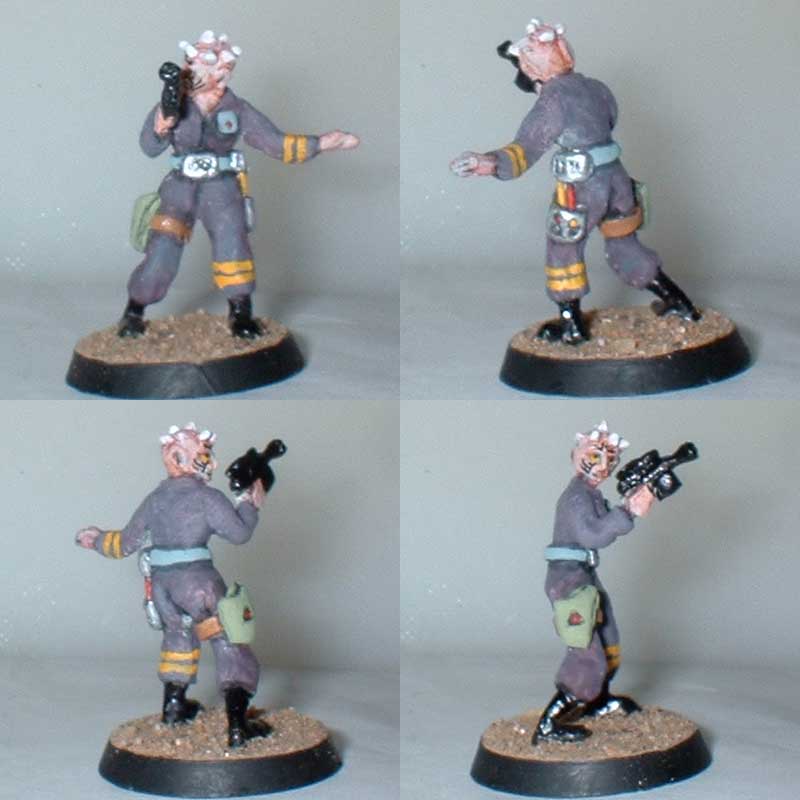
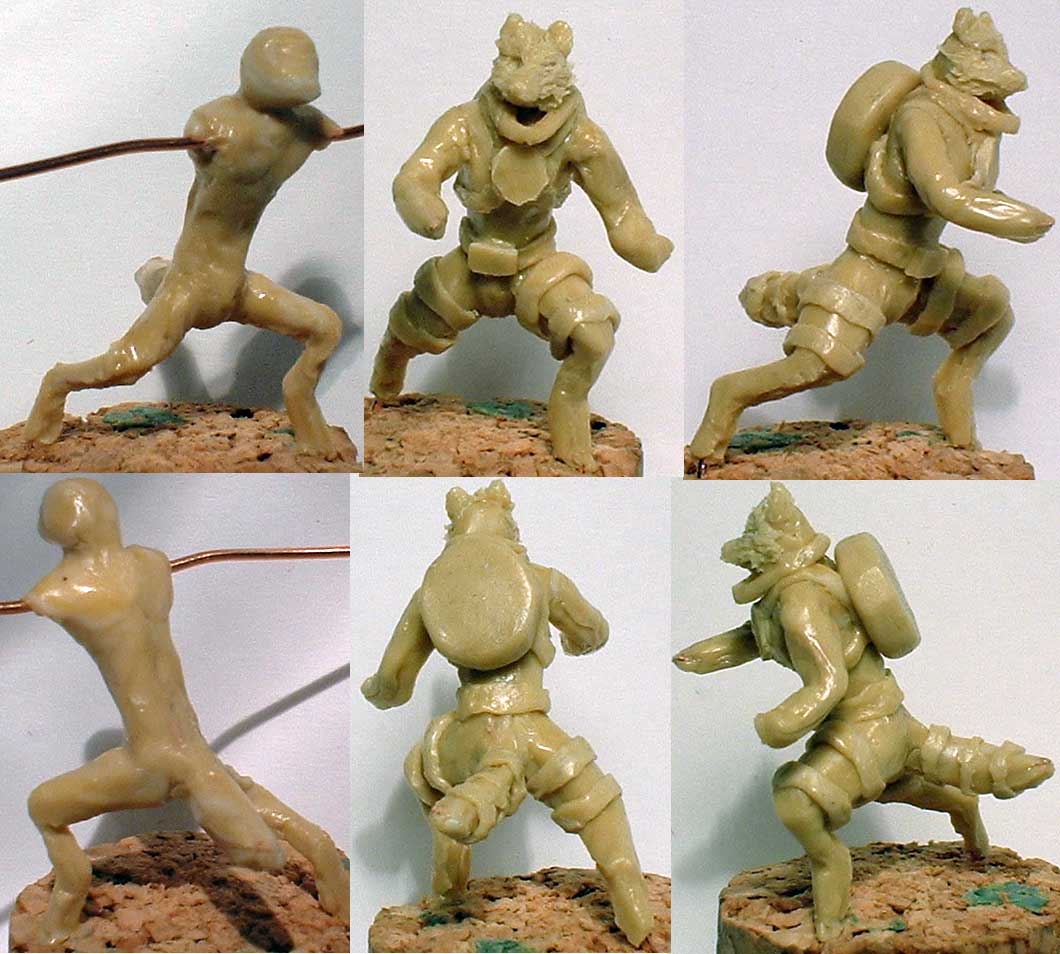 This sculpt is also in the Tamiya putty, though it looks a little green in the pictures. I figured that a creature with a tail would have a vac suit that would accommodate it. This sculpt is also in the Tamiya putty, though it looks a little green in the pictures. I figured that a creature with a tail would have a vac suit that would accommodate it.
|
|
| category: /other | permanent link | |
| R5 Droid (part 2) added Sep 23, 2005 | |
 I built legs around the wires, smoothing the feet down onto the top of the base. The wire was pushed through holes drilled in the base and bent over, but I think the putty alone would probably have been sufficient to keep the mini from falling over. After looking at the pictures, I noticed that it had gotten leaned back a little too far; I've since bent it further forward. The cutwhere I removed the bottom of the skewer wasn't very clean, but I'm not sure how I'll be able to correct it. I'll do what I can once the putty is cured, but I may just paint the remnants black and ignore them. I built legs around the wires, smoothing the feet down onto the top of the base. The wire was pushed through holes drilled in the base and bent over, but I think the putty alone would probably have been sufficient to keep the mini from falling over. After looking at the pictures, I noticed that it had gotten leaned back a little too far; I've since bent it further forward. The cutwhere I removed the bottom of the skewer wasn't very clean, but I'm not sure how I'll be able to correct it. I'll do what I can once the putty is cured, but I may just paint the remnants black and ignore them.
|
|
| category: /other | permanent link | |
| Riktar Izen (final) added Sep 23, 2005 | |
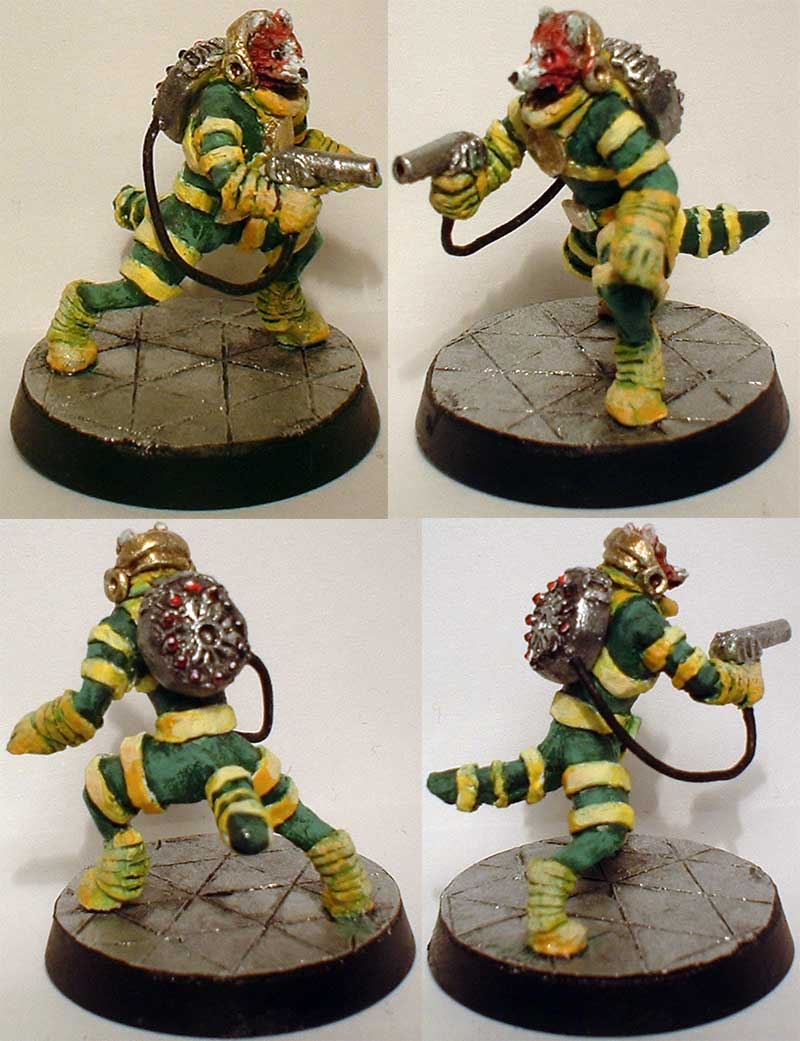 A nice bright color scheme for this one. the only interesting thing I did here was the cycling lights on the power pack. I'm not sure how visible it is, but at least I know it's there. A nice bright color scheme for this one. the only interesting thing I did here was the cycling lights on the power pack. I'm not sure how visible it is, but at least I know it's there.
|
|
| category: /other | permanent link | |
| R5 Droid (final) added Sep 23, 2005 | |
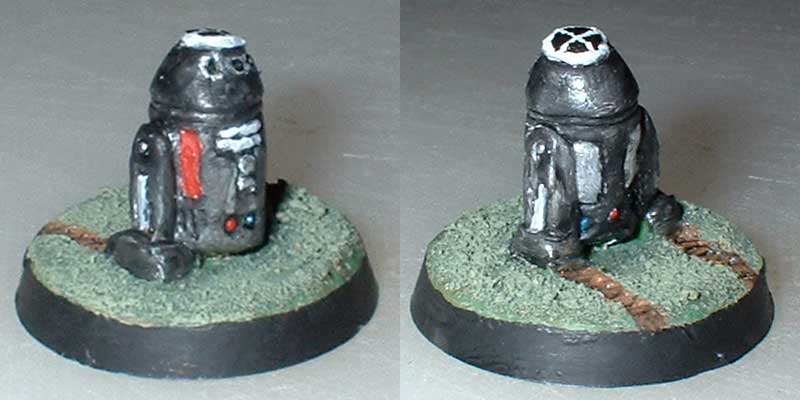 I was informed that the droid in question is black with white highlights, so that's the way I painted it. I went for a metallic sort of black, with a base coat of gunmetal followed by a fairly heavy black wash. This droid has apparently seen some hard use; it's very dented and crumpled. I'm starting to really enjoy using putty to customize bases as well. In this case, you can see tracks from the droid's treads. I was informed that the droid in question is black with white highlights, so that's the way I painted it. I went for a metallic sort of black, with a base coat of gunmetal followed by a fairly heavy black wash. This droid has apparently seen some hard use; it's very dented and crumpled. I'm starting to really enjoy using putty to customize bases as well. In this case, you can see tracks from the droid's treads.
|
|
| category: /other | permanent link | |
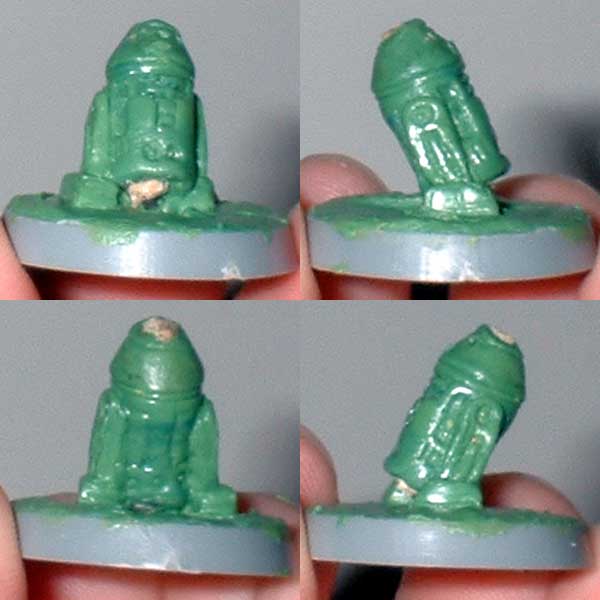
| R5 Droid (part 1) added Sep 23, 2005 | |
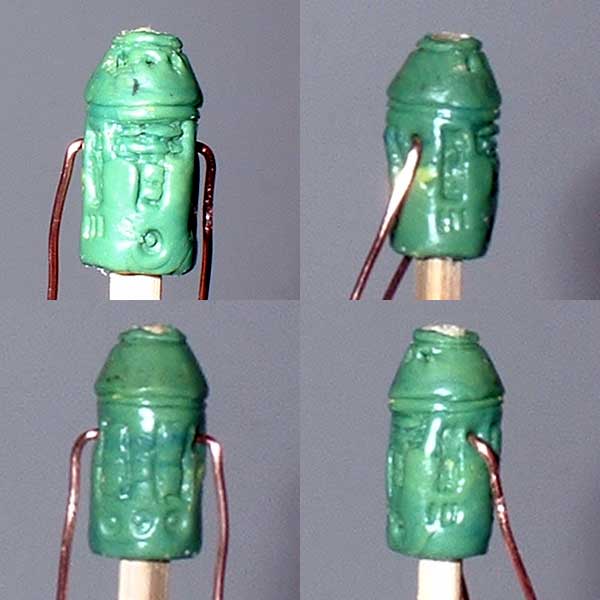 I've got the sculpting bug now, so I decided to fill one of the other gaps in the Star Wars game. We have an old R5 droid, but I have no droid minis. Compared to a humanoid, an astromech droid is really not much of a challenge. I built the main body around a wooden skewer. I had originally intended to add a separate head, but the body ended up a little tall, so I just sculpted the head on top of it. I tried adding tiny pieces of wire for the droid's eyes, but that ended up being more trouble than it was worth. I may still try to add some out of putty after the rest is cured, but for now little holes will have to do. I tried to get the details on the body as close as I could to the reference picture I had. I've got the sculpting bug now, so I decided to fill one of the other gaps in the Star Wars game. We have an old R5 droid, but I have no droid minis. Compared to a humanoid, an astromech droid is really not much of a challenge. I built the main body around a wooden skewer. I had originally intended to add a separate head, but the body ended up a little tall, so I just sculpted the head on top of it. I tried adding tiny pieces of wire for the droid's eyes, but that ended up being more trouble than it was worth. I may still try to add some out of putty after the rest is cured, but for now little holes will have to do. I tried to get the details on the body as close as I could to the reference picture I had.
|
|
| category: /other | permanent link | |
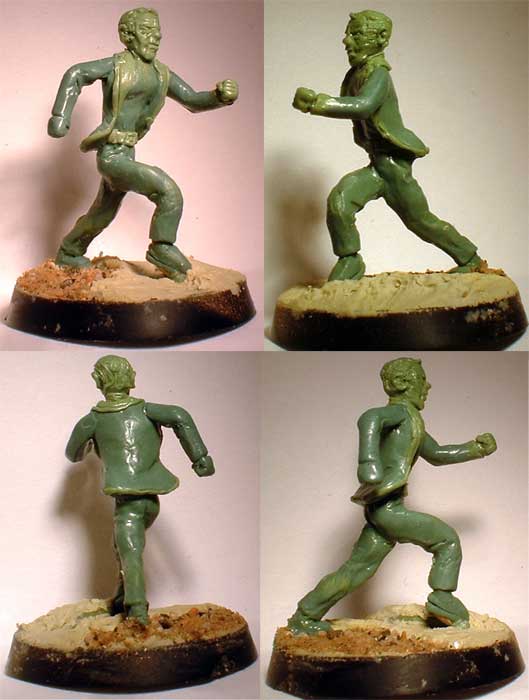
| Pilot (sculpt) added Sep 23, 2005 | |
 I'm overall pretty happy with this one. I hit the pose right where I wanted it, and the face looks like a real face. my faces are starting to look better from straight on, but the profiles are still a little off. This face looks completely different from the side than from the front. I guess I just need more practice. His hair also ended up bigger than I wanted it. I had originally planned to give him a sidearm, but I may just go without. I'm overall pretty happy with this one. I hit the pose right where I wanted it, and the face looks like a real face. my faces are starting to look better from straight on, but the profiles are still a little off. This face looks completely different from the side than from the front. I guess I just need more practice. His hair also ended up bigger than I wanted it. I had originally planned to give him a sidearm, but I may just go without.
|
|
| category: /other | permanent link | |
| Pilot (sculpt) added Sep 23, 2005 | |
 This is a fairly straightforward pose for an aerospace pilot. I don't have any profile pictures in this set, but I managed to avoid the flat-chested look that has plagued my male figures so far. I cut the backpack from a bar of partially-cured Milliput, and it has the clean edges that would have been impossible with GS. you can also see the beginnings of his helmet at his feet. I'll be adding more to that a little later. This is a fairly straightforward pose for an aerospace pilot. I don't have any profile pictures in this set, but I managed to avoid the flat-chested look that has plagued my male figures so far. I cut the backpack from a bar of partially-cured Milliput, and it has the clean edges that would have been impossible with GS. you can also see the beginnings of his helmet at his feet. I'll be adding more to that a little later.
|
|
| category: /other | permanent link | |
| Pilot (final) added Sep 23, 2005 | |
 A nice, simple paint job. Not the most handsome face, but acceptable. Practice, practice, practice. A nice, simple paint job. Not the most handsome face, but acceptable. Practice, practice, practice.
|
|
| category: /other | permanent link | |
| Number Six (sculpt) added Sep 23, 2005 | |
 They've been showing The Prisoner lately on BBC America, so I thought I'd do a sculpt in that vein. It was nice to have a fairly good selection of reference images from fan sites. It isn't exactly the spitting image of Patrick McGoohan, but I think I at least got the right flavor. I went back after these pictures were taken and smoothed out some of the rough spots, as well as giving some more meat to his right hip. They've been showing The Prisoner lately on BBC America, so I thought I'd do a sculpt in that vein. It was nice to have a fairly good selection of reference images from fan sites. It isn't exactly the spitting image of Patrick McGoohan, but I think I at least got the right flavor. I went back after these pictures were taken and smoothed out some of the rough spots, as well as giving some more meat to his right hip.
|
|
| category: /other | permanent link | |
| Mialee added Sep 23, 2005 | |
 I got this mini as part of a box set of WotC iconic characters. I painted her to play an evil tiefling enchantress character that I only played once. I got this mini as part of a box set of WotC iconic characters. I painted her to play an evil tiefling enchantress character that I only played once.
|
|
| category: /other | permanent link | |
| Number Six (final) added Sep 23, 2005 | |

|
|
| category: /other | permanent link | |
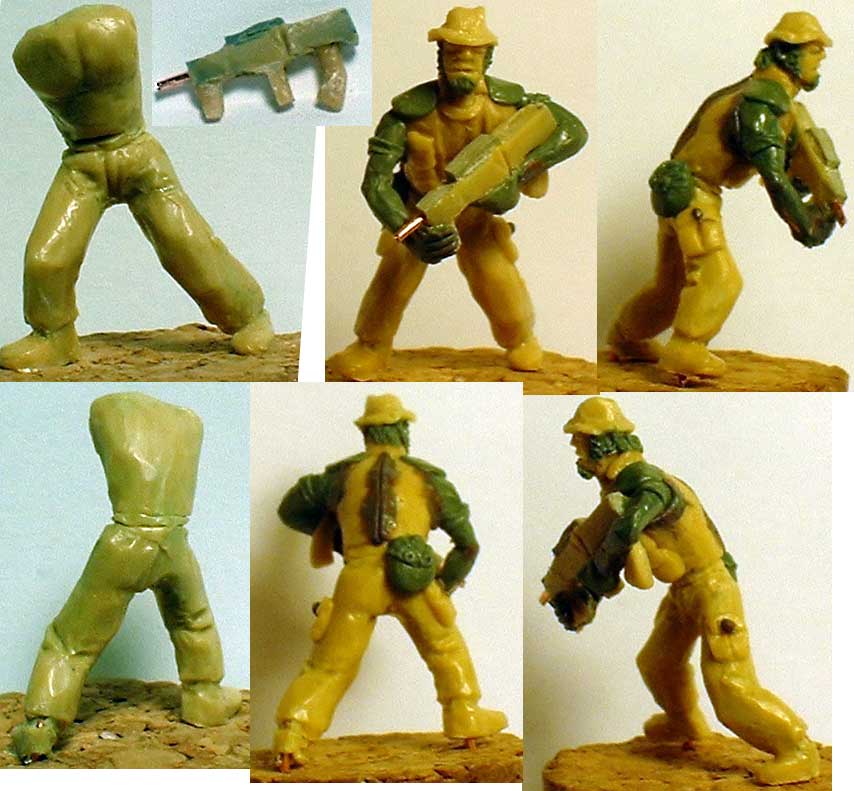
| Mercenary (sculpt) added Sep 23, 2005 | |
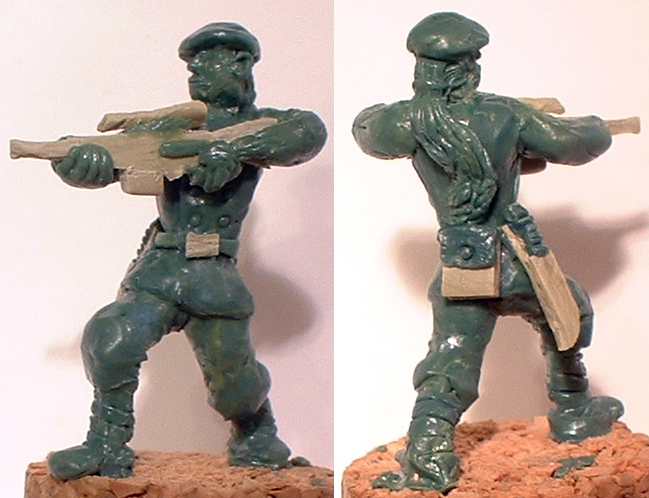 It took some doing to get the rifle to sit in the right place. Its still not perfect, but it's pretty close to where I wanted it to be. I'm starting to feel more comfortable with the Milliput, taking a little piece at a time off of the large strip I rolled out earlier today. The face on this one is a little hard to see in this picture. It's still not perfect, but it looks a lot better than the other ones I have done. the hair turned out great; hair is a lot easier than faces. It took some doing to get the rifle to sit in the right place. Its still not perfect, but it's pretty close to where I wanted it to be. I'm starting to feel more comfortable with the Milliput, taking a little piece at a time off of the large strip I rolled out earlier today. The face on this one is a little hard to see in this picture. It's still not perfect, but it looks a lot better than the other ones I have done. the hair turned out great; hair is a lot easier than faces.
|
|
| category: /other | permanent link | |
| Mercenary (sculpt) added Sep 23, 2005 | |
 Another Traveller sculpt, this time a gun-slinging mercenary. Even though I don't expect to ever cast any of these, I decided to stop using the styrene and other materials that wouldn't survive the mold-making process. I rolled out a long, thin piece of GS and rolled it flat, then left it to cure for a while. I've been cutting pieces off of it for belts, and it works quite well. I also made a vaguely rectangular strip of Milliput, which took a while to cure to the point where I could cut it. It's my first time working with Milliput, so I'm having to get used to how it works. I've been able to make a passable rifle, which will hopefully make an appearance in the next set of pictures. I've been trying to get my surfaces smoother and work in smaller stages this time, and I think it's paying off. I also got rid of the fiddly wire loops I've been using for head armatures, instead sticking a short, straight piece of wire into the torso after putting on the first coat of putty. It seems to be sturdy enough so far. Another Traveller sculpt, this time a gun-slinging mercenary. Even though I don't expect to ever cast any of these, I decided to stop using the styrene and other materials that wouldn't survive the mold-making process. I rolled out a long, thin piece of GS and rolled it flat, then left it to cure for a while. I've been cutting pieces off of it for belts, and it works quite well. I also made a vaguely rectangular strip of Milliput, which took a while to cure to the point where I could cut it. It's my first time working with Milliput, so I'm having to get used to how it works. I've been able to make a passable rifle, which will hopefully make an appearance in the next set of pictures. I've been trying to get my surfaces smoother and work in smaller stages this time, and I think it's paying off. I also got rid of the fiddly wire loops I've been using for head armatures, instead sticking a short, straight piece of wire into the torso after putting on the first coat of putty. It seems to be sturdy enough so far.
|
|
| category: /other | permanent link | |
| Mercenary (final) added Sep 23, 2005 | |
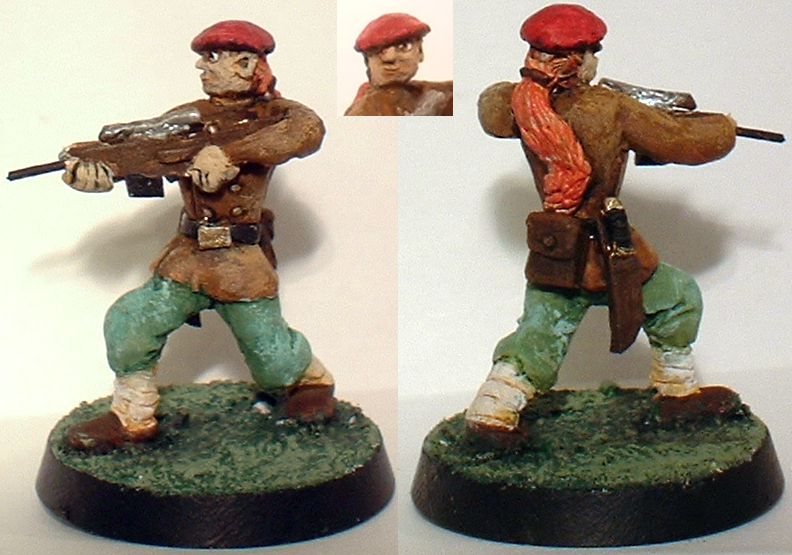 This is my favorite one so far. The scope on the rifle is a little rough, and the original barrel broke off, so I had to drill a hole and replace it with copper wire. This is my favorite one so far. The scope on the rifle is a little rough, and the original barrel broke off, so I had to drill a hole and replace it with copper wire.
|
|
| category: /other | permanent link | |
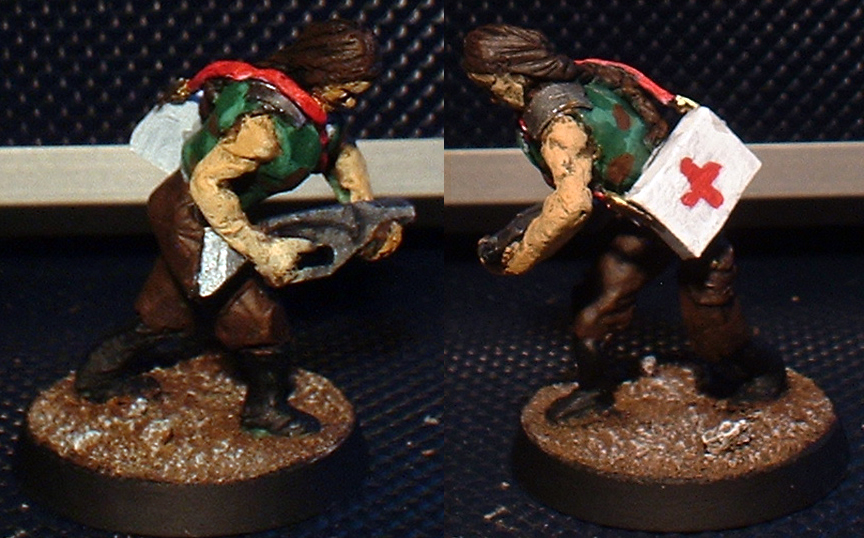
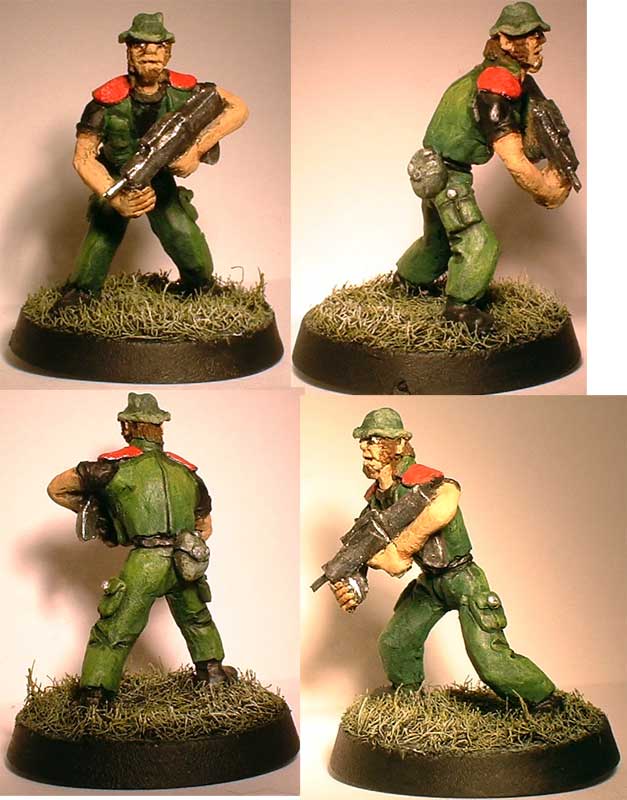
| Marine Medic (sculpt) added Sep 23, 2005 | |
 I decided to do two sculpts at once this time, so each one would have some time to cure while I was working on the other. I forgot to take an intermediate picture, but there wasn't anything too exciting going on. I'm pretty happy with the pose on this one; it's a little more dynamic than the "standing around" poses I've done so far. these two were the first sculpts that I tried doing hair on. After the success I had on the Vargr's fur, I felt pretty confident that I could do hair, and it seems to have turned out pretty well. I'm also feeling better about my faces. This one isn't exactly pretty, but it's not much uglier than some of the old Grenadier minis I have kicking around. this is also the first time I've tried doing bare arms. I think they look okay, but we'll see how they paint up. I decided to do two sculpts at once this time, so each one would have some time to cure while I was working on the other. I forgot to take an intermediate picture, but there wasn't anything too exciting going on. I'm pretty happy with the pose on this one; it's a little more dynamic than the "standing around" poses I've done so far. these two were the first sculpts that I tried doing hair on. After the success I had on the Vargr's fur, I felt pretty confident that I could do hair, and it seems to have turned out pretty well. I'm also feeling better about my faces. This one isn't exactly pretty, but it's not much uglier than some of the old Grenadier minis I have kicking around. this is also the first time I've tried doing bare arms. I think they look okay, but we'll see how they paint up.
There are a few more things I want to add before I call it finished. First, I want to add a little more detail to the rifle (which is carved from a piece of sprue). I'll also probably remove the strap from the medkit (except the very ends where they connect o the kit) and replace it with a green stuff strap. The sheet styrene worked well for building up the kit and the armor plates on her shoulders, but it's not flexible enough to make a convincing shoulder strap. Fortunately, it's not really connected over the shoulder areas so it should just fall away when I snip it. |
|
| category: /other | permanent link | |
| Marine (final) added Sep 23, 2005 | |
 The basic pose of this one I like, but the sculpt itself is pretty rough. It'll do for now, but I plan to make a new one later if the game runs long enough to warrant it. I ended up cutting the left arm and making a new elbow. The basic pose of this one I like, but the sculpt itself is pretty rough. It'll do for now, but I plan to make a new one later if the game runs long enough to warrant it. I ended up cutting the left arm and making a new elbow.
|
|
| category: /other | permanent link | |
| Lidda added Sep 23, 2005 | |
 This is one of the WotC iconic characters. She's a properly proportioned halfling, which means she's really really tiny! This is one of the WotC iconic characters. She's a properly proportioned halfling, which means she's really really tiny!
|
|
| category: /other | permanent link | |
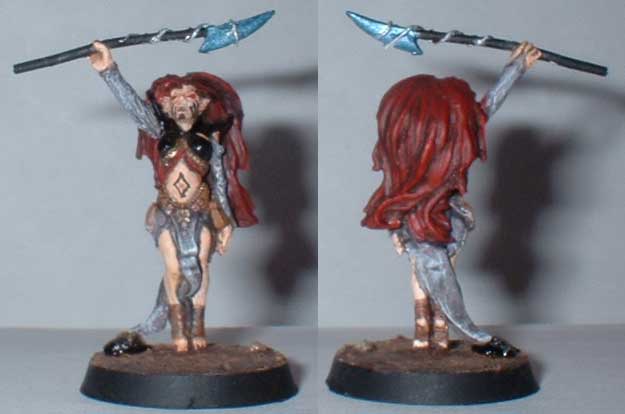
| Kade Mireth-Orat (part 5) added Sep 23, 2005 | |
 I'm glad her face is going to be covered with tattoos, because it's not very attractive. The underlying head shape was pretty well cured, so I had to add more putty to form the brow, nose, and mouth. I also had to work around the right arm, so it didn't turn out quite as well as I would have liked. For the horns, I laid a small roll of putty around the crown of the head, then pinched it into horns. I smoothed the putty between the horns into the surounding skull, which helped to cover some of the earlier imperfections. I also added another small strip with two more horns at the top of the head. The ears were simple blobs stuck to the sides of the head, smoothed, and shaped. I had to rebuild one of them because I accidnetally smashed it with my finger while making the second one. The left hand also had to be rebuilt, and the blaster needed to be nudged back into position. Hopefully everything will cure to a more durable state now that I can leave it alone. I'll try to touch things up once it's fully cured (I'll wait until tomorrow at least, to give it as much time as possible). Hopefully it will look better painted than it does green. Still, I'm pretty happy with the basic proportions and shape, considering it's my first attempt at sculpting. I'm glad her face is going to be covered with tattoos, because it's not very attractive. The underlying head shape was pretty well cured, so I had to add more putty to form the brow, nose, and mouth. I also had to work around the right arm, so it didn't turn out quite as well as I would have liked. For the horns, I laid a small roll of putty around the crown of the head, then pinched it into horns. I smoothed the putty between the horns into the surounding skull, which helped to cover some of the earlier imperfections. I also added another small strip with two more horns at the top of the head. The ears were simple blobs stuck to the sides of the head, smoothed, and shaped. I had to rebuild one of them because I accidnetally smashed it with my finger while making the second one. The left hand also had to be rebuilt, and the blaster needed to be nudged back into position. Hopefully everything will cure to a more durable state now that I can leave it alone. I'll try to touch things up once it's fully cured (I'll wait until tomorrow at least, to give it as much time as possible). Hopefully it will look better painted than it does green. Still, I'm pretty happy with the basic proportions and shape, considering it's my first attempt at sculpting.
|
|
| category: /other | permanent link | |
| Kade Mireth-Orat (part 3) added Sep 23, 2005 | |
 Nothing much was changed on the body itself except for adding the opening at the front of the jumpsuit -- just a simple line. At the end of the last stage I made a small roll of putty and laid it on a glossy cardstock brochure (my work surface). I flattened it some and left it to cure a little. When I came back I began cutting off pieces of the roll to add accessories. First I made a belt with a rectangular buckle. Using another good hint I made the round studs using a mechanical pencil tip with the lead retracted. It works amazingly well. Then I added a rank plaque on the chest of the jumpsuit, marked with a single pip in the corner. Finally, I added some sort of gadgetry on the left leg, inspired by the life support apparatus I'd seen on space suits. I connected the box on the leg to a belt pack by two short pieces of copper wire. The markings were done with the pencil and a small eyeglass screwdriver. Nothing much was changed on the body itself except for adding the opening at the front of the jumpsuit -- just a simple line. At the end of the last stage I made a small roll of putty and laid it on a glossy cardstock brochure (my work surface). I flattened it some and left it to cure a little. When I came back I began cutting off pieces of the roll to add accessories. First I made a belt with a rectangular buckle. Using another good hint I made the round studs using a mechanical pencil tip with the lead retracted. It works amazingly well. Then I added a rank plaque on the chest of the jumpsuit, marked with a single pip in the corner. Finally, I added some sort of gadgetry on the left leg, inspired by the life support apparatus I'd seen on space suits. I connected the box on the leg to a belt pack by two short pieces of copper wire. The markings were done with the pencil and a small eyeglass screwdriver.
I finally cut down the arm wires and bent them into position. I decided to make the armature for the blaster part of the arm wire, which should make it as stable as possible. It really shouldn't be a huge blaster, but I'll just have to see how it looks when I start sculpting it. Ther eare still some fingerprints and other imperfections on the body, and I'm not sure how I can smooth them out without adding another layer of putty. I may end up doing just that if I can't find any other way, but I don't want to add extra bulk; I'm pretty happy with the shape of the body as it is. I may wait until the whole thing is fully cured and try to file the surface smooth. I'm not sure how to tell when that is; so far it's been several hours and the putty is still somewhat flexible. It may never be rock hard. I'm also hoping to get a chance at some point to file the edges of some of the accessories more square. |
|
| category: /other | permanent link | |
| Kade Mireth-Orat (part 4) added Sep 23, 2005 | |
 Added the arms, blaster, and holster. The blaster is a little mushy looking, but that's about the best I can do with Green Stuff, I think. The little bit of grip sticking out of the bottom of her hand is probably going to go away. All that's left is to finish the head. Added the arms, blaster, and holster. The blaster is a little mushy looking, but that's about the best I can do with Green Stuff, I think. The little bit of grip sticking out of the bottom of her hand is probably going to go away. All that's left is to finish the head.
|
|
| category: /other | permanent link | |
| Kade Mireth-Orat (part 2) added Sep 23, 2005 | |
 During this stage I finished the basic shape of the body, legs, and head. I had to pul the armature up out of the cork a little bit to make room for feet. So far they're nothing but featureless boots. I may just leave them that way. I added a little bit of putty to add some fullness to the pants at the top of each boot. The upper legs are unchanged. I finished the shape of the torso and added the collar of the jumpsuit using a small roll of putty blended in to the rest of the clothing on the outer edge. I was surprised at how easily it created the right effect. I also added a little to the head and did some more shaping. During this stage I finished the basic shape of the body, legs, and head. I had to pul the armature up out of the cork a little bit to make room for feet. So far they're nothing but featureless boots. I may just leave them that way. I added a little bit of putty to add some fullness to the pants at the top of each boot. The upper legs are unchanged. I finished the shape of the torso and added the collar of the jumpsuit using a small roll of putty blended in to the rest of the clothing on the outer edge. I was surprised at how easily it created the right effect. I also added a little to the head and did some more shaping.
|
|
| category: /other | permanent link | |
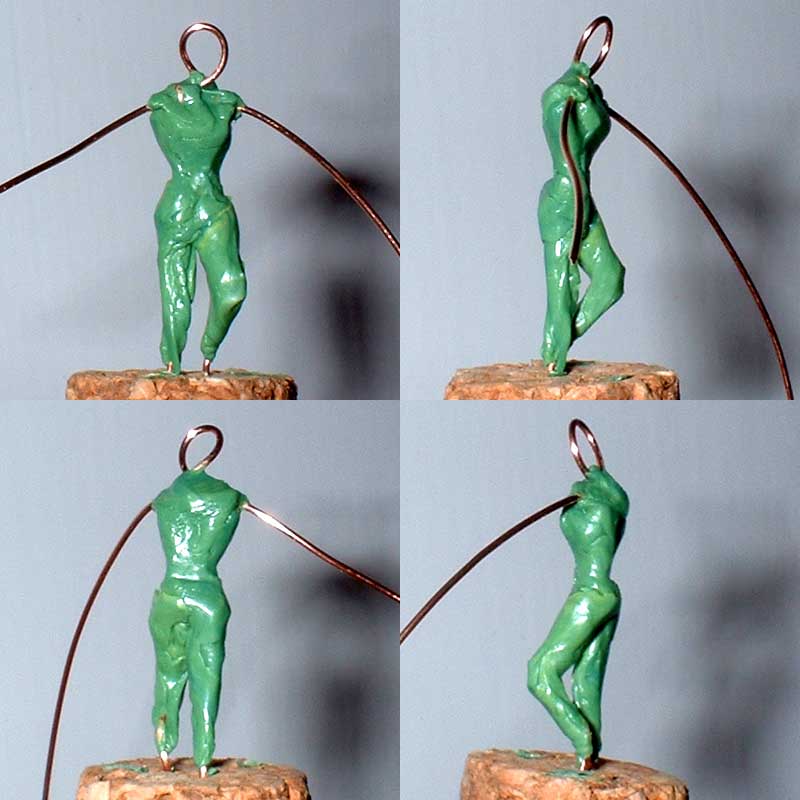
| Kade Mireth-Orat (part 1) added Sep 23, 2005 | |
 With the general lack of Star Wars minis available, I don't think I'll ever find anything to fit my wife's Zabrak pilot character. I also don't want to hunt all over for another sci-fi type min to convert, so I've decided to take on my first sculpting project. With the general lack of Star Wars minis available, I don't think I'll ever find anything to fit my wife's Zabrak pilot character. I also don't want to hunt all over for another sci-fi type min to convert, so I've decided to take on my first sculpting project.
I picked up a ribbon of Green Stuff in a Citadel Modelling blister pack at the local hobby store some time back, just in case I ever needed it. I also have a few tools that I used to use on modelling clay when I was a child. One is a burnishing ball tool, with a different sized ball on each end. The other hs a curved, flat round shape on one end and a curved, dull pick sort of implement on the other. I'm glad I didn't lose track of these tools over the years, since they're ideal for this sort of thing. I laid my hands on a cork and began to try to build an armature. I had some very fine brass wire and some stiff piano wire immediately to hand. The brass wire was far too flimsy to make any sort of skeleton. The piano wire was very sturdy; in fact, it was so sturdy I couldn't get it into any sort of useful shape. I looked around some more and found some insulated copper wire I'd used for an automotive wiring project some time ago. It's about 22ga, I think, maybe 20ga. There's no marking on the spool. At any rate, it was very easy to shape and held its shape well. I'm worried that it's a little too soft, but hopefully the putty will be sturdy enough that it won't matter. The hardest part of working with the copper wire was pushing it into the cork; it tended to bend instead of go in. Finally I got enough of it secured that I could start building my body shape. I started with two pieces of wire about 3.5" long. I twisted them together into a torso, then splayed them back out for arms. I untwisted the wires a little to reduce the overall height of the skeleton, as it will need to coexist with the old 25mm West End minis. I think she'll still be a little Amazonian, but I don't want to try sculpting on too small a scale my first time out. I made a small wire loop for the head, twisting one of the free ends from the loop around the torso and the other around an arm. The result was a fairly well secured head that I could position without it coming loose from the body. I put the first layer of putty on the torso, head, and legs. Following advice from some online sculpting guides I've left the arms naked at this point to allow easier access to the torso. I decided to start adding some of the basic body shape at this point. I want the figure to look unmistakably female, so I added some shape to the hips and thighs. Since Zabraks have no hair, the face and body will be the only way to determine gender. I don't know how well I'll be able to sculpt the face, so I'm trying to make sure the body is recognizably female. My initial concept is to sculpt her wearing a flight suit, which should be fairly easy to do. I'm not sure what I want her arms to be doing, but one will probably be holding a blaster vertically, with the other held out behind, hand down. The head seemed to take on some shape as I messed with it, and it seems to be looking over to the right, which works just fine for me. Once this first layer cures, I plan to work on the upper torso and add feet, then maybe begin defining the clothes. Next I'll work on the arms, and leave the head for last. I've found myself putting my finger on top of the head as I sculpt the body, so I'll save the head for last so I don't mess it up while working on other things. |
|
| category: /other | permanent link | |
| Kade Mireth-Orat (final) added Sep 23, 2005 | |
 Okay, I couldn't wait until tomorrow. I tried to do some trimming, but it really didn't seem to be working well so I decided to just paint it up and see what happened. I clipped the wires below the feet and put them through holes drilled in an old GW plastic base. It turned out pretty well, considering that this morning it was just a flat ribbon of goo. Comparing it to other minis, it looks like I hit 28mm scale pretty well. She'll still stand out among her 25mm companions, but I'll just have to live with that. Okay, I couldn't wait until tomorrow. I tried to do some trimming, but it really didn't seem to be working well so I decided to just paint it up and see what happened. I clipped the wires below the feet and put them through holes drilled in an old GW plastic base. It turned out pretty well, considering that this morning it was just a flat ribbon of goo. Comparing it to other minis, it looks like I hit 28mm scale pretty well. She'll still stand out among her 25mm companions, but I'll just have to live with that.
|
|
| category: /other | permanent link | |
| Ilse Toskala (sculpt) added Sep 23, 2005 | |
 I swear the face looks better in person. The original gun fell off and got lost, so I had to replace it. I swear the face looks better in person. The original gun fell off and got lost, so I had to replace it.
|
|
| category: /other | permanent link | |
| Imperial Officer added Sep 23, 2005 | |
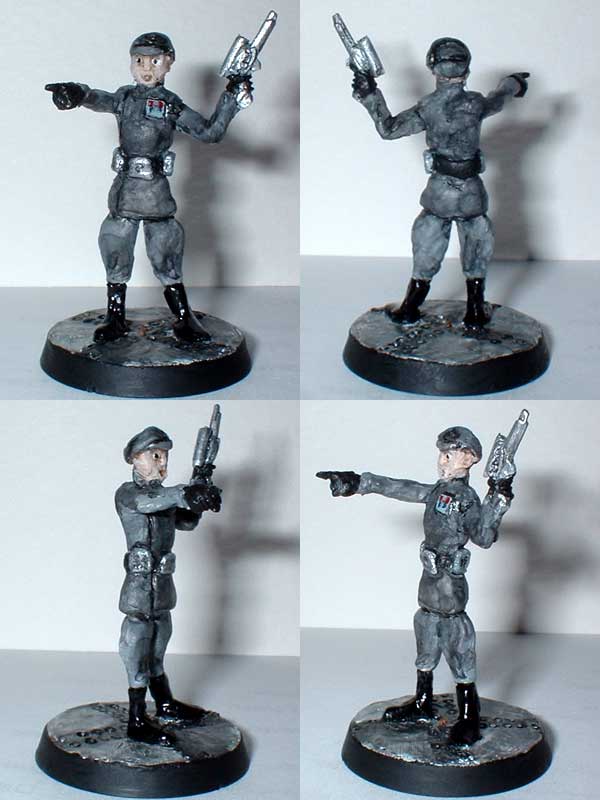 This was mostly experimental, so I didn't bother to document the process this time. I used some leftover pirate hands for this one, including one with a pistol. I added a small piece of insulation from the copper wire as a scope, stuck to the pistol with putty. The face on this one turned out pretty bad. I was mostly seeing how I could do some of the small details like the rank plaque, code cyliners, and other accessories. I'm mostly just pleased that it's recognizable as an Imperial Navy uniform, or at least I think it is. I had intended to paint the uniform black, but I find that the detail is lost when things are just black. I've had good luck before starting with grey and using black washes, but this time it turned out blotchy and kind of gross. A lot of that I'm sure is due to the uneven texture of the uniform. I may go back and just paint it all flat black, which will no doubt look much better. This was mostly experimental, so I didn't bother to document the process this time. I used some leftover pirate hands for this one, including one with a pistol. I added a small piece of insulation from the copper wire as a scope, stuck to the pistol with putty. The face on this one turned out pretty bad. I was mostly seeing how I could do some of the small details like the rank plaque, code cyliners, and other accessories. I'm mostly just pleased that it's recognizable as an Imperial Navy uniform, or at least I think it is. I had intended to paint the uniform black, but I find that the detail is lost when things are just black. I've had good luck before starting with grey and using black washes, but this time it turned out blotchy and kind of gross. A lot of that I'm sure is due to the uneven texture of the uniform. I may go back and just paint it all flat black, which will no doubt look much better.
|
|
| category: /other | permanent link | |
| Ilse Toskala (sculpt) added Sep 23, 2005 | |
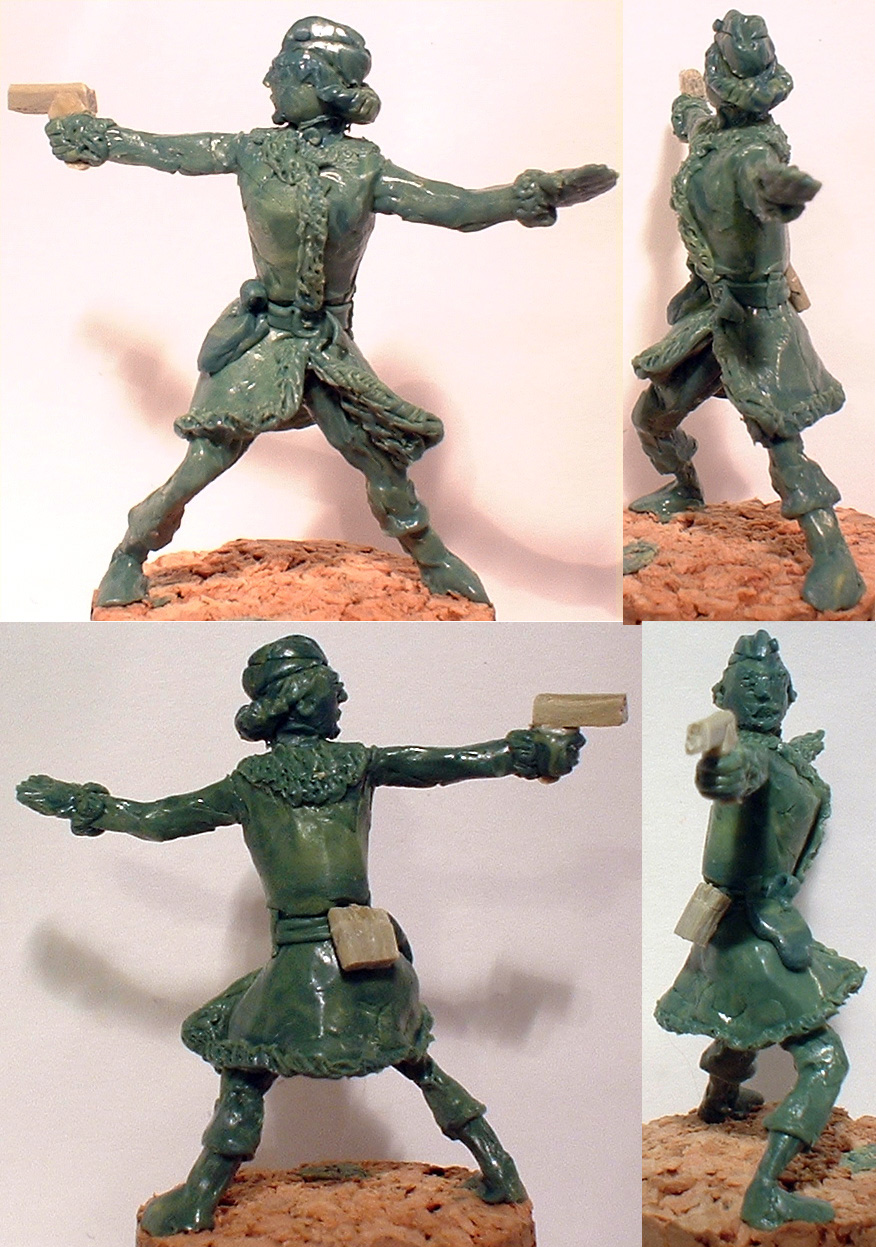
 An NPC for the Traveller game. The pose is close to a couple others I've done already, but I'm hoping to improve the sculpting this time. I started with a more careful skin coat on the armature, adding putty in distinct pieces instead of just lumping it on and trying to make a body shape on top of it. I should have taken pictures of the first stage, since the coat covers up the hips I was so proud of. Ah well. I'm also aiming for a much more slender look this time. I think it helps in that regard to define the musculature right at the beginning, rather than trying to build it on top of the skin coat and thus adding extra bulk. I tried to add some motion to the pose with the flare of the coat, which I think works pretty well. i'll be doing more of the same with her hair. Every time I put fur on something it feels like I'm cheating, since it covers so many mistakes so easily. I've found out recently that making belts out of GS only works if the belt hasn't cured too long. After a certain point it gets so stiff that it's impossible to get the ends to lie flat. I'm quite pleased with the way this belt turned out. An NPC for the Traveller game. The pose is close to a couple others I've done already, but I'm hoping to improve the sculpting this time. I started with a more careful skin coat on the armature, adding putty in distinct pieces instead of just lumping it on and trying to make a body shape on top of it. I should have taken pictures of the first stage, since the coat covers up the hips I was so proud of. Ah well. I'm also aiming for a much more slender look this time. I think it helps in that regard to define the musculature right at the beginning, rather than trying to build it on top of the skin coat and thus adding extra bulk. I tried to add some motion to the pose with the flare of the coat, which I think works pretty well. i'll be doing more of the same with her hair. Every time I put fur on something it feels like I'm cheating, since it covers so many mistakes so easily. I've found out recently that making belts out of GS only works if the belt hasn't cured too long. After a certain point it gets so stiff that it's impossible to get the ends to lie flat. I'm quite pleased with the way this belt turned out.
|
|
| category: /other | permanent link | |
| Ilse Toskala (final) added Sep 23, 2005 | |
 Not much to say. Everything always looks better painted. Not much to say. Everything always looks better painted.
|
|
| category: /other | permanent link | |
| Hiver (sculpt) added Sep 23, 2005 | |
 I prefer round bases, but this one just wouldn't fit. It barely fit on the square base as it is. In the blurry picture from underneath you can sort of see the mouth I put on the underside. i haven't seen any specific mention of colors, so I'll have an opportunity to get creative when it comes time to paint. I may be adding some equipment, if I can figure out where the heck it would go. I prefer round bases, but this one just wouldn't fit. It barely fit on the square base as it is. In the blurry picture from underneath you can sort of see the mouth I put on the underside. i haven't seen any specific mention of colors, so I'll have an opportunity to get creative when it comes time to paint. I may be adding some equipment, if I can figure out where the heck it would go.
|
|
| category: /other | permanent link | |
| Hennet added Sep 23, 2005 | |
 This was the first WotC mini I picked up after converting to 3e D&D. I didn't like the size of the base, so I cut it down and rebuilt it. This was the first WotC mini I picked up after converting to 3e D&D. I didn't like the size of the base, so I cut it down and rebuilt it.
|
|
| category: /other | permanent link | |
| Hiver (sculpt) added Sep 23, 2005 | |
 This is my first real non-humanoid sculpt. I bulked it out with Milliput, then added a skin coat of Tamiya putty. I applied the skin texture with an old canvas dice bag, then made the hard plates on the back with little squashed putty balls. The underside is mostly unfinished; I plan to finish everything I can reach from the top, then remove it from the cork and sculpt the underside. I'll probably wait until after I do the underside to do the toes on the feet that are on the ground. This is my first real non-humanoid sculpt. I bulked it out with Milliput, then added a skin coat of Tamiya putty. I applied the skin texture with an old canvas dice bag, then made the hard plates on the back with little squashed putty balls. The underside is mostly unfinished; I plan to finish everything I can reach from the top, then remove it from the cork and sculpt the underside. I'll probably wait until after I do the underside to do the toes on the feet that are on the ground.
|
|
| category: /other | permanent link | |
| Mercenary With Goatee (final) added Sep 23, 2005 | |
 i went back to black primer with this one and I think it worked out fine. once I put him next to my other sculpts and the GW minis, i realized that I hadn't scaled him quite right; he ended up closer to 25mm than 28mm. Still the proportions are good, and nudging the size of my template upward should fix the scale issue. the face and hands are still not perfect, but definitely improving bit by bit. i went back to black primer with this one and I think it worked out fine. once I put him next to my other sculpts and the GW minis, i realized that I hadn't scaled him quite right; he ended up closer to 25mm than 28mm. Still the proportions are good, and nudging the size of my template upward should fix the scale issue. the face and hands are still not perfect, but definitely improving bit by bit.
|
|
| category: /other | permanent link | |
| Mercenary With Goatee (sculpt) added Sep 23, 2005 | |
 There's not much exciting about the pose on this one, but I worked on some other issues this time around. First, I printed out a template based on a scaled-down skeleton image. I used that to make sure the proportions of my armature were correct. After the scale issues I had on the last one, I decided to be a bit more careful this time around. It worked pretty well. There's not much exciting about the pose on this one, but I worked on some other issues this time around. First, I printed out a template based on a scaled-down skeleton image. I used that to make sure the proportions of my armature were correct. After the scale issues I had on the last one, I decided to be a bit more careful this time around. It worked pretty well.
I also wanted to make a better weapon this time than a featureless rectangle. I did a little research, looking for a weapon to use as a template that didn't look like the typical modern assault rifle. I decided to make a bullpup-style rifle. I roughed it out with a milliput/gs mixture around a piece of wire. I filed and cut it down to the basic shape I wanted, then added the clip and handles with beige putty. The two putties didn't stick together well enough, so I ended up building up the sides with beige putty as well to anchor the extra bits on. In the end, the front grip broke off and I had to glue it back on. The merc's body was roughed out with milliput again, then the details were added with beige putty from the feet up. as I was getting to the arms and last details, my new supply of green stuff arrived in the mail. I'm quite pleased with it. It's hard to see how it's going to look with all the different colored putties, but I think it will be pretty good once it's painted. |
|
| category: /other | permanent link | |
| Alice Contest Entries added Sep 23, 2005 | |
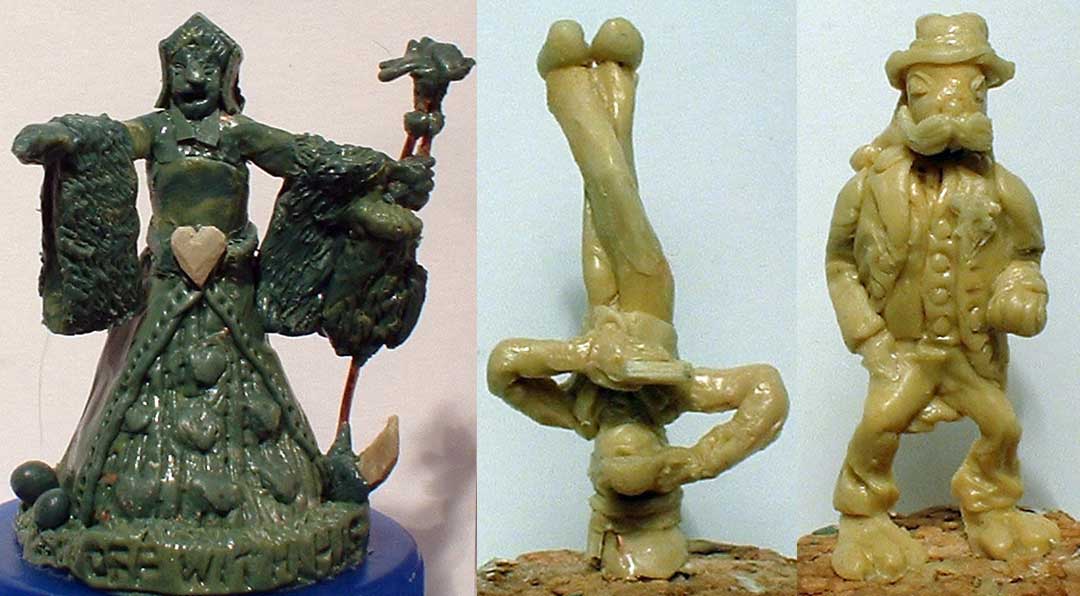 A while back I submitted these sculpts for the Frothers Unite! UK Alice in Wonderland sculpting contest. Amazingly enough, my Mad Hatter managed to tie for third place in the "Tea Party" category. The "Wyatt Rabbit" sculpt (on the right) was certainly the best of the ones I submitted, but the competition was quite stiff in the "Other Characters" category. A while back I submitted these sculpts for the Frothers Unite! UK Alice in Wonderland sculpting contest. Amazingly enough, my Mad Hatter managed to tie for third place in the "Tea Party" category. The "Wyatt Rabbit" sculpt (on the right) was certainly the best of the ones I submitted, but the competition was quite stiff in the "Other Characters" category.
A few notes on each of these: The Queen of Hearts was done back before I had learned to make recognizable faces, and it shows. I also was attempting to do some patterns on her skirt with a stampingtool carved out of milliput. It didn't really work as well as I would have liked. I was pretty happy with the basic execution of the dress, though the details left much to be desired. I built the skirt over a crazy spiral armature, which I ended up filling with milliput. The hardest part of the Hatter was trying to visualize what I was doing when everything was upside down. The arms caused me a lot of traouble, as each one was built over a separate wire stuck in a hole drilled in the torso. They were very hard to get positioned right. I should have gone back after the putty had cured and done a better job of finishing the details there, but I think I had just gotten too frustrated with it to do any more work on it. The rabbit was based on a photograph of Wyatt Earp, which made it much easier to figure out the details of the clothing. I forgot, however, to put any fur on him before sending off the pictures. |
|
| category: /other | permanent link | |
| Engineer (sculpt) added Sep 23, 2005 | |
 I'm happy with the hair on this one, though the face is stil a little ugly. the head is usually the last thing I do, and I'm worried that I'm getting burned out by the time I get to it. I think I may try doing a series of disembodied heads just to practice faces. Then I can just stick them onto bodies as I make them. I'm happy with the hair on this one, though the face is stil a little ugly. the head is usually the last thing I do, and I'm worried that I'm getting burned out by the time I get to it. I think I may try doing a series of disembodied heads just to practice faces. Then I can just stick them onto bodies as I make them.
I did some more experimentation with sheet styrene here. The belt, buckle, and wrenches are all cut from styrene, while the pistol is carved from sprue. I like the way the belt loops turned out here. I'm starting to get more comfortable working with tiny specks of putty, like the belt loops and eyes. I want to add some pockets to the jumpsuit and a holster, and also clean up the tool belt a little, but I'm fairly pleased with this one. |
|
| category: /other | permanent link | |
| Engineer (final) added Sep 23, 2005 | |
 The body is decent, nothing too exciting. The hair I like, but the face is atrocious. I'm fond of the little wrenches. The deck plates on the base are cut from sheet styrene. The body is decent, nothing too exciting. The hair I like, but the face is atrocious. I'm fond of the little wrenches. The deck plates on the base are cut from sheet styrene.
|
|
| category: /other | permanent link | |
| Ember added Sep 23, 2005 | |
 I got this WotC mini soon after switching to 3e D&D, because I had no female monks. Unlike most WotC minis, she isn't particularly weird looking. I got this WotC mini soon after switching to 3e D&D, because I had no female monks. Unlike most WotC minis, she isn't particularly weird looking.
|
|
| category: /other | permanent link | |
| Elf With Crossbow added Sep 23, 2005 | |
 This Grenadier mini is one of a pair that I received from a friend. The other one is still sitting around half painted. This Grenadier mini is one of a pair that I received from a friend. The other one is still sitting around half painted.
|
|
| category: /other | permanent link | |
| Dwarves added Sep 23, 2005 | |
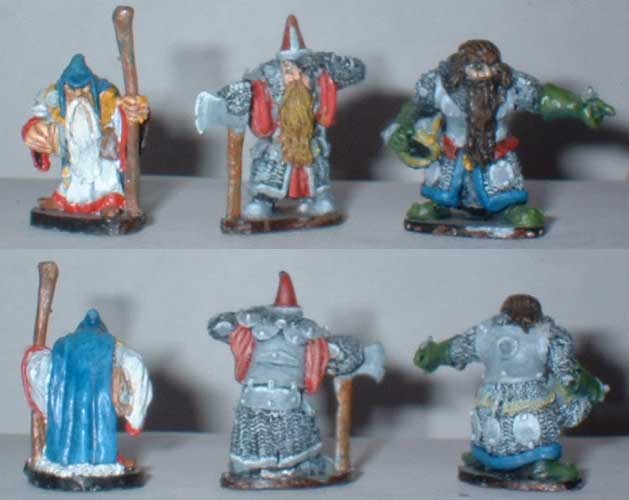 These three are part of a Grenadier box set of dwarves. I started repainting them at one point but these three were the only ones I finished. The fighters have some decent NMM on them. The wizard gets used a fair amount, as dwarven wizards are hard to find. These three are part of a Grenadier box set of dwarves. I started repainting them at one point but these three were the only ones I finished. The fighters have some decent NMM on them. The wizard gets used a fair amount, as dwarven wizards are hard to find.
|
|
| category: /other | permanent link | |
| Dengar and a Stormtrooper added Sep 23, 2005 | |
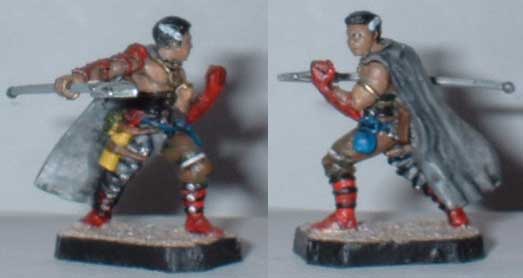
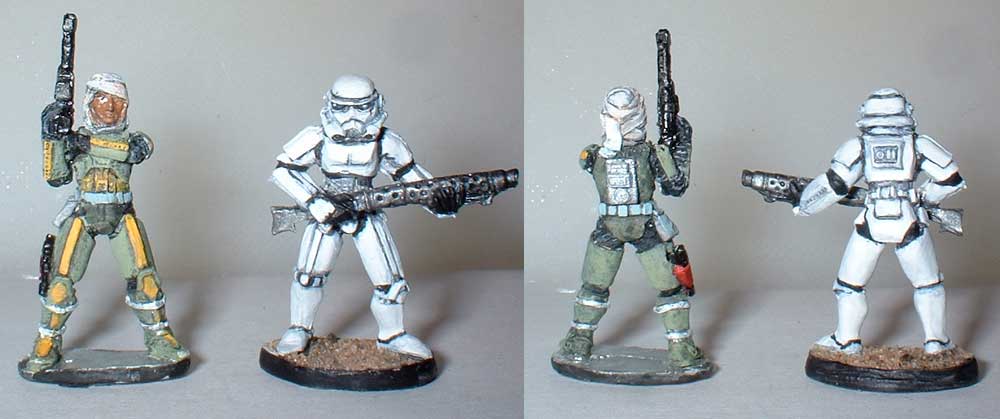 These two are from the West End Games Star Wars Miniatures Battles box set. The stormtrooper is painted normally. I started painting Dengar like he is shown in the movie, but ran out of steam. I came back to him recently to repaint him as a character I'm playing with modified clone trooper armor.
It's hard to find Star Wars minis that are a perfect match for PCs, and I hate the thought of altering the few I have since they're so hard to find. Are there any sources for them aside from old out-of-print West End minis and the handful of WotC ones? These two are from the West End Games Star Wars Miniatures Battles box set. The stormtrooper is painted normally. I started painting Dengar like he is shown in the movie, but ran out of steam. I came back to him recently to repaint him as a character I'm playing with modified clone trooper armor.
It's hard to find Star Wars minis that are a perfect match for PCs, and I hate the thought of altering the few I have since they're so hard to find. Are there any sources for them aside from old out-of-print West End minis and the handful of WotC ones?
|
|
| category: /other | permanent link | |
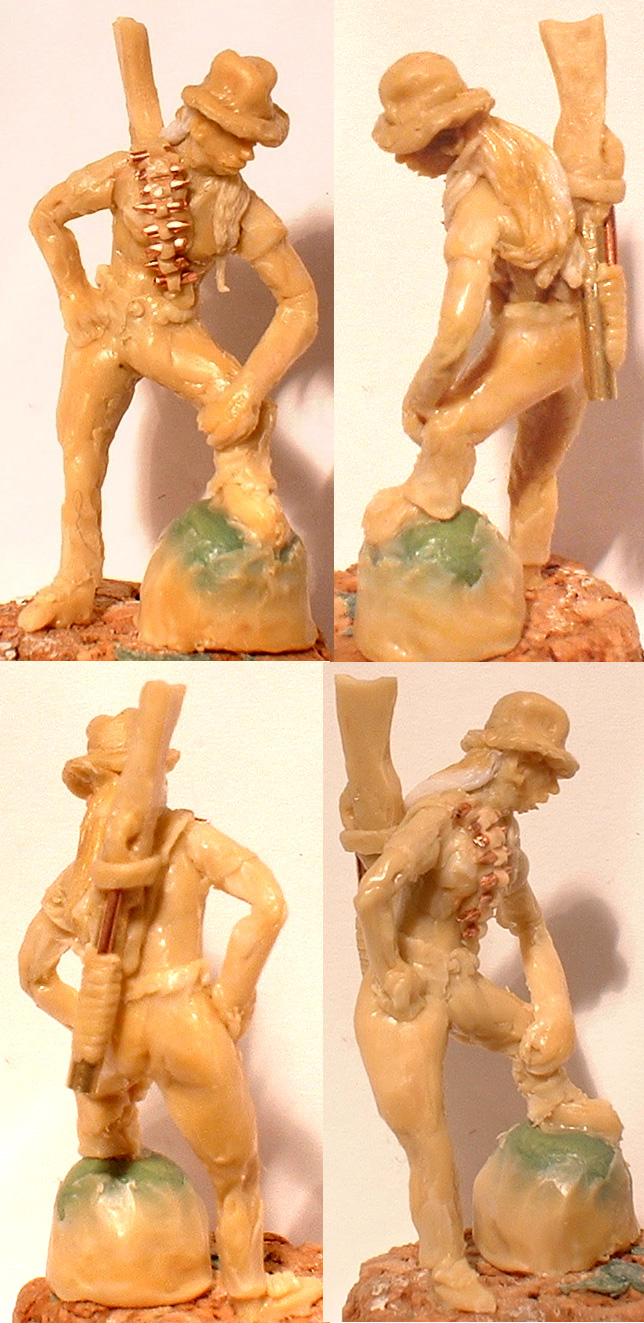
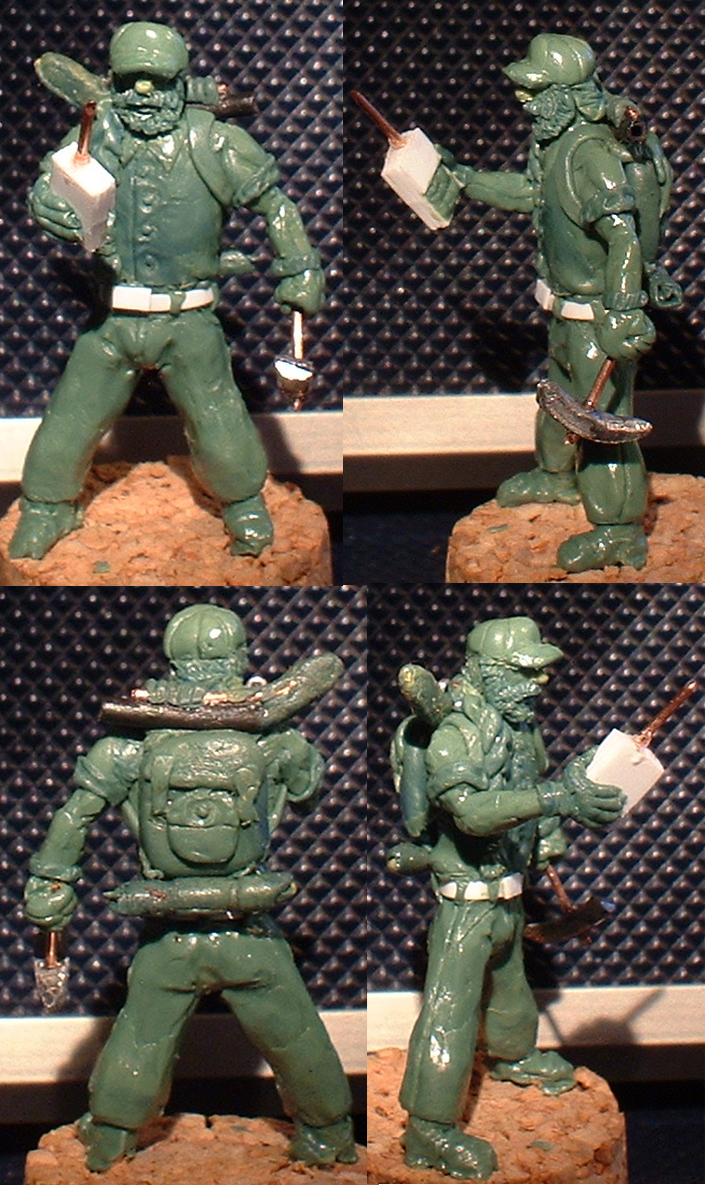
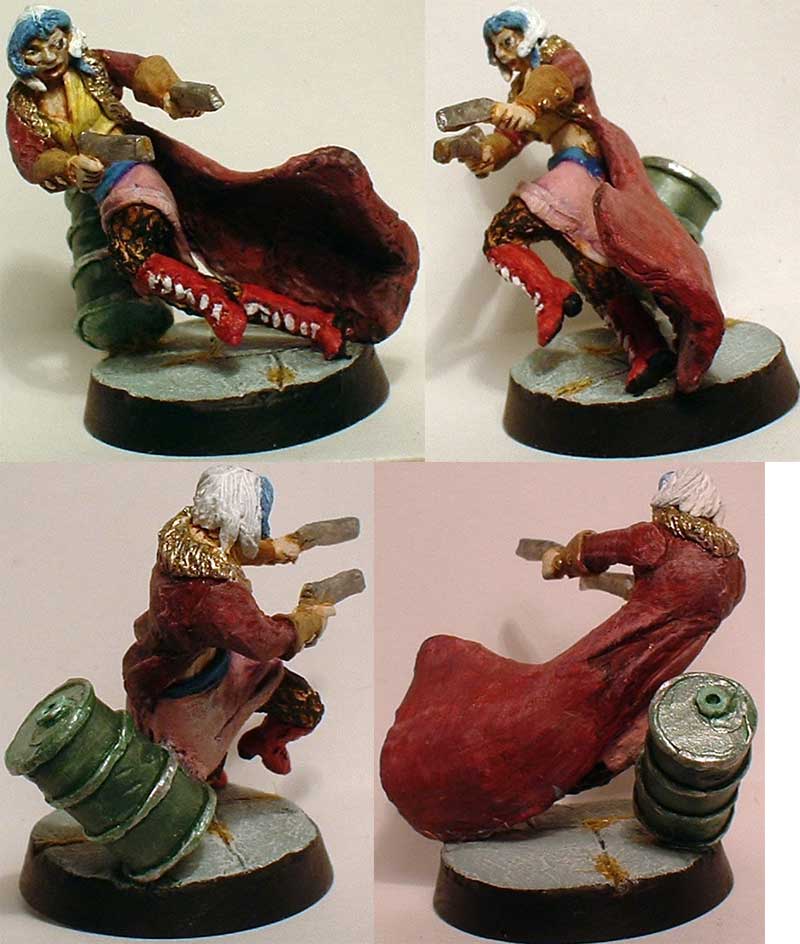
| Cowboy Bounty Hunter (sculpt) added Sep 23, 2005 | |
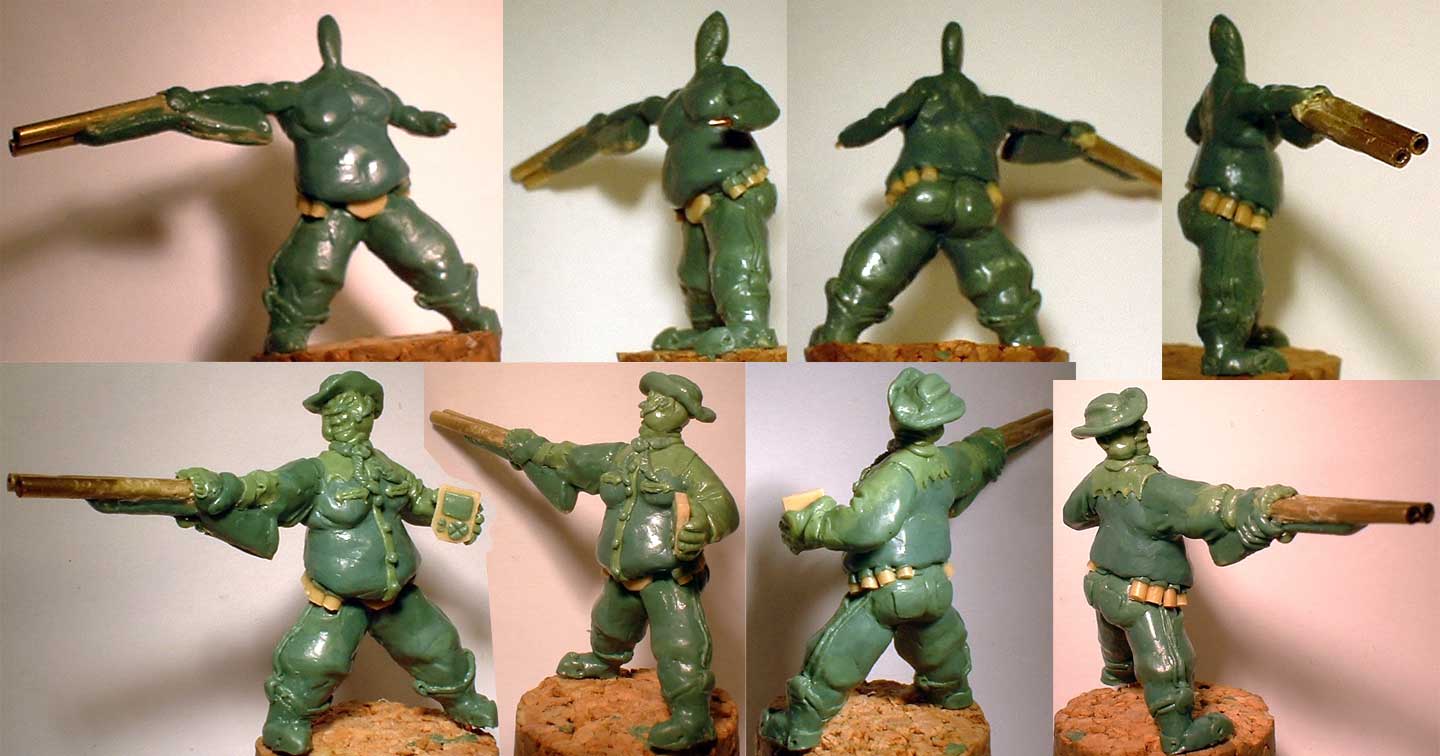 One of the things I wanted to do with this sculpt was to make use of the somewhat oversized shotgun I had built some time ago. Not only was this guy big enough to not be dwarfed by the shotgun, i decided that he was big enough to fire it one handed. Maybe not very realistic, but impressive. To accomodate the giant gun, i had to give him very large hands, but they didn't seem too out of line with the rest of his body. I added to the body one roll and fold at a time, and I must say I'm quite pleased with the final shape. I did the same thing on the face, starting with a basic face mask built over the original stub, then adding chins and jowls until it looked right. One of the things I wanted to do with this sculpt was to make use of the somewhat oversized shotgun I had built some time ago. Not only was this guy big enough to not be dwarfed by the shotgun, i decided that he was big enough to fire it one handed. Maybe not very realistic, but impressive. To accomodate the giant gun, i had to give him very large hands, but they didn't seem too out of line with the rest of his body. I added to the body one roll and fold at a time, and I must say I'm quite pleased with the final shape. I did the same thing on the face, starting with a basic face mask built over the original stub, then adding chins and jowls until it looked right.
This is the first mini I've done since i got my new supply of green stuff, and I must say it's a superior product for general sculpting. I still used milliput for the basic body shape, and beige putty for some of the mechanical accessories, but for the most part he's all GS. After reading the discussions on the Yahoo sculpting list about the different properties of various proportions of blue to yellow, I decided to experiment with them (sometimes by accident). You can see that many of the details on the shirt have a higher yellow content, and they were indeed much easier to shape. For once I find myself looking at the finished sculpt and not just hoping that it will look better when it's painted. Part of that I think is that the green putty is less translucent than the beige, and its opacity and color makes it easier to see details on the sculpt. Mostly, however, I think the more rubbery nature of gs makes it easier to make smoother shapes with less effort. |
|
| category: /other | permanent link | |
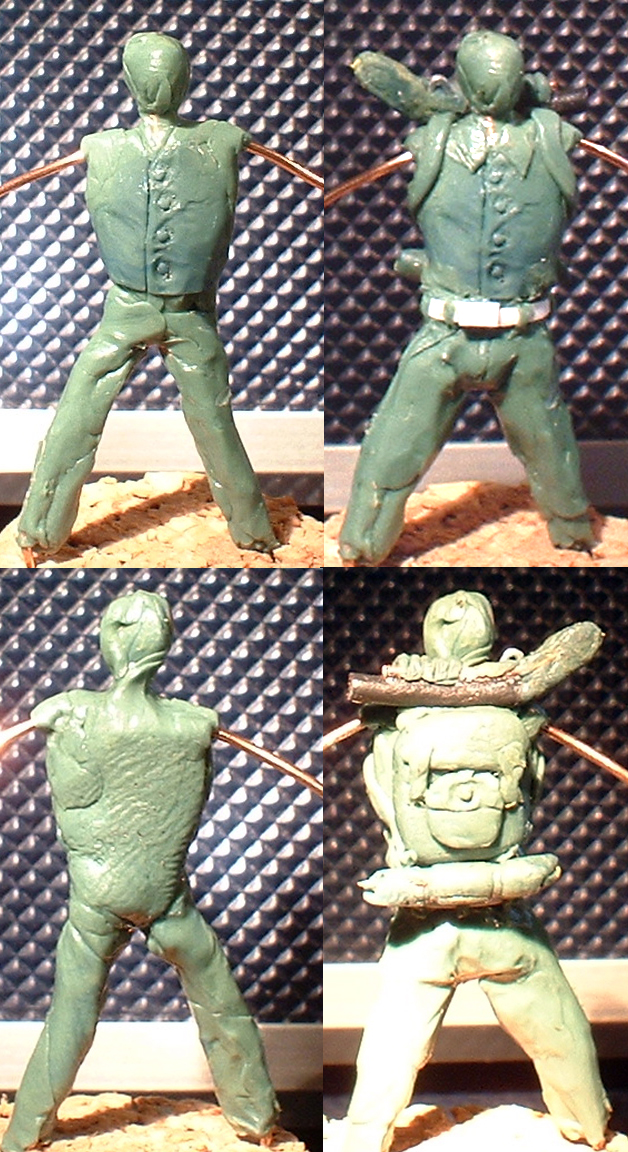
| Cowboy Bounty Hunter (sculpt) added Sep 23, 2005 | |
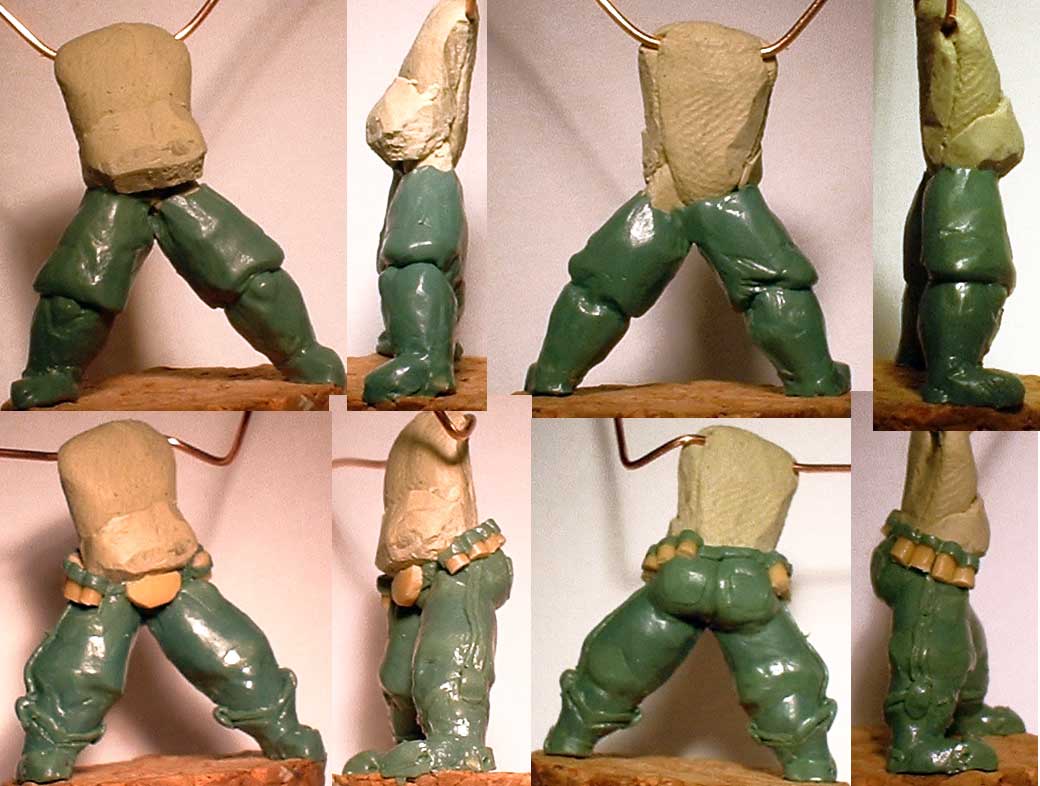 I was trying to come up with a subject for my next sculpt, and kept drawing a blank. I didn't have any specific characters that I needed, and no new exciting poses really jumped out at me. One of the things that has bothered me about my sculpts so far is the somewhat rigid and boring anatomy that my sculpts have ended up with. they're fairly conservative and realistic in proportion, which isn't really the norm for miniatures in this scale. I decided to try something to expand my anatomical horizons. I was trying to come up with a subject for my next sculpt, and kept drawing a blank. I didn't have any specific characters that I needed, and no new exciting poses really jumped out at me. One of the things that has bothered me about my sculpts so far is the somewhat rigid and boring anatomy that my sculpts have ended up with. they're fairly conservative and realistic in proportion, which isn't really the norm for miniatures in this scale. I decided to try something to expand my anatomical horizons.
I was looking for reference images for extremely fat men on the internet, and found it surprisingly difficult. I ended up going more or less from memory. I started from the feet up again, which seemed to work well last time. I flashed out the legs until they looked right, even though many of the folds and details would be covered by clothing. I wanted to make sure the clothing would drape believably over the underlying body. In this case, I also had to do all the belt details before working on the torso, as the belly would have to partially obscure those details later. I wasn't sure exactly what sort of person this guy was going to be when I first started doing the design sketch, but somewhere along the way it struck me to dress him up in western-style clothing. you can see the detailing on the boots in these pictures, though the upper body proved to be even more fun to do. |
|
| category: /other | permanent link | |
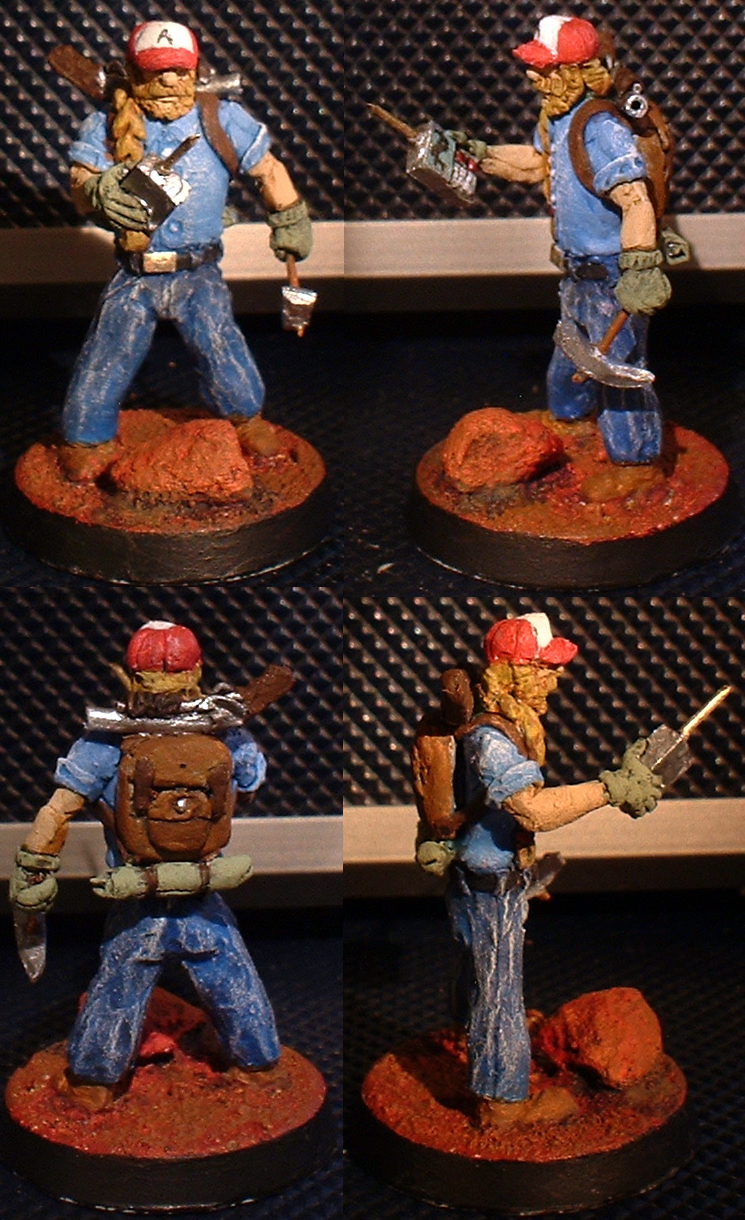
| Cowboy Bounty Hunter (final) added Sep 23, 2005 | |
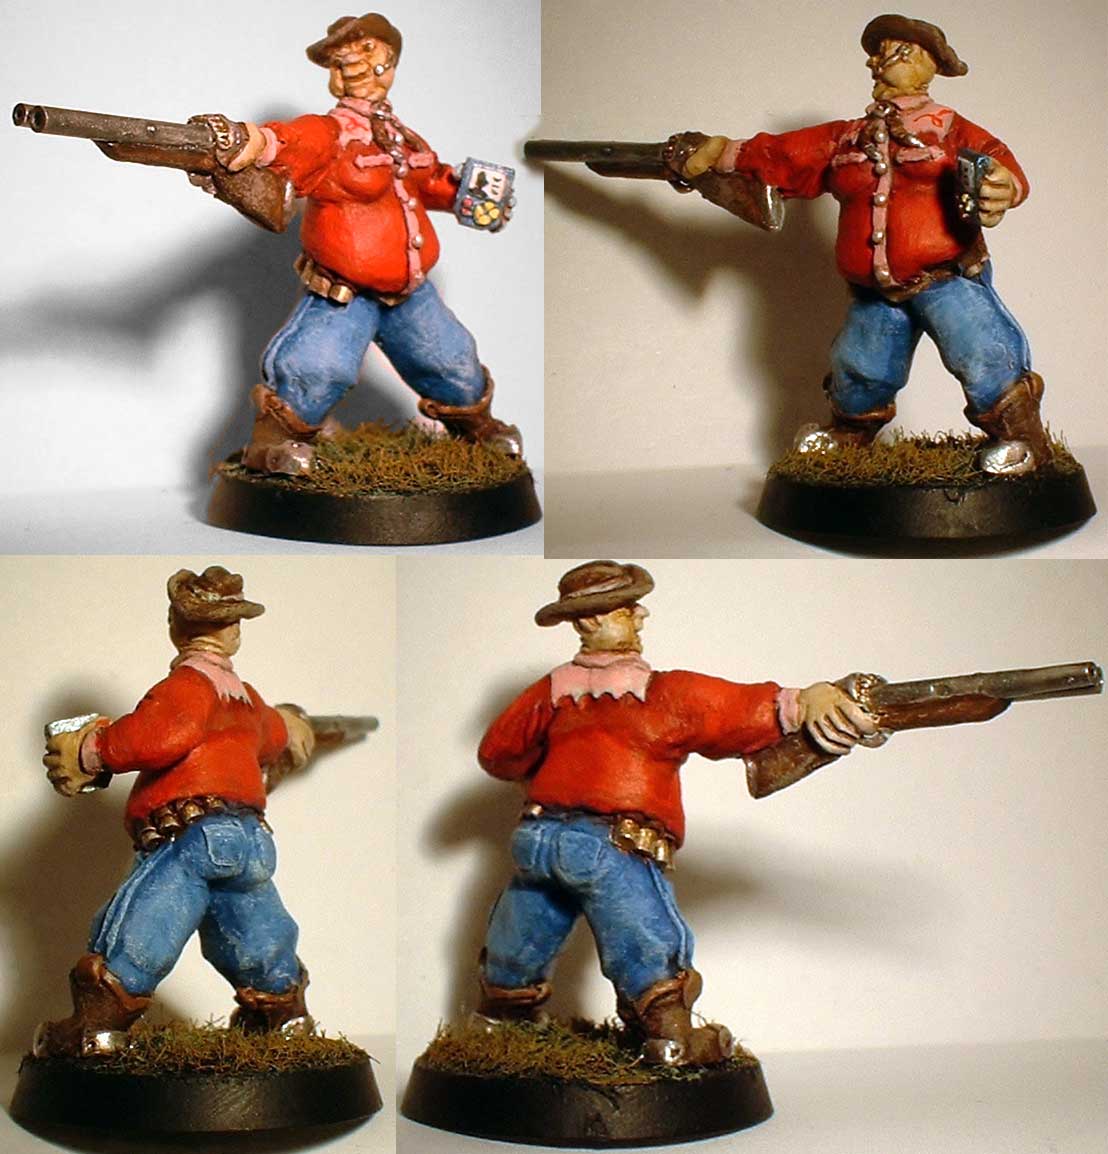 I'm really pleased with the way this one turned out. Smooth surfaces are a lot more enjoyable to paint than uneven ones. I'm really pleased with the way this one turned out. Smooth surfaces are a lot more enjoyable to paint than uneven ones.
|
|
| category: /other | permanent link | |
| Warrior In Blue And White added Sep 23, 2005 | |
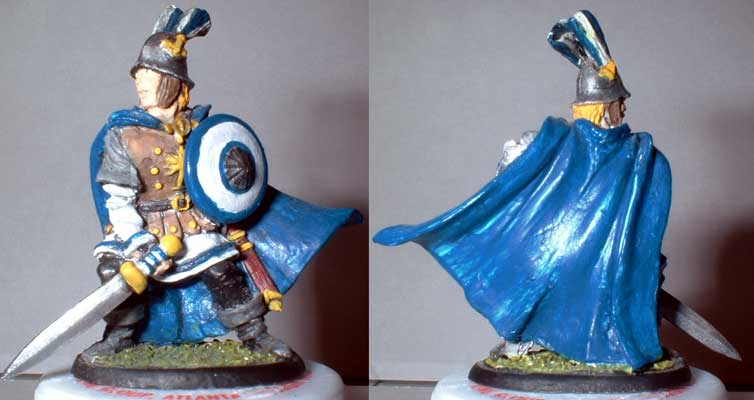 This is from the old Mithril line of LotR minis. I don't know if anyone is still producing them, but they were awfully pretty and came pre-primed. This is his second paint job. This is from the old Mithril line of LotR minis. I don't know if anyone is still producing them, but they were awfully pretty and came pre-primed. This is his second paint job.
|
|
| category: /other | permanent link | |
| Belter (sculpt) added Sep 23, 2005 | |
 The finished sculpt (the hole in the left hand was fixed after these pictures were taken). I'm pretty happy with how this one has turned out. The finished sculpt (the hole in the left hand was fixed after these pictures were taken). I'm pretty happy with how this one has turned out.
|
|
| category: /other | permanent link | |
| Belter (sculpt) added Sep 23, 2005 | |
 This is my first commissioned sculpt. Not much exciting at this point. This is my first commissioned sculpt. Not much exciting at this point.
|
|
| category: /other | permanent link | |
| Belter (final) added Sep 23, 2005 | |
 The painted belter sculpt. Aside from being a little flatter-chested than I would have liked, I'm pleased with it. The painted belter sculpt. Aside from being a little flatter-chested than I would have liked, I'm pleased with it.
|
|
| category: /other | permanent link | |
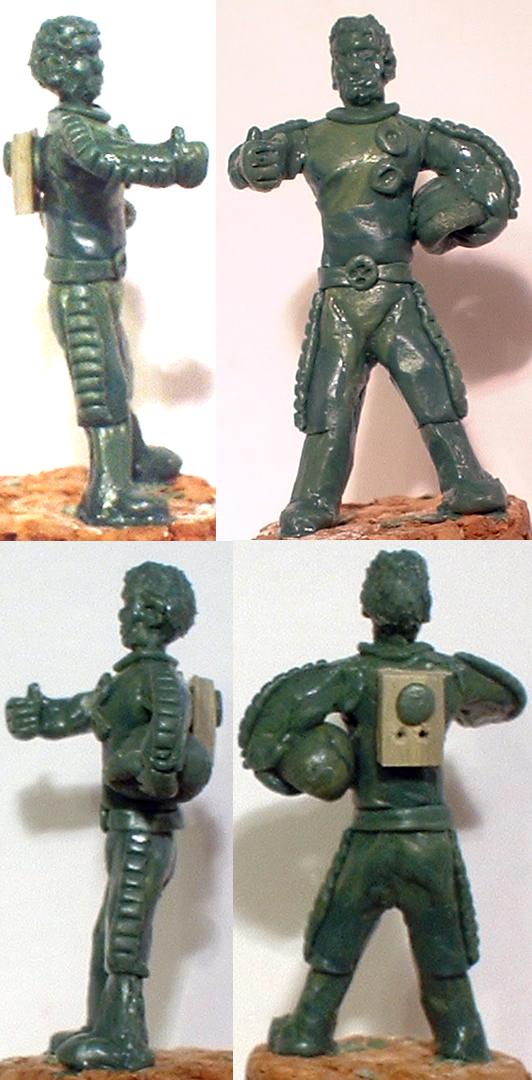
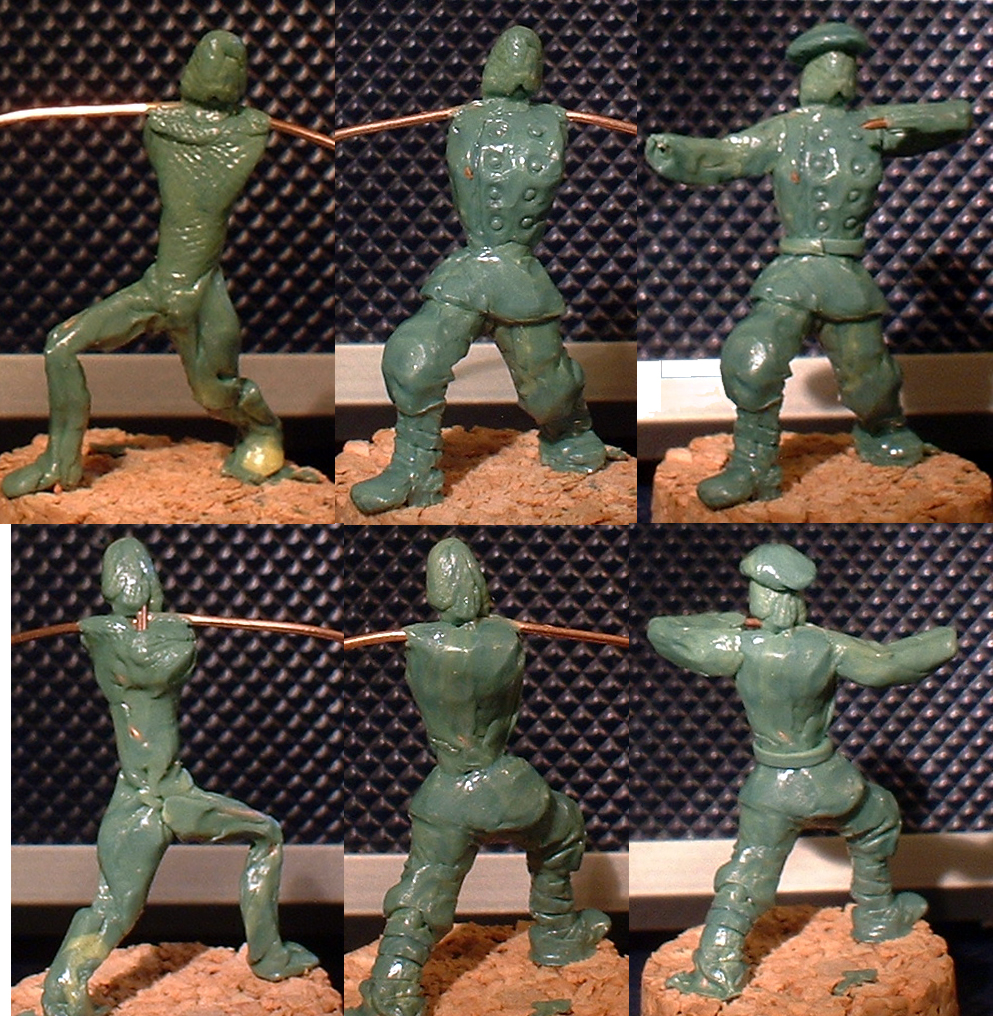
| Imperial Battle Dress (sculpt) added Sep 23, 2005 | |
 Many stages came between the last pictures and these. I'm pretty pleased with the final product. It's not the most striking design, but it seems at least plausible. Many stages came between the last pictures and these. I'm pretty pleased with the final product. It's not the most striking design, but it seems at least plausible.
|
|
| category: /other | permanent link | |
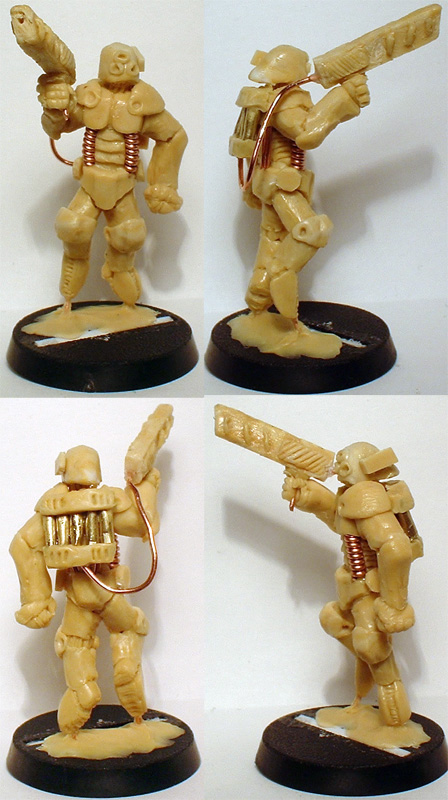
| Imperial Battle Dress (sculpt) added Sep 23, 2005 | |
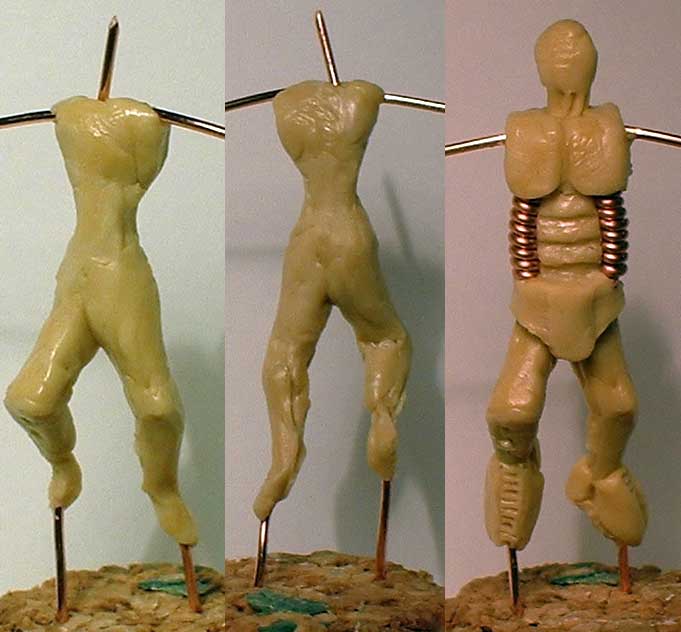 I've finished all the sculpts that I really wanted to get done, so now I'm looking for new things to try. I decided to try sculpting someone in battle dress (powered armor), which I really haven't done before. I decided to start with a good body shape, so I could fit the armor in a plausible way around it. Even though it was all going to get covered up, I tried to get the base body as smooth and well-formed as I could. Once it was well-cured, I started adding bits of armor. The "muscles" in the abdomen are copper wire coiled around a wire core, and went on first so I could cover the clipped ends with other armor pieces. I'm going to let this stage cure for a good long while before I start the next phase. Eventually I'll come back and try to sharpen up the edges, though the Tamiya putty holds a fairly good edge to begin with. I've finished all the sculpts that I really wanted to get done, so now I'm looking for new things to try. I decided to try sculpting someone in battle dress (powered armor), which I really haven't done before. I decided to start with a good body shape, so I could fit the armor in a plausible way around it. Even though it was all going to get covered up, I tried to get the base body as smooth and well-formed as I could. Once it was well-cured, I started adding bits of armor. The "muscles" in the abdomen are copper wire coiled around a wire core, and went on first so I could cover the clipped ends with other armor pieces. I'm going to let this stage cure for a good long while before I start the next phase. Eventually I'll come back and try to sharpen up the edges, though the Tamiya putty holds a fairly good edge to begin with.
|
|
| category: /other | permanent link | |
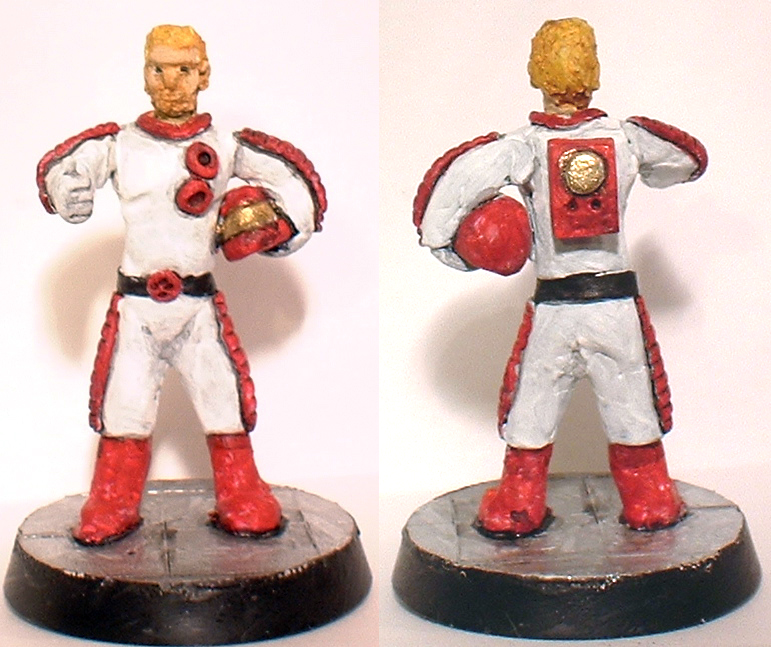
| Imperial Battle Dress (final) added Sep 23, 2005 | |
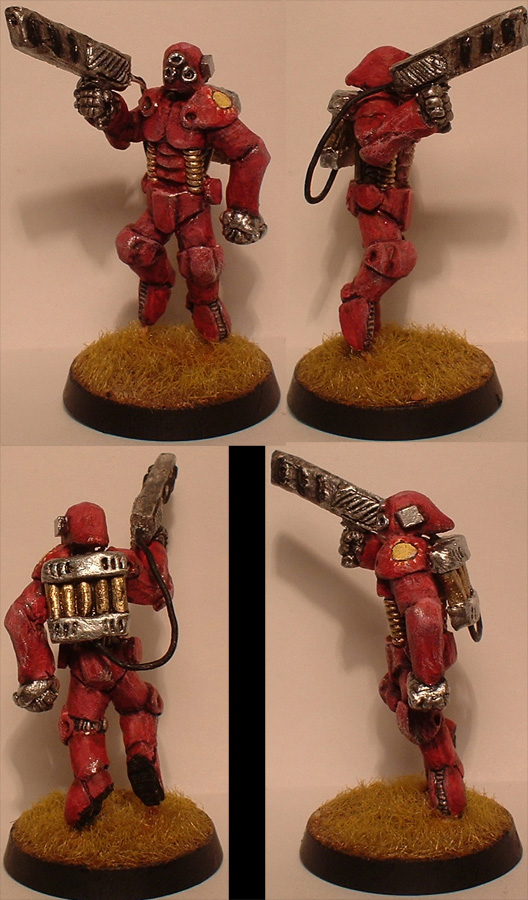 I'm much happier with the static grass this time around. I mixed some brown paint into the white glue before applying it to the base, so that I didn't have to try to paint the base through the grass. There is a little bit of rock and sand scattered under the grass, and a little bit of dry brushing with yellow on top. The mini itslef is painted fairly simply, and the "floating" effect works quite well, I think. I'm much happier with the static grass this time around. I mixed some brown paint into the white glue before applying it to the base, so that I didn't have to try to paint the base through the grass. There is a little bit of rock and sand scattered under the grass, and a little bit of dry brushing with yellow on top. The mini itslef is painted fairly simply, and the "floating" effect works quite well, I think.
|
|
| category: /other | permanent link | |
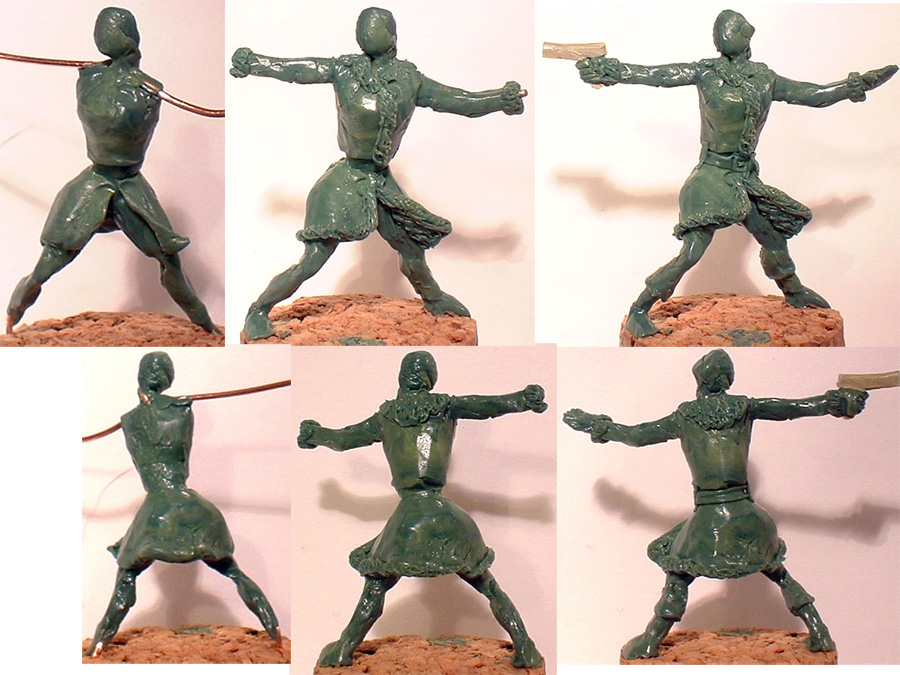
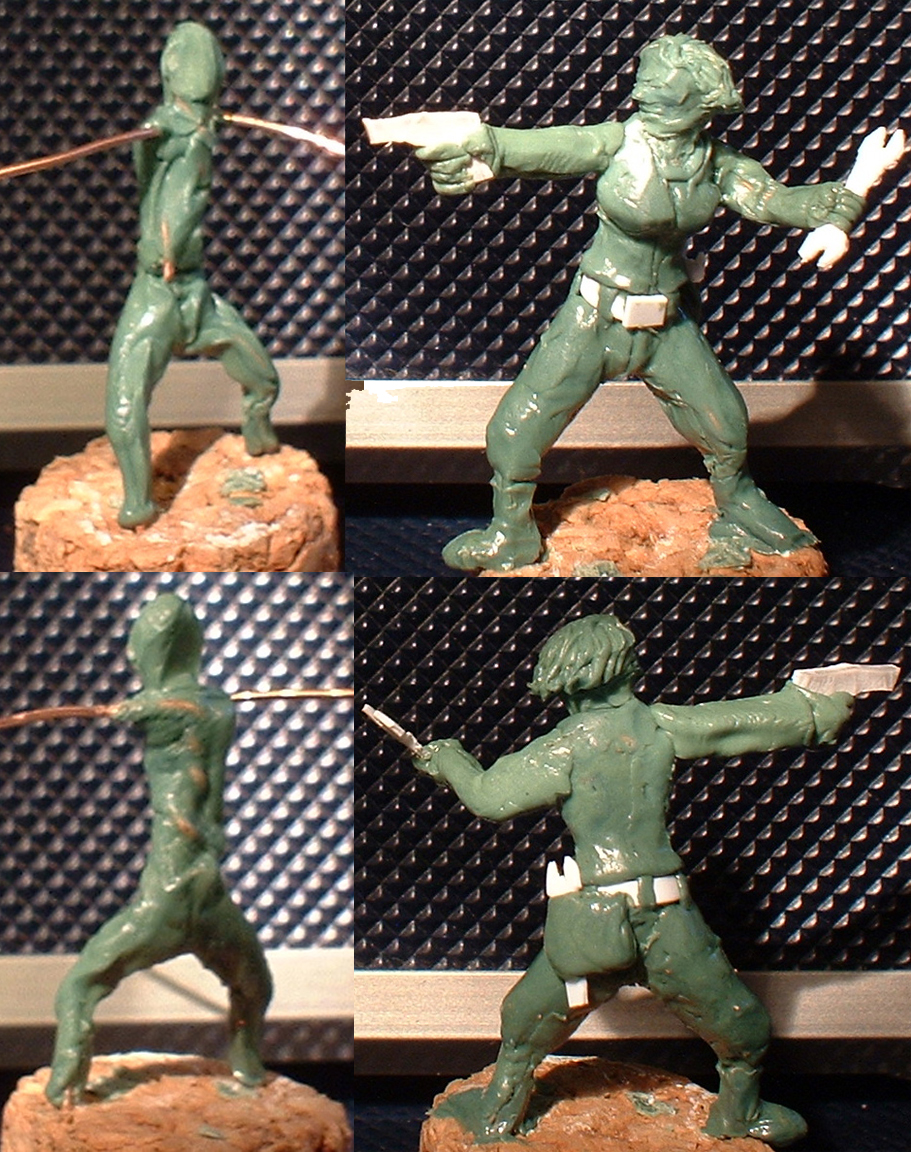
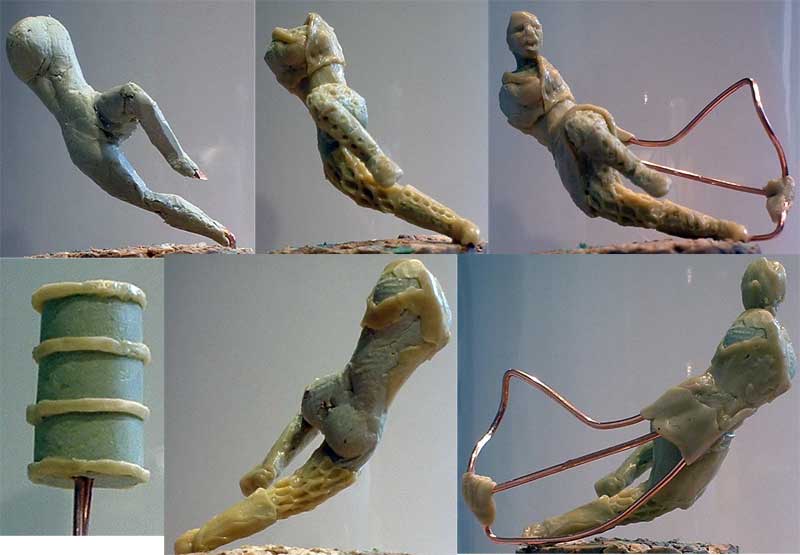
| Woman With Two Guns (sculpt) added Sep 23, 2005 | |
 Here you can see many of the final details. I didn't take any other minis along for scale reference, and as a result she turned out a little to the Amazonian side. With the extreme pose, it's not too obvious how much bigger she is than her peers. I tried attaching the barrel to her hip with just putty, but I ended up having to drill and pin the joint. It turned out to be a very sturdy construction, though I don't think it would be easy to cast without taking off at least one arm and/or leg. Here you can see many of the final details. I didn't take any other minis along for scale reference, and as a result she turned out a little to the Amazonian side. With the extreme pose, it's not too obvious how much bigger she is than her peers. I tried attaching the barrel to her hip with just putty, but I ended up having to drill and pin the joint. It turned out to be a very sturdy construction, though I don't think it would be easy to cast without taking off at least one arm and/or leg.
|
|
| category: /other | permanent link | |
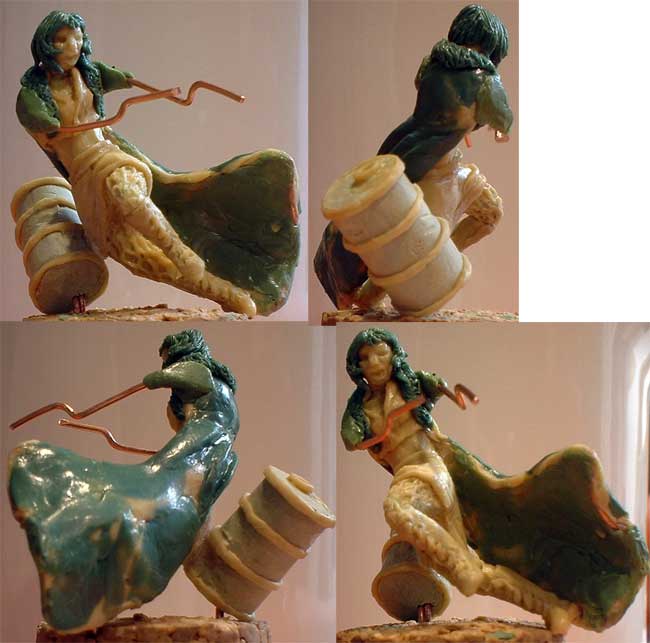
| Woman With Two Guns (sculpt) added Sep 23, 2005 | |
 This sculpt was inspired by some recent discussion in various message boards on the relative popularity of dynamic and static poses. Most of the sculpts I've done so far have been pretty square, so I decided to go for a very dramatic pose with this one. I also wanted to take more time and try to achieve a better finished product. I think I achieved the first goal better than the second, but I'm still pretty happy with it. This sculpt was inspired by some recent discussion in various message boards on the relative popularity of dynamic and static poses. Most of the sculpts I've done so far have been pretty square, so I decided to go for a very dramatic pose with this one. I also wanted to take more time and try to achieve a better finished product. I think I achieved the first goal better than the second, but I'm still pretty happy with it.
I ended up using quite a few different types of putty for this one. I did the initial rough body shape with milliput, then added the base details with Tamiya putty. The final details (which appear in the next set of pictures) were done with some of my very small remaining supply of green stuff. The sculpt ended up pretty close to my original sketch. I made sure to run the armatures for the arms all the way out through the hands and guns, to avoid the problems I've had with weakness in those areas. I built a wire armature for the coat, which was attached by drilling holes in the lower back. It was the first time I'd used an armature for a flowing garment, and I was pretty pleased with how it turned out. |
|
| category: /other | permanent link | |
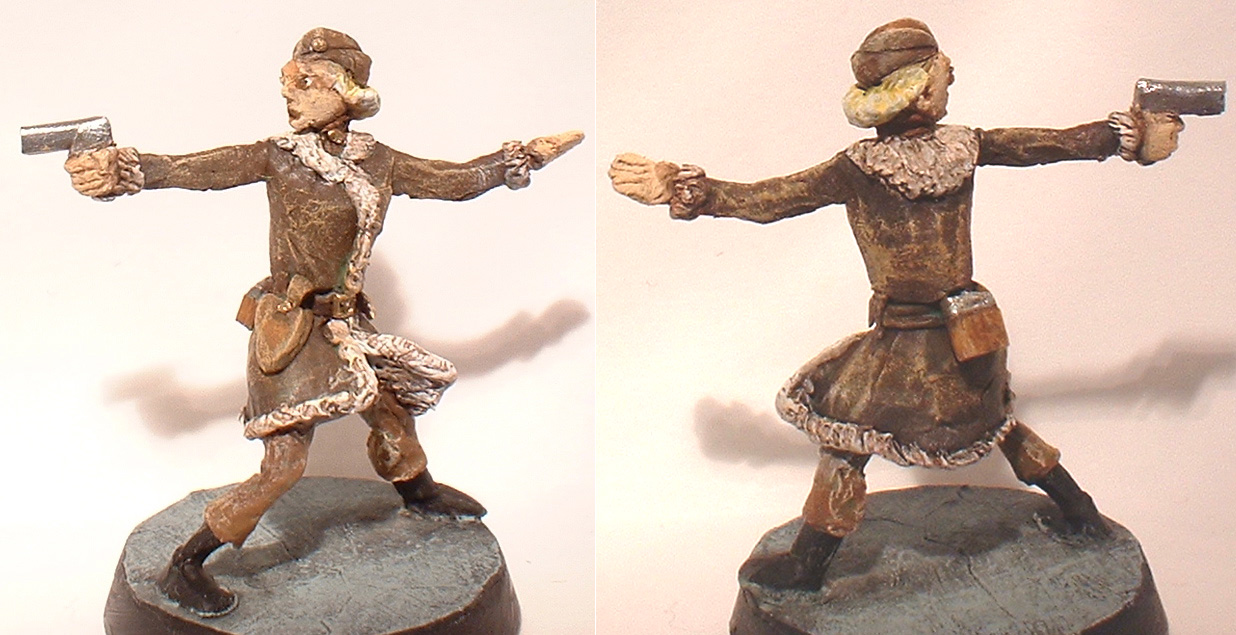
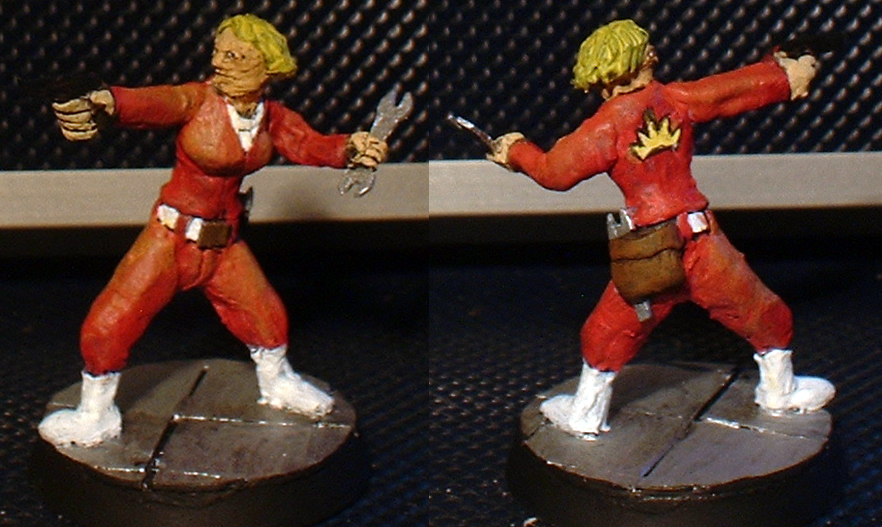
| Woman With Two Guns (final) added Sep 23, 2005 | |
|
|
| category: /other | permanent link | |