Ben's Miniature Gallery
This is a gallery of my painted miniatures. Feel free to email me with any comments or questions.
Categories:
| Three Stage Elven Fighter-Mage added Sep 23, 2005 | |
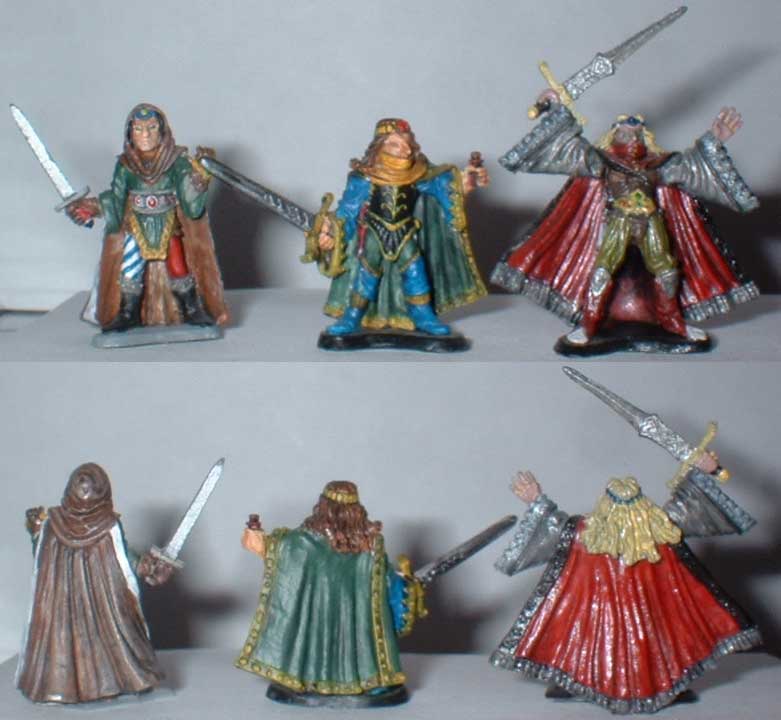 Only the low-level version has ever gotten any use, but he's infuriatingly unstable. I actually had to tape him down to get this picture. If I were painting these now I would definitely rebuild the bases. Only the low-level version has ever gotten any use, but he's infuriatingly unstable. I actually had to tape him down to get this picture. If I were painting these now I would definitely rebuild the bases.
|
|
| category: /ral_partha | permanent link | |
| Three Orcs added Sep 23, 2005 | |
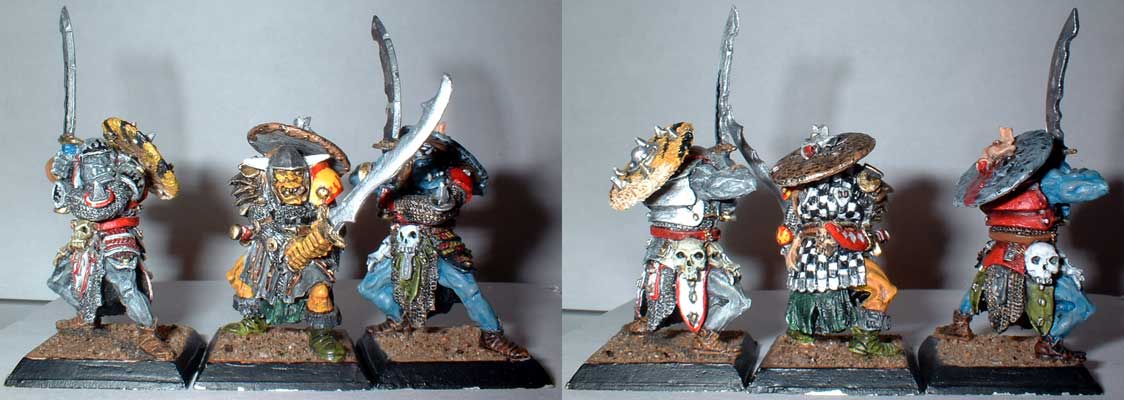 I picked these orcs up from a bin of old Ral Partha minis. I needed to update my rather frumpy orc population. I am a firm believer in multi-colored orcs. I also support the decorative nailing of hands to shields. I picked these orcs up from a bin of old Ral Partha minis. I needed to update my rather frumpy orc population. I am a firm believer in multi-colored orcs. I also support the decorative nailing of hands to shields.
|
|
| category: /ral_partha | permanent link | |
| New Photography Rig added Sep 23, 2005 | |
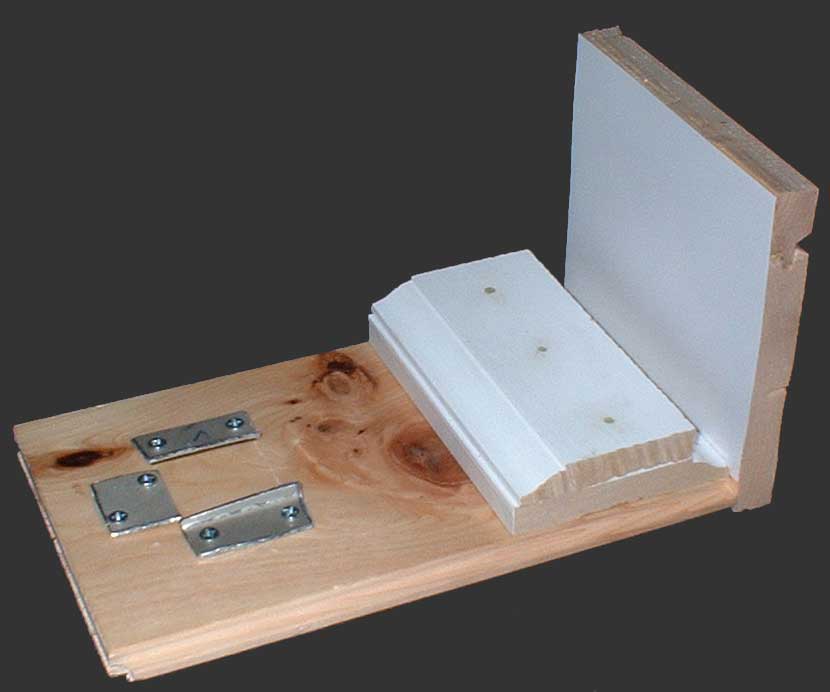 Recently, I've been taking pictures using my digital camera (Fuji FinePix A201), mounted on a tripod. The minis have been staged on a piece of styrofoam covered with paper and set on top of some boxes. While more or less functional, it far from ideal. I had to use the timer to keep from moving the camera when I pushed the button, I had to guess at the right dinstance to keep the subject in focus using macro mode, and the narrow stage was hard to fit larger minis on. Also, the whole arrangement was ugly and took up a lot of space. Recently, I've been taking pictures using my digital camera (Fuji FinePix A201), mounted on a tripod. The minis have been staged on a piece of styrofoam covered with paper and set on top of some boxes. While more or less functional, it far from ideal. I had to use the timer to keep from moving the camera when I pushed the button, I had to guess at the right dinstance to keep the subject in focus using macro mode, and the narrow stage was hard to fit larger minis on. Also, the whole arrangement was ugly and took up a lot of space.
I started toying with the idea today of building a mount for the camera that would allow me to take more consistent pictures. First, I found a copy of the camera manual and noted the optimum focal distance for the macro zoom (8-13cm). After some rough patterning, I fished out some scrap pieces of pine flooring and marked out where the camera and stage needed to be to maintain the proper distance. I kept the camera mounted on the quick release plate from the tripod, and fabricated a bracket on the rig with a few bits of aluminum sheet. I screwed another piece of flooring on the rear of the rig to serve as a backdrop, and glued a piece of styrene sheet to that to provide a neutral white background. I did a couple of test shots to find the right height for the stage (1", more or less), then scrounged up a couple bits of MDF baseboard. Since it was already conveniently painted white, All I had to do was cut them to the right size and nail them down. I filled the nail holes with a little milliput, which I may go back and paint over later. For now it provides a good marker for the center of the stage. The flat area at the top of the stage marks the limits of the focal range of the camera. I'm still fiddling around with lighting techniques that don't involve holding a light with my other hand, but hopefully this setup will allow me to take some better pictures from here on out. |
|
| category: | permanent link | |
| Evil Woman With Skull Helmet added Sep 23, 2005 | |
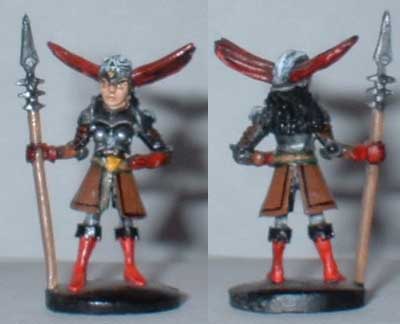 I searched long and hard for a mini to portray an insane cleric of mine. This Rafm mini fit the bill, except for the fact that it fell vistim to the old bikini = armor fallacy. I ended up building her a nice leather skirt out of paper stiffened with superglue. Her left hand was also holding the top of a shield, which I cut away. Then I cut out the inside of her elbowso I could reposition the hand on her hip. In the end I was very happy with the conversion, even though I think I only got to play the character twice. I searched long and hard for a mini to portray an insane cleric of mine. This Rafm mini fit the bill, except for the fact that it fell vistim to the old bikini = armor fallacy. I ended up building her a nice leather skirt out of paper stiffened with superglue. Her left hand was also holding the top of a shield, which I cut away. Then I cut out the inside of her elbowso I could reposition the hand on her hip. In the end I was very happy with the conversion, even though I think I only got to play the character twice.
|
|
| category: /other | permanent link | |
| Vargr Traveller (sculpt) added Sep 23, 2005 | |
 One of the players for the traveller gameis likely goingto be making a Vargr. rather than kill myself trying to find or convert an appropriate mini, I decided to break out the green stuff again. My previous sculpts ended up a little larger than I would have liked, so I made a conscious effort to keep this guy small. Vargr are supposed to be slightly smaller than humans, and this miniwinds up about half a head taller than the 25mm West end Star Wars minis, and about half a head shorter than the 28mm GW Cadians. I really prefer the 28mm scale for painting, so he hit just the right height. One of the players for the traveller gameis likely goingto be making a Vargr. rather than kill myself trying to find or convert an appropriate mini, I decided to break out the green stuff again. My previous sculpts ended up a little larger than I would have liked, so I made a conscious effort to keep this guy small. Vargr are supposed to be slightly smaller than humans, and this miniwinds up about half a head taller than the 25mm West end Star Wars minis, and about half a head shorter than the 28mm GW Cadians. I really prefer the 28mm scale for painting, so he hit just the right height.
There's still some roughness to my sculpts, but overall I think he turned out pretty nice. No fingerprints, fairly smooth on all the large surfaces. When I started putting on the clothes, I realized that the tail was emerging way too low. It was built on a wire that goes all the way through the torso and also forms the base of the head. I carefully snipped the tail off at the base, shaved of a little putty to give me a small piece of bare wire, and reinserted it at a better spot. I was worried that it would be weak, but it seems to have turned out sturdy enough. The character is probably going to be a merchant/diplomat type, so I only gave him a little pistol to defend himself with. I cut and shaved bits of plastic from a leftover sprue, and I think it helps to give some clean lines to balance out the organic look of all the putty. the epaulets and belt were thin shavings, while the pistol body is a solid chunk. There were a few more bits of putty added after the last picture in this series was taken, mostly finishing the boots and filling out the right leg. |
|
| category: /other | permanent link | |
| Twi'lek Slicer (part 3) added Sep 23, 2005 | |
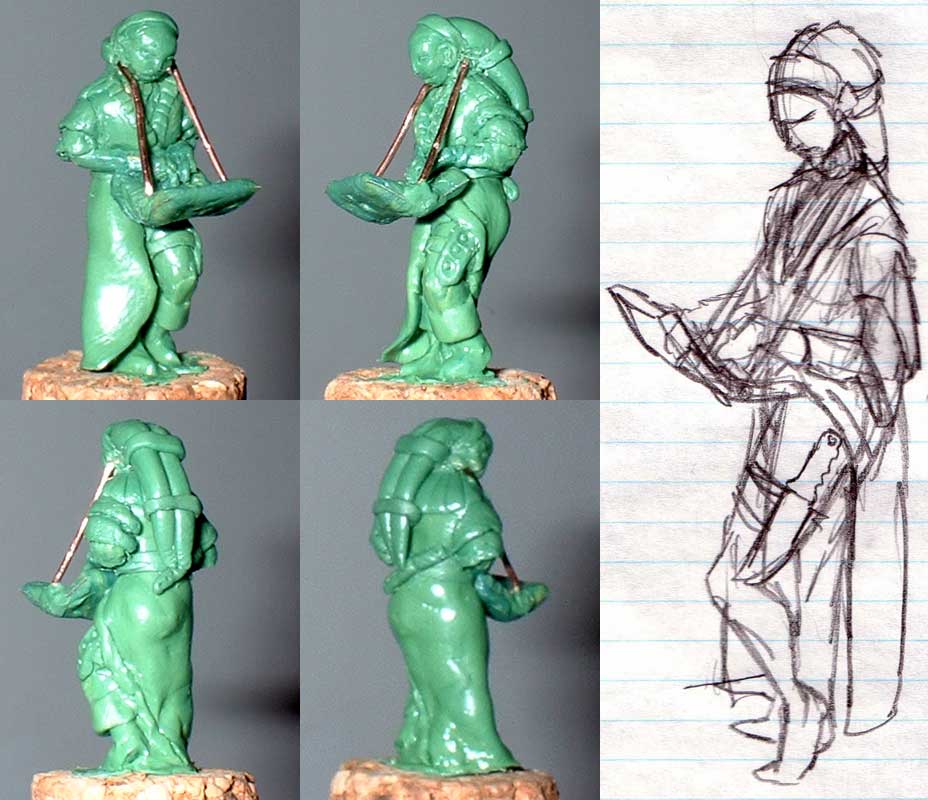 First, I put on a base layer of putty on the arms, and sculpted the hands. I was pretty happy with the way the hands turned out; I'll try to get a better picture of them once it's all painted. First, I put on a base layer of putty on the arms, and sculpted the hands. I was pretty happy with the way the hands turned out; I'll try to get a better picture of them once it's all painted.
I also built the computer at this point. I wanted it to be sturdy and maintain its shape, so I cut a piece out of a soda can and bent it into the basic shape. I covered it with putty and engraved a screen and keyboard on it. There is also a certain fruit-shaped logo on the lid.I added the sleeves of the coat at this point, built up out of separate pieces layered on top of each other. I should have done these last, as they ended up getting smashed and rebuilt many times. The hardest part of this stage was getting the strap attached to the computer. I started with copper wire that I had flattened with a hammer, but it ended up being too inflexible. Also, a flat strap required more work to make it look natural. I scrapped that plan and used round wire instead. It's not perfect, but it gets the job done. I imagine it'll look better painted. The head areas was cured enough that I had to drill a hole for the strap. Once I got all the strap pieces in place, I added more putty to secure them in place and fill the holes that had been created. I've included the original design sketch. I think I ended up pretty close to my plan. |
|
| category: /other | permanent link | |
| Vargr Traveller (final) added Sep 23, 2005 | |
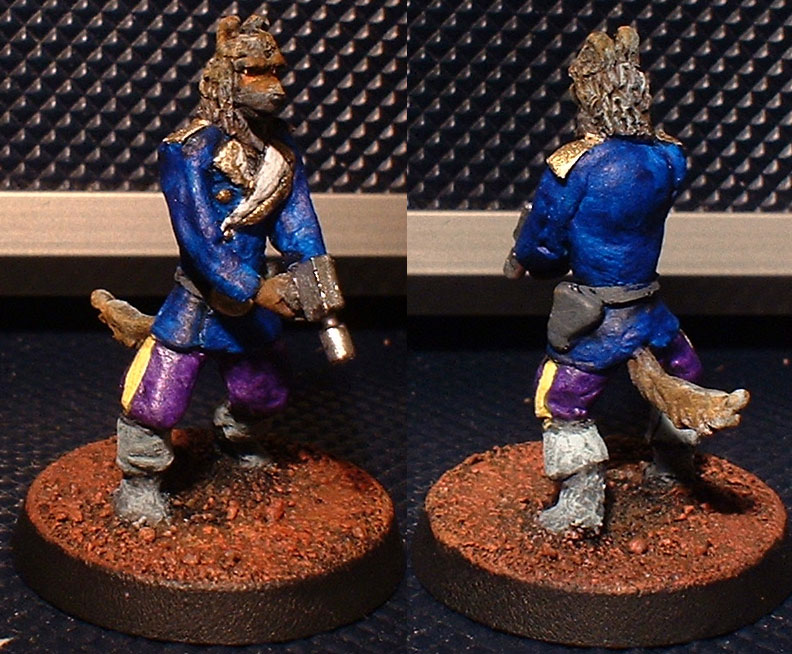 The outfit was somewhat inspired by the Vargr on the cover of the T20 book, so I kept fairly close to that color scheme. Vargr are generally flamboyant, so I felt pretty comfortable using some vibrant colors. I'm quite pleased with how the fur turned out. It's certainly easier to sculpt than smooth skin. The outfit was somewhat inspired by the Vargr on the cover of the T20 book, so I kept fairly close to that color scheme. Vargr are generally flamboyant, so I felt pretty comfortable using some vibrant colors. I'm quite pleased with how the fur turned out. It's certainly easier to sculpt than smooth skin.
|
|
| category: /other | permanent link | |
| Twi'lek Slicer (part 2) added Sep 23, 2005 | |
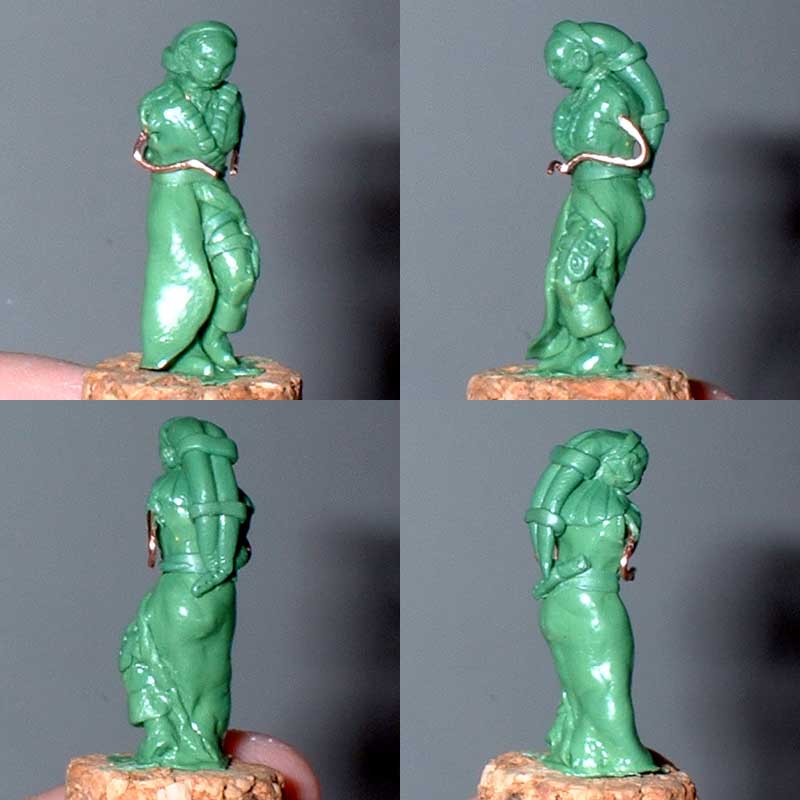 There were actually two stages completed before these pictures were taken. the first stage saw the addition of feet and some fleshing out of the legs. I also made the basic head shape, which I left flat on the back to receive the twi'lek head-tails later. There were actually two stages completed before these pictures were taken. the first stage saw the addition of feet and some fleshing out of the legs. I also made the basic head shape, which I left flat on the back to receive the twi'lek head-tails later.
Next, I made some flat sheets of putty and began applying them to form the trenchcoat. I didn't try to make exact shapes, since the putty is difficult to cut cleanly and tends to stretch out of shape easily anyway. I could have waited for the sheets to cure some, but instead I just worked with them in their initial soft form and let the coat grow organically. I started with a large triangular section that went down the back and around the straight right leg. It ended up with a curved hem, which I thought looked pretty neat. I trimmed the rest of the coat even with the ground. I added more small pieces, and ended up with the cross-over closure at the front more or less by accident. I turned back the collar there and added further pieces to conform to the style that had. I added a large collar at the back and the bottom portion that is falling back from her upraised leg. I wanted to have more leg exposed, but it just didn't happen that way. Finally, I used the edge of an x-acto knife to add the texture to the collar. This was the end of the first stage. After the head and coat had had time to cure, I went back and added the tops of the boots (I may have doone that just after adding the coat, I don't recall) I also added the knife sheath strapped to her leg. With the coat falling so low there, it's hard to figure out just what that is, so I added the belt with another knife at the small of her back. The character carries several knives, so it works. I put a fresh layer of putty on the face and worked it into the right shape. This face worked out much better than the last one. I'll probably try to add eyeballs in the empty sockets later, but I want to make sure the rest of the face is well cured before I start messing around with things like that. I added the head-tails and their bindings. Last, I shaped a couple of tiny blobs of putty into ears. The ruffly texture of the shirt wasn't really a design decision so much as an inability to get that area smooth after putting the coat on. There were some holes in the torso that needed to be filled, but I couldn't get the right tool in there without messing up the coat. In the end, I just rouched it up and called it fashion. Finally, I bent the arms into position. There is going to be a computer hanging from a strap around her neck, propped up on her raised leg. I had orginally intended for the strap to actually go around her neck, but now that I look at the pictures there are going to be some head-tails in the way. I feel confident that I'll be able to improvise a solution. |
|
| category: /other | permanent link | |
| Twi'lek Slicer (part 1) added Sep 23, 2005 | |
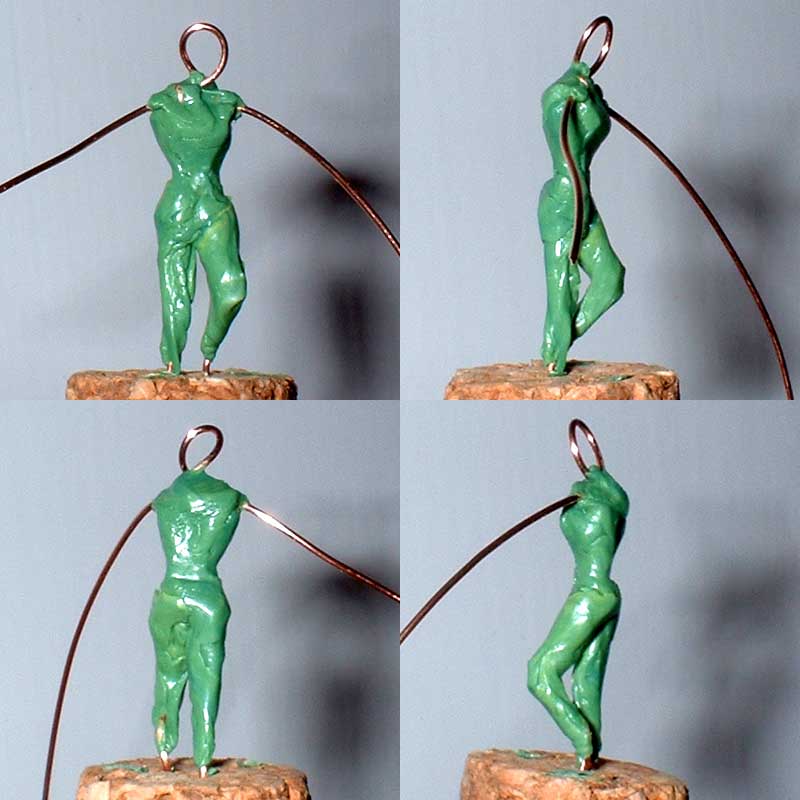 I'm hooked on this whole sculpting thing. The last character for our Star Wars game has finally been created, and she's a twi'lek slicer (computer hacker). I know there are some twi'lek minis to be had out there, but I'm 1) impatient and 2) looking for excuses to sculpt more. This time I did a concept drawing first, which I'll probably scan at the end. There wasn't too much that changed between my first idea and what got drawn, but it was good to have a concrete image to work from. I'm hooked on this whole sculpting thing. The last character for our Star Wars game has finally been created, and she's a twi'lek slicer (computer hacker). I know there are some twi'lek minis to be had out there, but I'm 1) impatient and 2) looking for excuses to sculpt more. This time I did a concept drawing first, which I'll probably scan at the end. There wasn't too much that changed between my first idea and what got drawn, but it was good to have a concrete image to work from.
As I did before, I started with the torso and legs, aiming for a generally female shape. I decided to hold off on the head entirely this time, after seeing what the last head went through during later stages. There's really not a whole lot to say at this point. |
|
| category: /other | permanent link | |
| Twi'lek Slicer (part 0) added Sep 23, 2005 | |
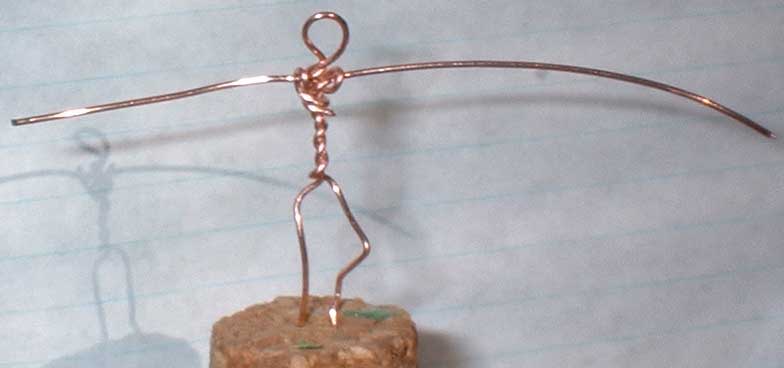 I decided to take a picture of the wire armature this time, just to show how I'm making it. This time the ends of the head loop are wrapped each once around the arm and once around the torso. It seems pretty sturdy. The arms are, of course, freakishly long. I decided to take a picture of the wire armature this time, just to show how I'm making it. This time the ends of the head loop are wrapped each once around the arm and once around the torso. It seems pretty sturdy. The arms are, of course, freakishly long.
The hardest part with this armature was getting it to be the right height. My first attempt looked pretty good until I compared it with the zabrak I'd sculpted earlier. The new armature was at least a head taller than the already-enormous zabrak, so I scrapped that one and started over. Even then I had to cut down the legs several times before I got the height right. |
|
| category: /other | permanent link | |