Ben's Miniature Gallery
This is a gallery of my painted miniatures. Feel free to email me with any comments or questions.
Categories:
| Woman With Two Guns (sculpt) added Sep 23, 2005 | |
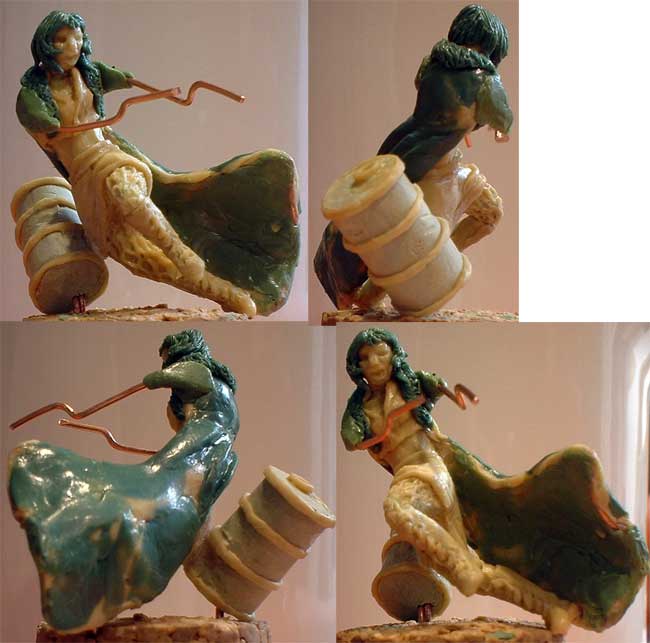 Here you can see many of the final details. I didn't take any other minis along for scale reference, and as a result she turned out a little to the Amazonian side. With the extreme pose, it's not too obvious how much bigger she is than her peers. I tried attaching the barrel to her hip with just putty, but I ended up having to drill and pin the joint. It turned out to be a very sturdy construction, though I don't think it would be easy to cast without taking off at least one arm and/or leg. Here you can see many of the final details. I didn't take any other minis along for scale reference, and as a result she turned out a little to the Amazonian side. With the extreme pose, it's not too obvious how much bigger she is than her peers. I tried attaching the barrel to her hip with just putty, but I ended up having to drill and pin the joint. It turned out to be a very sturdy construction, though I don't think it would be easy to cast without taking off at least one arm and/or leg.
|
|
| category: /other | permanent link | |
| Woman With Two Guns (sculpt) added Sep 23, 2005 | |
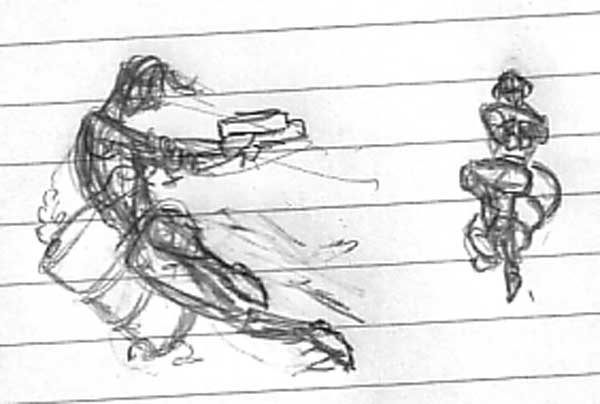
 This sculpt was inspired by some recent discussion in various message boards on the relative popularity of dynamic and static poses. Most of the sculpts I've done so far have been pretty square, so I decided to go for a very dramatic pose with this one. I also wanted to take more time and try to achieve a better finished product. I think I achieved the first goal better than the second, but I'm still pretty happy with it. This sculpt was inspired by some recent discussion in various message boards on the relative popularity of dynamic and static poses. Most of the sculpts I've done so far have been pretty square, so I decided to go for a very dramatic pose with this one. I also wanted to take more time and try to achieve a better finished product. I think I achieved the first goal better than the second, but I'm still pretty happy with it.
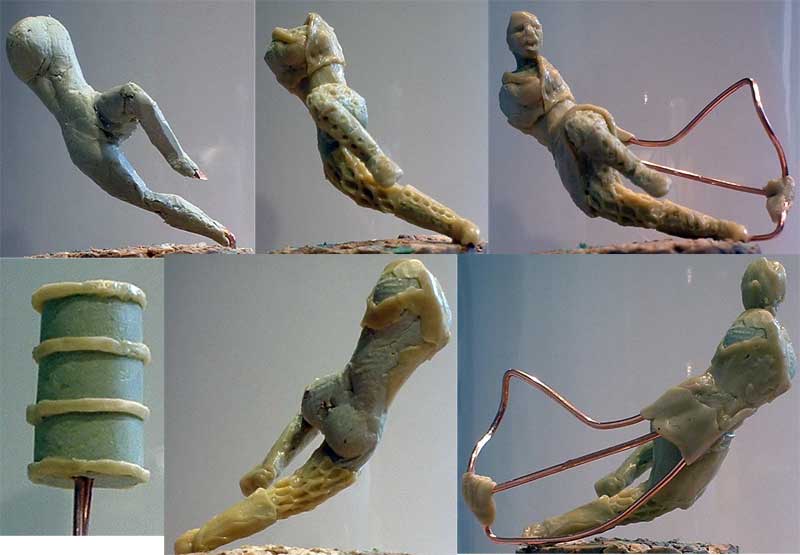
I ended up using quite a few different types of putty for this one. I did the initial rough body shape with milliput, then added the base details with Tamiya putty. The final details (which appear in the next set of pictures) were done with some of my very small remaining supply of green stuff. The sculpt ended up pretty close to my original sketch. I made sure to run the armatures for the arms all the way out through the hands and guns, to avoid the problems I've had with weakness in those areas. I built a wire armature for the coat, which was attached by drilling holes in the lower back. It was the first time I'd used an armature for a flowing garment, and I was pretty pleased with how it turned out. |
|
| category: /other | permanent link | |
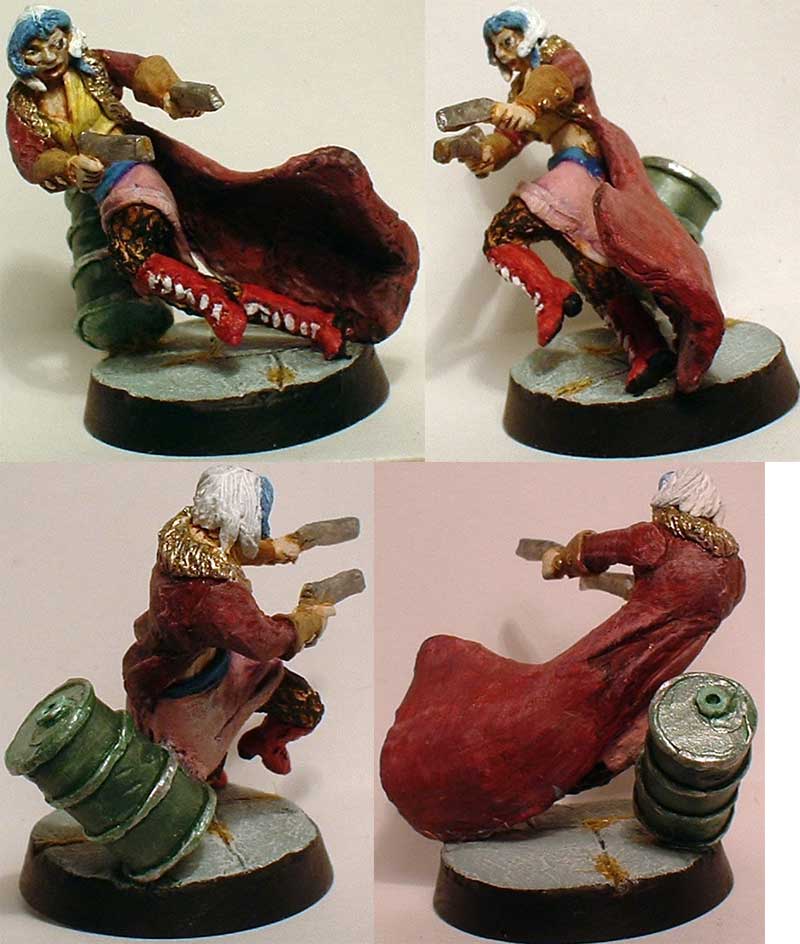
| Woman With Two Guns (final) added Sep 23, 2005 | |
|
|
| category: /other | permanent link | |
| Cadian Shock Troopers (Red Squad) added Sep 23, 2005 | |
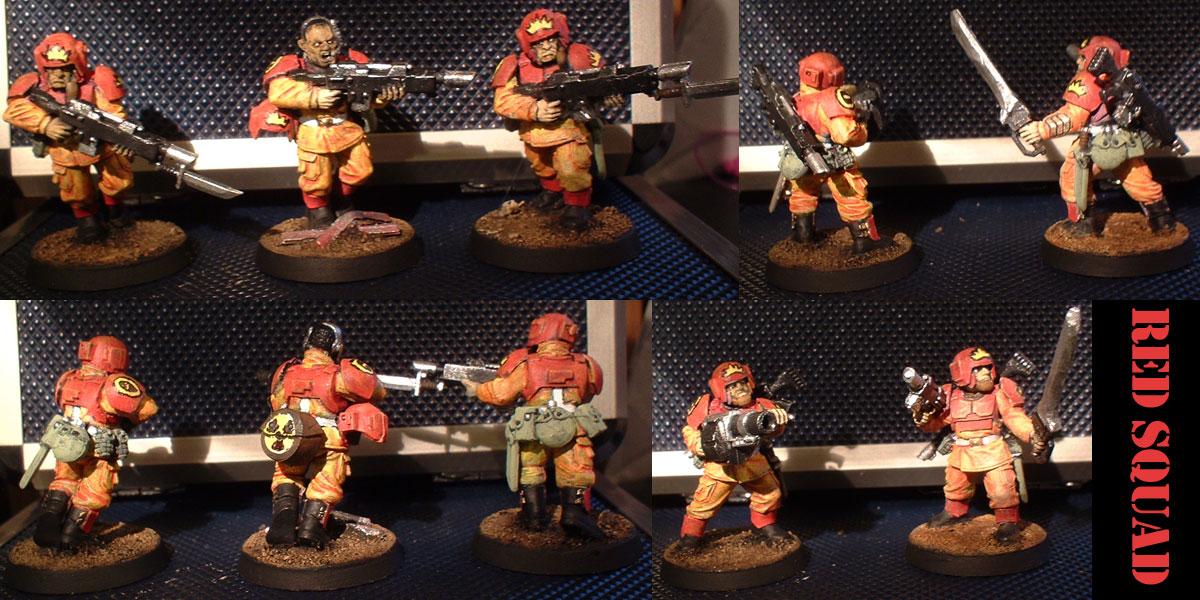 I cut off all the winged skull insignias from the other half of the Cadians, intending to make them Archon Corporation soldiers. i had a color scheme in mind for these guys, but when Is tarted painting them I found out that my red and yellow were far too transparent to show up well at all on the black primer. I ended up mixing red and yellow with white to make sufficiently opaque base coats to get bright colors. these guys looked quite silly in pale yellow and pink after their first coat of paint. Aside from that issue, these presented no problems. I cut off all the winged skull insignias from the other half of the Cadians, intending to make them Archon Corporation soldiers. i had a color scheme in mind for these guys, but when Is tarted painting them I found out that my red and yellow were far too transparent to show up well at all on the black primer. I ended up mixing red and yellow with white to make sufficiently opaque base coats to get bright colors. these guys looked quite silly in pale yellow and pink after their first coat of paint. Aside from that issue, these presented no problems.
|
|
| category: /gw | permanent link | |
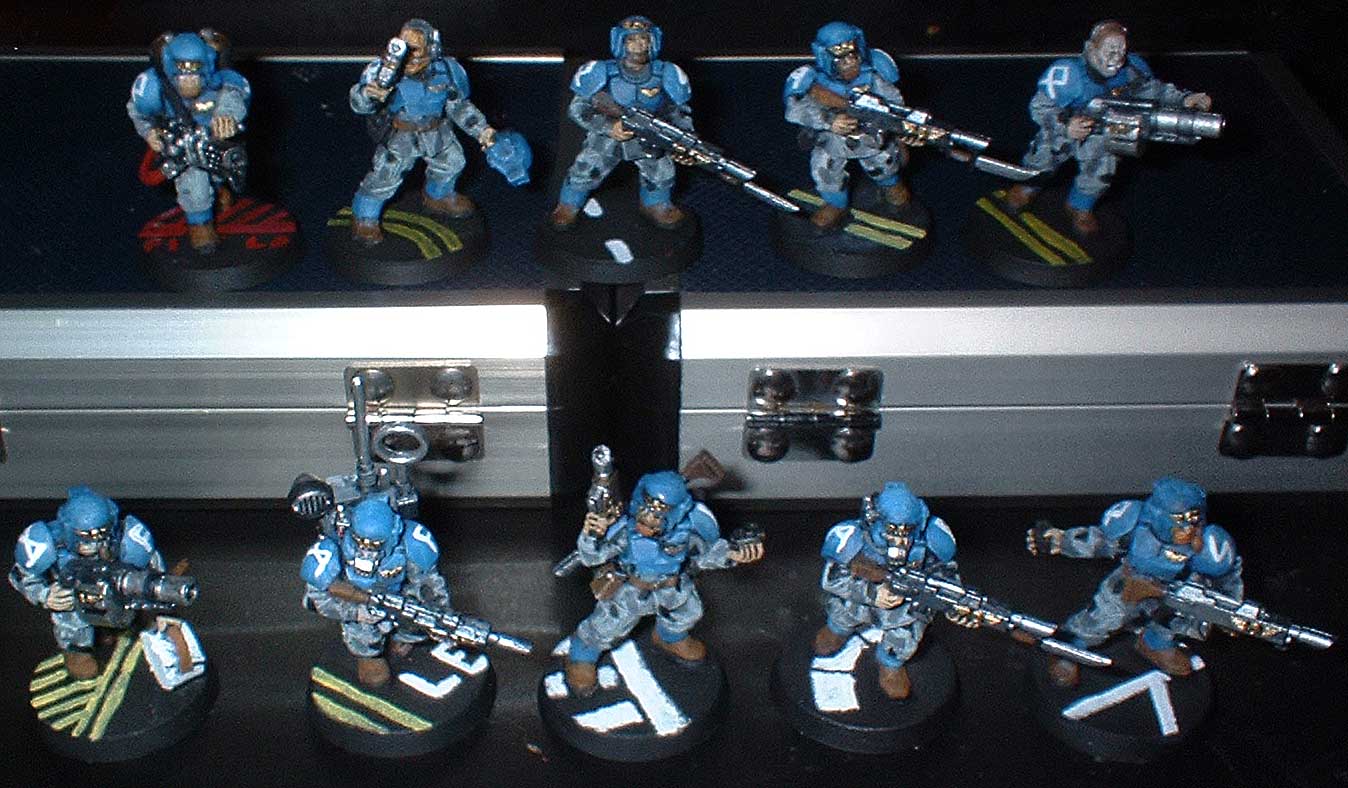
| Cadian Shock Troopers (Blue Squad) added Sep 23, 2005 | |
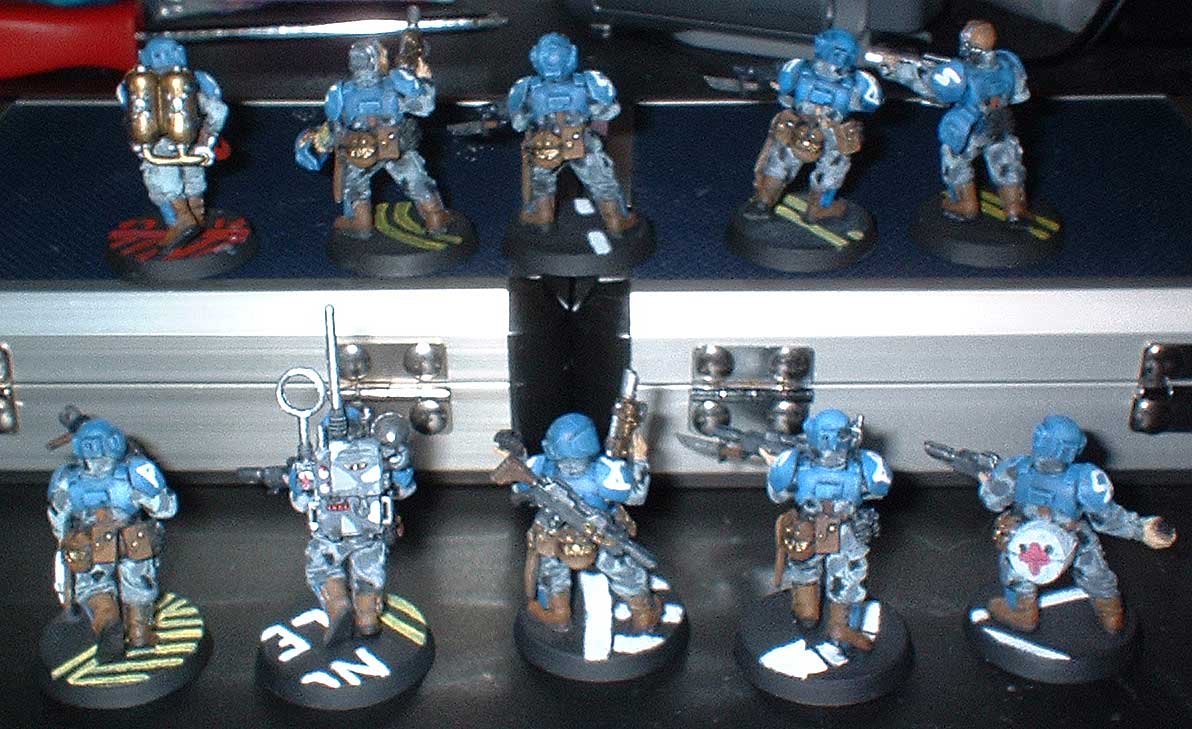 When it came time to start painting these guys, I decided to follow GW's painting guide and start with black primer. I've always primed with white, but I figured it would be a good experiment. After a little getting used to it, I was quite pleased with the way things turned out. It's a very different technique building color up from black rather than putting color on a blank white surface. It's very easy to achieve strong shadows and not as hard as I thought to get bright colors. Some colors (especially red), are very hard to get bright, and have required some extra steps. I'm glad I decided to do the black primer, because the multi-part nature of the figures creates a lot of areas that are nearly impossible to paint, for example between weapon and body. Also, since most of the shadows make themselves, there's less need for washes and therefore less long drying stages. When it came time to start painting these guys, I decided to follow GW's painting guide and start with black primer. I've always primed with white, but I figured it would be a good experiment. After a little getting used to it, I was quite pleased with the way things turned out. It's a very different technique building color up from black rather than putting color on a blank white surface. It's very easy to achieve strong shadows and not as hard as I thought to get bright colors. Some colors (especially red), are very hard to get bright, and have required some extra steps. I'm glad I decided to do the black primer, because the multi-part nature of the figures creates a lot of areas that are nearly impossible to paint, for example between weapon and body. Also, since most of the shadows make themselves, there's less need for washes and therefore less long drying stages.
I decided to do a grey urban camouflage on these, with blue body armor. After repainting a squad of six identical draconians recently, I got seriously burned out on the idea of painting units, but the wide variety of poses made painting these minis a much better experience. I painted the first seven of them one at a time, but the last three I did simultaneously. I think I'll do the next squad in batches as well, so I can make better use of each color of paint as I mix it. Finally, I decided to make the urban theme more obvious by painting the bases with road markings. |
|
| category: /gw | permanent link | |
| Cadian Shock Troopers (Green Squad) added Sep 23, 2005 | |
 not much to say about these guys. I painted the red squad all at the same time (after the sergeant, who was my test subject). After doing all of those annoying undercoats, I was ready to do something else. Fortunately, I had split them right down the middle and had five of each color. Green squad was painted in forest/jungle camo. They ended up with both of the flamers, so maybe they need to do some defoliation. not much to say about these guys. I painted the red squad all at the same time (after the sergeant, who was my test subject). After doing all of those annoying undercoats, I was ready to do something else. Fortunately, I had split them right down the middle and had five of each color. Green squad was painted in forest/jungle camo. They ended up with both of the flamers, so maybe they need to do some defoliation.
|
|
| category: /gw | permanent link | |
| Cadian Shock Troopers (Blue Squad) added Sep 23, 2005 | |
 In preparation for my upcoming d20 Traveller campaign, I looked through my tiny selection of old Star Wars minis and decided I needed to expand my selection of sci-fi goodies. i originally went to the store looking for vehicles that I could convert into something useful, but I ended up seeing this nice little box set. At $30 for 20 total minis (not counting all the extra body parts), it's as good a deal as I could hope for. In preparation for my upcoming d20 Traveller campaign, I looked through my tiny selection of old Star Wars minis and decided I needed to expand my selection of sci-fi goodies. i originally went to the store looking for vehicles that I could convert into something useful, but I ended up seeing this nice little box set. At $30 for 20 total minis (not counting all the extra body parts), it's as good a deal as I could hope for.
I was a little worried about the quality of the sculpts, since they're plastic, but I was very impressed with the detail. Even better was the fact that they are multi-part figures. I was worried about the durability of the finished product, but it turns out that superglue holds plastic together much stronger than metal. Even the figures that are attached to their bases by only the toe of one boot give no indication of weakness. I found the lightness of the plastic a little disconcerting while handling them, so I glued a penny inside the base of each one. With a wide variety of limbs, weapons, and accessories, it was easy to make dynamic and unique poses without worrying about duplication. In fact, I would guess that I could put together another box of them without having any obvious twins. Rather than starting with a simple pose, I wanted to try putting a female head on one of the minis' torsos. After a lot of clipping, filing, and cursing, I had to give up that project. In the process, however, I had trimmed away the collar of the flak jacket on the torso. Fortunately, the way the heads are sculpted makes it easy to orient them in a variety of ways, so I just tilted the head back and ended up with one of my favorite poses from the bunch (the center of the top row in these pictures). With plastic being so much easier to alter than metal, I was able to do sevaral quick mini-conversions to make interesting poses. For example, on the figure on the far laft in the bottom row, I was able to convert the left arm (which was supposed to be holding the second handle of the grenade launcher) by cutting off the hand and rotating it, then cutting up one of the belt accessory packs to build a first aid kit. i did a similar conversion with the figure holding his helmet in his left hand. All in all, building the minis was almost more fun than painting them. |
|
| category: /gw | permanent link | |
| Cadian Commander added Sep 23, 2005 | |
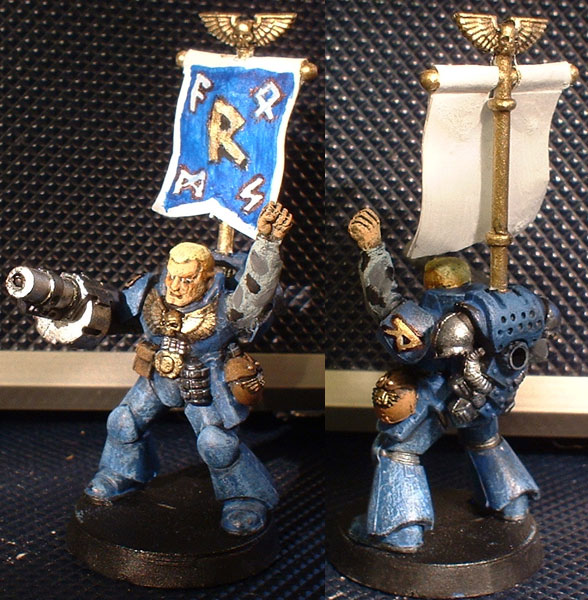 My brother found some old GW plastics at a garage sale somewhere. Most of them are little ugly orks, but there was one space marine that's been sitting in a drawer in pieces for years. I decided to use some of my extra Cadian bits to make him a little more palatable than he was. I ditched the bolter/chainsword combo he came with (I just think chainswords are silly) and carved off the giant pauldron on his left shoulder. I had to do some alterations to the right arm I used to get the right pose, but didn't have any problem with it. I made the banner out of paper laminated together with white glue, then soaked with superglue to make it stiff. i'm prety pleased with the way he came out. My brother found some old GW plastics at a garage sale somewhere. Most of them are little ugly orks, but there was one space marine that's been sitting in a drawer in pieces for years. I decided to use some of my extra Cadian bits to make him a little more palatable than he was. I ditched the bolter/chainsword combo he came with (I just think chainswords are silly) and carved off the giant pauldron on his left shoulder. I had to do some alterations to the right arm I used to get the right pose, but didn't have any problem with it. I made the banner out of paper laminated together with white glue, then soaked with superglue to make it stiff. i'm prety pleased with the way he came out.
|
|
| category: /gw | permanent link | |
| Brettonian Duke on Pegasus (rider) added Sep 23, 2005 | |
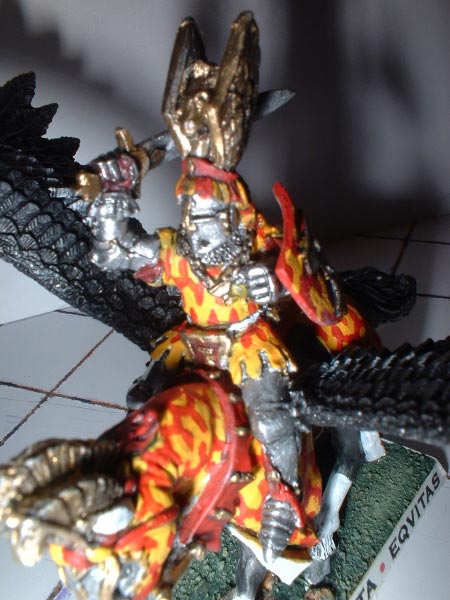 The finished version of the rider. The finished version of the rider.
|
|
| category: /gw | permanent link | |
| Brettonian Duke on Pegasus (in progress) added Sep 23, 2005 | |
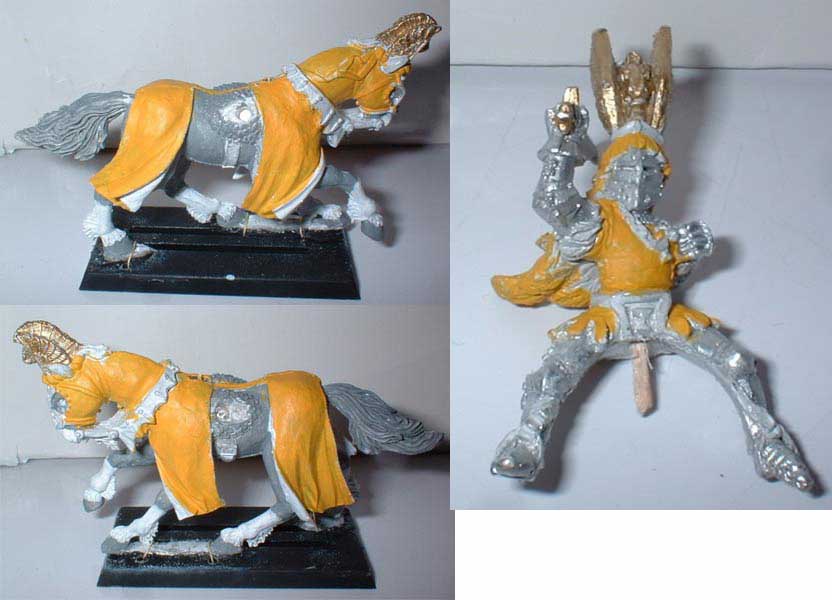 I picked this figure up to use for a paladin with a pegasus mount. The problem with playing an unusual character is finding a good miniature to portray it. Sometimes I'll make a character to fit an interesting mini, but this was not such a case. The first good match I came across doing web searches was this Warhammer figure. I've never really painted a GW mini before (aside from a plastic space ork I got for free), both because I don't like the look of most of them and because they're pretty expensive. The Bretonnians look pretty good, however, and I didn't think I'd be able to find a better fit without hunting for obscure and/or out of print minis. I picked this figure up to use for a paladin with a pegasus mount. The problem with playing an unusual character is finding a good miniature to portray it. Sometimes I'll make a character to fit an interesting mini, but this was not such a case. The first good match I came across doing web searches was this Warhammer figure. I've never really painted a GW mini before (aside from a plastic space ork I got for free), both because I don't like the look of most of them and because they're pretty expensive. The Bretonnians look pretty good, however, and I didn't think I'd be able to find a better fit without hunting for obscure and/or out of print minis.
This was also the first time I'd painted a figure with so many pieces. The rider was in three pieces: legs, torso, and weapon arm. The choice of lance or sword was welcome, since a sword was really what I wanted. I drilled a hole through both body pieces and the top of the pegasus and pinned everything together with a toothpick. The pegasus was split into two body halves, the head, and two wings. The pieces went together well, but I had trouble getting it attached to the base. There were slots on the base but no corresponding tabs. The pegasus only had three hooves on the ground, so it was very unstable and tended to fall over when handled. I wrestled with glue for a while with little success. I finally decided to drill some holes in the plastic base and tie the figure to the base with brass wire. After wiring it, it was rock solid. |
|
| category: /gw | permanent link | |