Ben's Miniature Gallery
This is a gallery of my painted miniatures. Feel free to email me with any comments or questions.
Categories:
| Kade Mireth-Orat (part 4) added Sep 23, 2005 | |
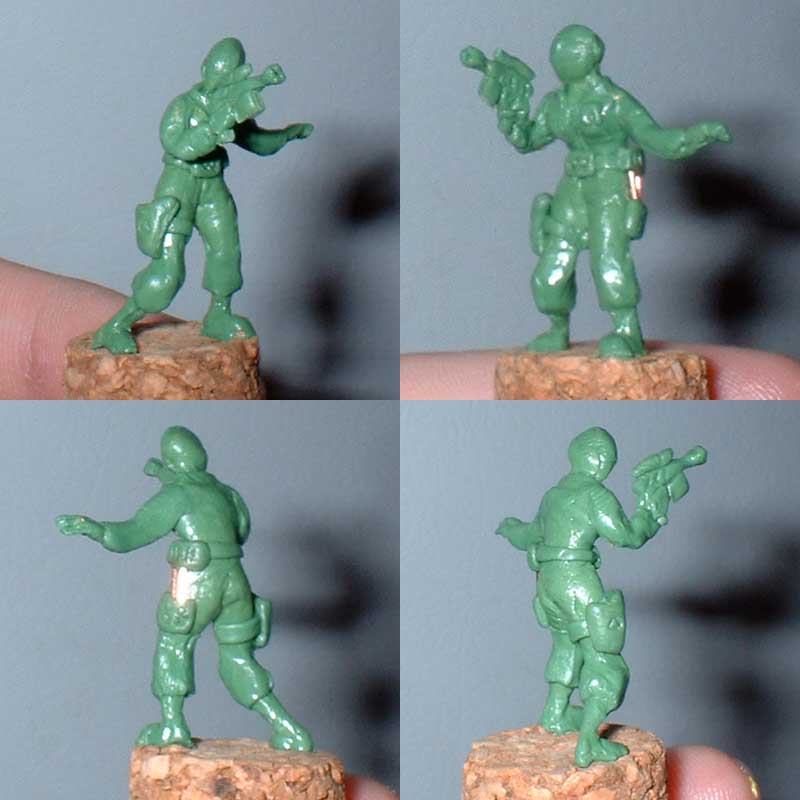 Added the arms, blaster, and holster. The blaster is a little mushy looking, but that's about the best I can do with Green Stuff, I think. The little bit of grip sticking out of the bottom of her hand is probably going to go away. All that's left is to finish the head. Added the arms, blaster, and holster. The blaster is a little mushy looking, but that's about the best I can do with Green Stuff, I think. The little bit of grip sticking out of the bottom of her hand is probably going to go away. All that's left is to finish the head.
|
|
| category: /other | permanent link | |
| Kade Mireth-Orat (part 2) added Sep 23, 2005 | |
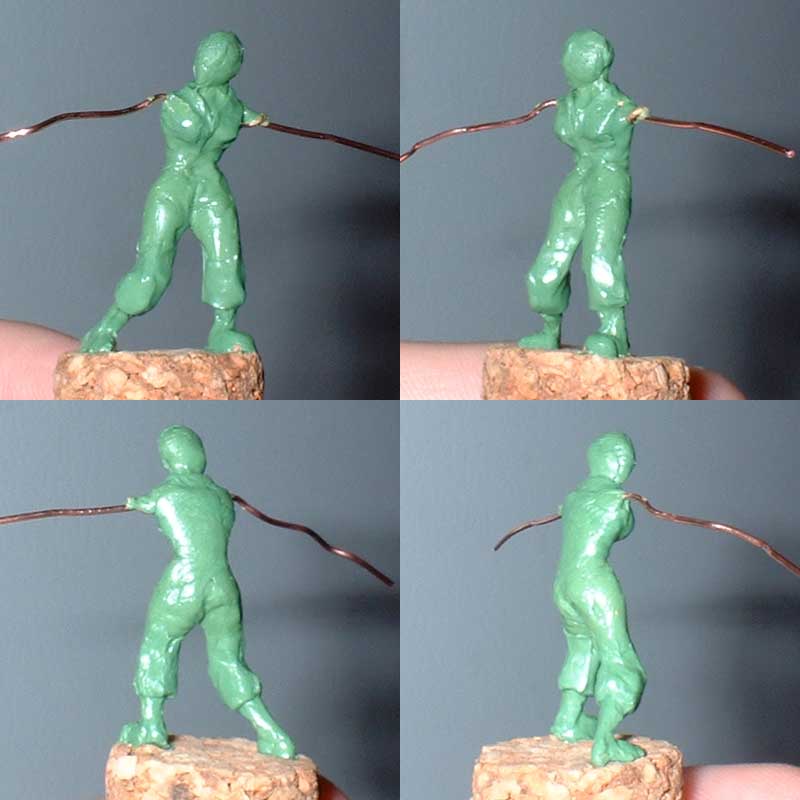 During this stage I finished the basic shape of the body, legs, and head. I had to pul the armature up out of the cork a little bit to make room for feet. So far they're nothing but featureless boots. I may just leave them that way. I added a little bit of putty to add some fullness to the pants at the top of each boot. The upper legs are unchanged. I finished the shape of the torso and added the collar of the jumpsuit using a small roll of putty blended in to the rest of the clothing on the outer edge. I was surprised at how easily it created the right effect. I also added a little to the head and did some more shaping. During this stage I finished the basic shape of the body, legs, and head. I had to pul the armature up out of the cork a little bit to make room for feet. So far they're nothing but featureless boots. I may just leave them that way. I added a little bit of putty to add some fullness to the pants at the top of each boot. The upper legs are unchanged. I finished the shape of the torso and added the collar of the jumpsuit using a small roll of putty blended in to the rest of the clothing on the outer edge. I was surprised at how easily it created the right effect. I also added a little to the head and did some more shaping.
|
|
| category: /other | permanent link | |
| Kade Mireth-Orat (part 1) added Sep 23, 2005 | |
 With the general lack of Star Wars minis available, I don't think I'll ever find anything to fit my wife's Zabrak pilot character. I also don't want to hunt all over for another sci-fi type min to convert, so I've decided to take on my first sculpting project. With the general lack of Star Wars minis available, I don't think I'll ever find anything to fit my wife's Zabrak pilot character. I also don't want to hunt all over for another sci-fi type min to convert, so I've decided to take on my first sculpting project.
I picked up a ribbon of Green Stuff in a Citadel Modelling blister pack at the local hobby store some time back, just in case I ever needed it. I also have a few tools that I used to use on modelling clay when I was a child. One is a burnishing ball tool, with a different sized ball on each end. The other hs a curved, flat round shape on one end and a curved, dull pick sort of implement on the other. I'm glad I didn't lose track of these tools over the years, since they're ideal for this sort of thing. I laid my hands on a cork and began to try to build an armature. I had some very fine brass wire and some stiff piano wire immediately to hand. The brass wire was far too flimsy to make any sort of skeleton. The piano wire was very sturdy; in fact, it was so sturdy I couldn't get it into any sort of useful shape. I looked around some more and found some insulated copper wire I'd used for an automotive wiring project some time ago. It's about 22ga, I think, maybe 20ga. There's no marking on the spool. At any rate, it was very easy to shape and held its shape well. I'm worried that it's a little too soft, but hopefully the putty will be sturdy enough that it won't matter. The hardest part of working with the copper wire was pushing it into the cork; it tended to bend instead of go in. Finally I got enough of it secured that I could start building my body shape. I started with two pieces of wire about 3.5" long. I twisted them together into a torso, then splayed them back out for arms. I untwisted the wires a little to reduce the overall height of the skeleton, as it will need to coexist with the old 25mm West End minis. I think she'll still be a little Amazonian, but I don't want to try sculpting on too small a scale my first time out. I made a small wire loop for the head, twisting one of the free ends from the loop around the torso and the other around an arm. The result was a fairly well secured head that I could position without it coming loose from the body. I put the first layer of putty on the torso, head, and legs. Following advice from some online sculpting guides I've left the arms naked at this point to allow easier access to the torso. I decided to start adding some of the basic body shape at this point. I want the figure to look unmistakably female, so I added some shape to the hips and thighs. Since Zabraks have no hair, the face and body will be the only way to determine gender. I don't know how well I'll be able to sculpt the face, so I'm trying to make sure the body is recognizably female. My initial concept is to sculpt her wearing a flight suit, which should be fairly easy to do. I'm not sure what I want her arms to be doing, but one will probably be holding a blaster vertically, with the other held out behind, hand down. The head seemed to take on some shape as I messed with it, and it seems to be looking over to the right, which works just fine for me. Once this first layer cures, I plan to work on the upper torso and add feet, then maybe begin defining the clothes. Next I'll work on the arms, and leave the head for last. I've found myself putting my finger on top of the head as I sculpt the body, so I'll save the head for last so I don't mess it up while working on other things. |
|
| category: /other | permanent link | |
| Kade Mireth-Orat (final) added Sep 23, 2005 | |
 Okay, I couldn't wait until tomorrow. I tried to do some trimming, but it really didn't seem to be working well so I decided to just paint it up and see what happened. I clipped the wires below the feet and put them through holes drilled in an old GW plastic base. It turned out pretty well, considering that this morning it was just a flat ribbon of goo. Comparing it to other minis, it looks like I hit 28mm scale pretty well. She'll still stand out among her 25mm companions, but I'll just have to live with that. Okay, I couldn't wait until tomorrow. I tried to do some trimming, but it really didn't seem to be working well so I decided to just paint it up and see what happened. I clipped the wires below the feet and put them through holes drilled in an old GW plastic base. It turned out pretty well, considering that this morning it was just a flat ribbon of goo. Comparing it to other minis, it looks like I hit 28mm scale pretty well. She'll still stand out among her 25mm companions, but I'll just have to live with that.
|
|
| category: /other | permanent link | |
| Ilse Toskala (sculpt) added Sep 23, 2005 | |
 I swear the face looks better in person. The original gun fell off and got lost, so I had to replace it. I swear the face looks better in person. The original gun fell off and got lost, so I had to replace it.
|
|
| category: /other | permanent link | |
| Imperial Officer added Sep 23, 2005 | |
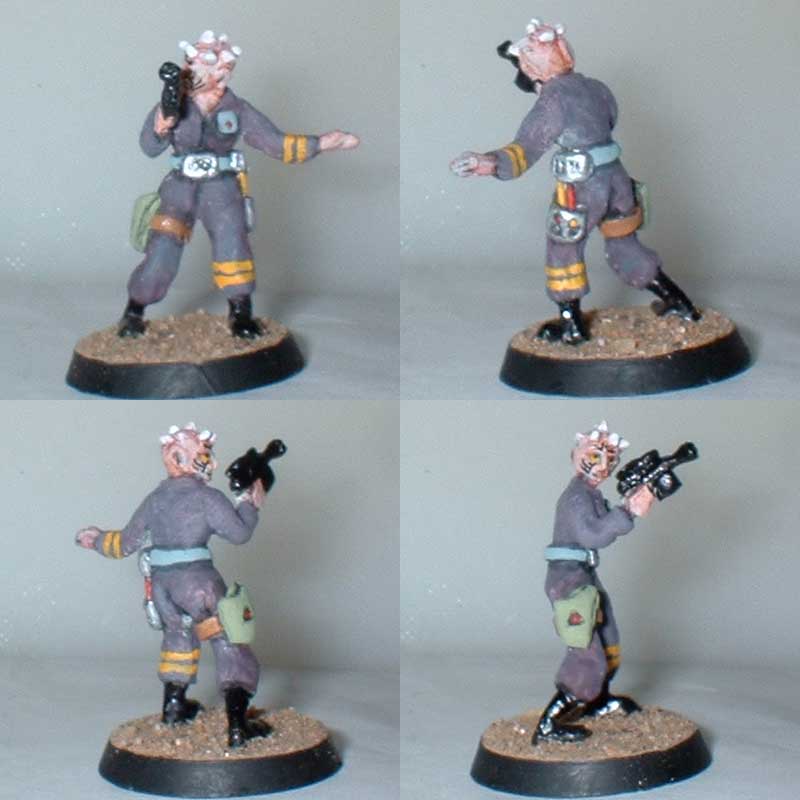
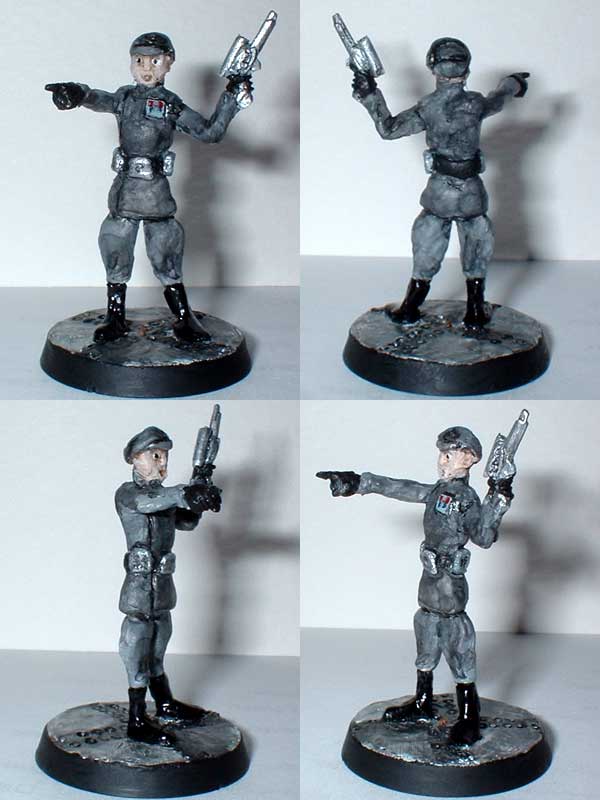 This was mostly experimental, so I didn't bother to document the process this time. I used some leftover pirate hands for this one, including one with a pistol. I added a small piece of insulation from the copper wire as a scope, stuck to the pistol with putty. The face on this one turned out pretty bad. I was mostly seeing how I could do some of the small details like the rank plaque, code cyliners, and other accessories. I'm mostly just pleased that it's recognizable as an Imperial Navy uniform, or at least I think it is. I had intended to paint the uniform black, but I find that the detail is lost when things are just black. I've had good luck before starting with grey and using black washes, but this time it turned out blotchy and kind of gross. A lot of that I'm sure is due to the uneven texture of the uniform. I may go back and just paint it all flat black, which will no doubt look much better. This was mostly experimental, so I didn't bother to document the process this time. I used some leftover pirate hands for this one, including one with a pistol. I added a small piece of insulation from the copper wire as a scope, stuck to the pistol with putty. The face on this one turned out pretty bad. I was mostly seeing how I could do some of the small details like the rank plaque, code cyliners, and other accessories. I'm mostly just pleased that it's recognizable as an Imperial Navy uniform, or at least I think it is. I had intended to paint the uniform black, but I find that the detail is lost when things are just black. I've had good luck before starting with grey and using black washes, but this time it turned out blotchy and kind of gross. A lot of that I'm sure is due to the uneven texture of the uniform. I may go back and just paint it all flat black, which will no doubt look much better.
|
|
| category: /other | permanent link | |
| Ilse Toskala (sculpt) added Sep 23, 2005 | |
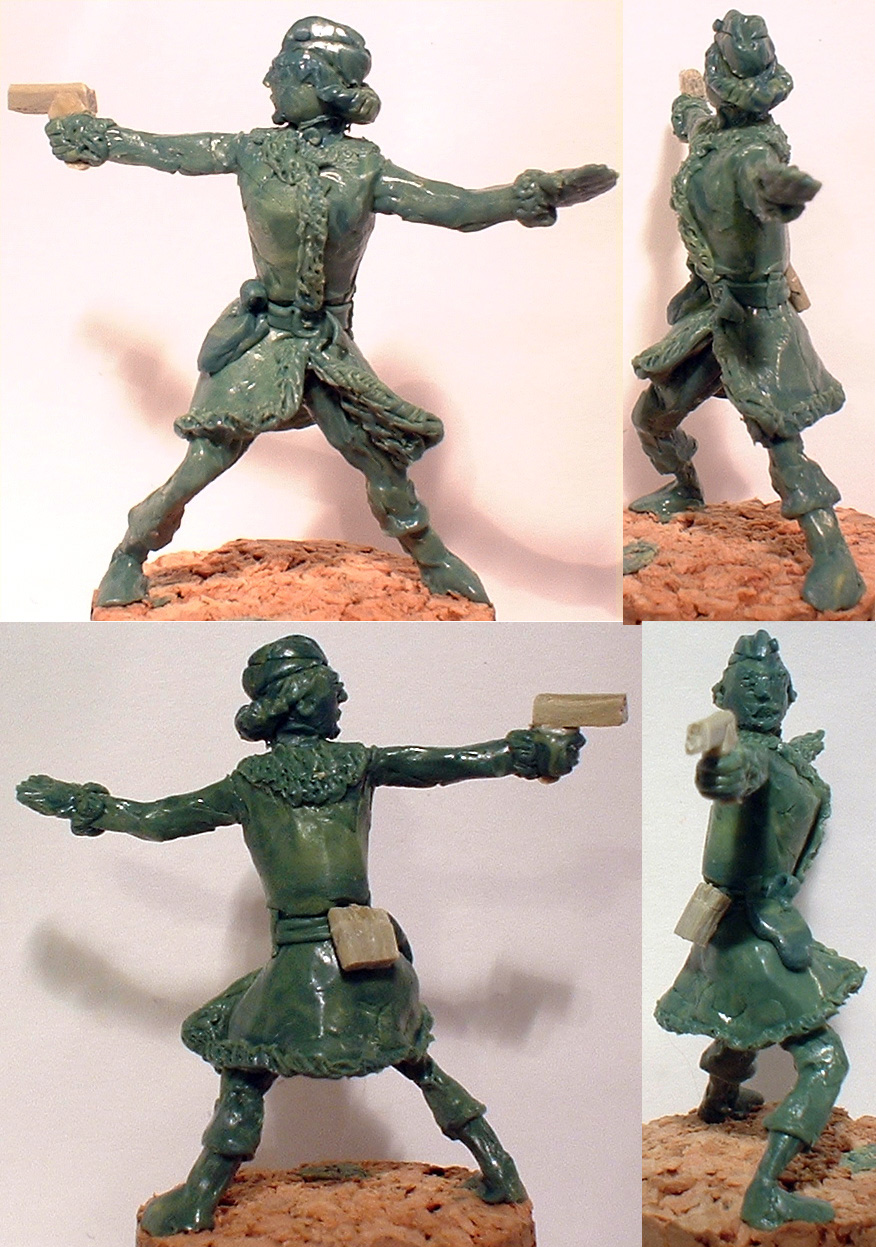
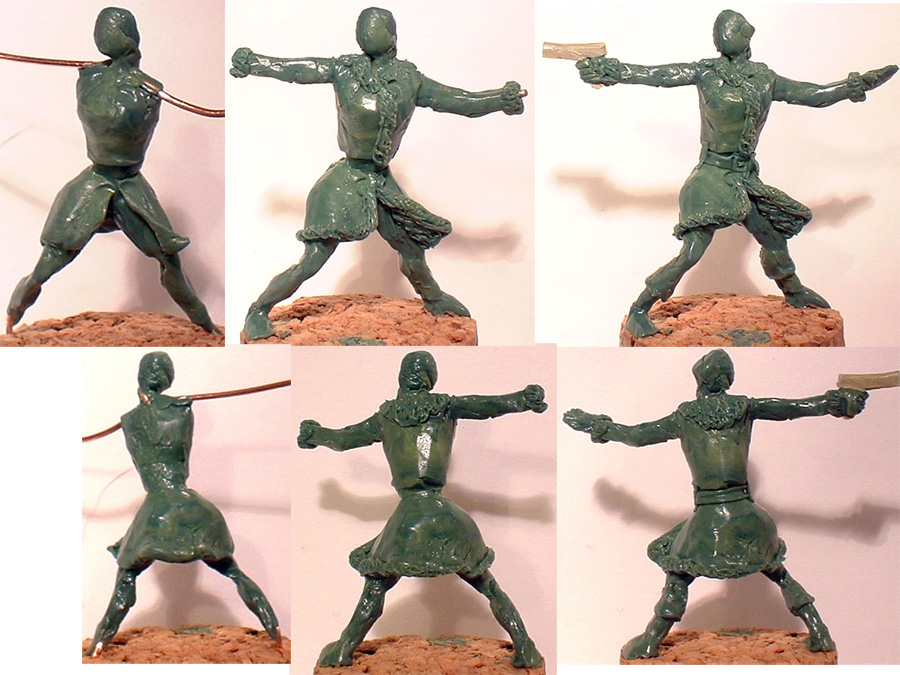 An NPC for the Traveller game. The pose is close to a couple others I've done already, but I'm hoping to improve the sculpting this time. I started with a more careful skin coat on the armature, adding putty in distinct pieces instead of just lumping it on and trying to make a body shape on top of it. I should have taken pictures of the first stage, since the coat covers up the hips I was so proud of. Ah well. I'm also aiming for a much more slender look this time. I think it helps in that regard to define the musculature right at the beginning, rather than trying to build it on top of the skin coat and thus adding extra bulk. I tried to add some motion to the pose with the flare of the coat, which I think works pretty well. i'll be doing more of the same with her hair. Every time I put fur on something it feels like I'm cheating, since it covers so many mistakes so easily. I've found out recently that making belts out of GS only works if the belt hasn't cured too long. After a certain point it gets so stiff that it's impossible to get the ends to lie flat. I'm quite pleased with the way this belt turned out. An NPC for the Traveller game. The pose is close to a couple others I've done already, but I'm hoping to improve the sculpting this time. I started with a more careful skin coat on the armature, adding putty in distinct pieces instead of just lumping it on and trying to make a body shape on top of it. I should have taken pictures of the first stage, since the coat covers up the hips I was so proud of. Ah well. I'm also aiming for a much more slender look this time. I think it helps in that regard to define the musculature right at the beginning, rather than trying to build it on top of the skin coat and thus adding extra bulk. I tried to add some motion to the pose with the flare of the coat, which I think works pretty well. i'll be doing more of the same with her hair. Every time I put fur on something it feels like I'm cheating, since it covers so many mistakes so easily. I've found out recently that making belts out of GS only works if the belt hasn't cured too long. After a certain point it gets so stiff that it's impossible to get the ends to lie flat. I'm quite pleased with the way this belt turned out.
|
|
| category: /other | permanent link | |
| Ilse Toskala (final) added Sep 23, 2005 | |
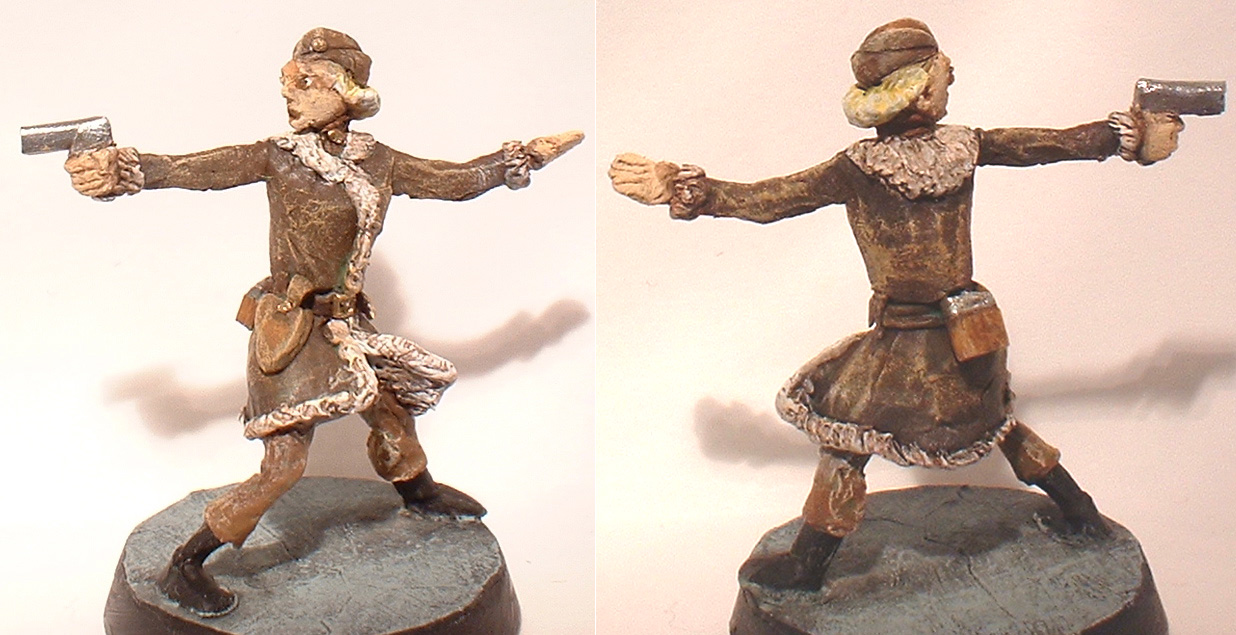 Not much to say. Everything always looks better painted. Not much to say. Everything always looks better painted.
|
|
| category: /other | permanent link | |
| Hiver (sculpt) added Sep 23, 2005 | |
 I prefer round bases, but this one just wouldn't fit. It barely fit on the square base as it is. In the blurry picture from underneath you can sort of see the mouth I put on the underside. i haven't seen any specific mention of colors, so I'll have an opportunity to get creative when it comes time to paint. I may be adding some equipment, if I can figure out where the heck it would go. I prefer round bases, but this one just wouldn't fit. It barely fit on the square base as it is. In the blurry picture from underneath you can sort of see the mouth I put on the underside. i haven't seen any specific mention of colors, so I'll have an opportunity to get creative when it comes time to paint. I may be adding some equipment, if I can figure out where the heck it would go.
|
|
| category: /other | permanent link | |
| Hennet added Sep 23, 2005 | |
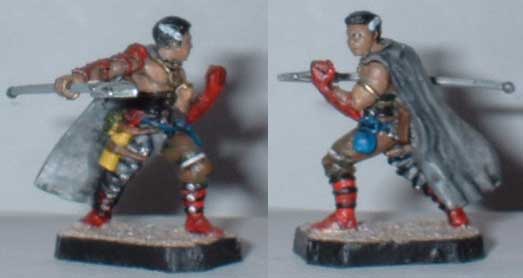 This was the first WotC mini I picked up after converting to 3e D&D. I didn't like the size of the base, so I cut it down and rebuilt it. This was the first WotC mini I picked up after converting to 3e D&D. I didn't like the size of the base, so I cut it down and rebuilt it.
|
|
| category: /other | permanent link | |